How-To Geek
How to automatically enlarge small fonts in safari on mac.
No more straining! Save your eyes by using bigger fonts.
Having trouble reading Safari's tiny fonts on your Mac? It's easy to make all of the smallest fonts in Safari bigger by default with a quick change in Safari Preferences. Here's how.
In Safari, you may be familiar with increasing or decreasing the font size on a website-to-website basis using the Command+Plus ("+") and Command+Minus ("-") keyboard shortcuts . But if you don't want to fiddle with those settings for every site, Safari allows you to increase the minimum font size and have it apply to all the websites you visit.
This is similar to Safari's Page Zoom feature . While the zoom feature enlarges both the content and the text, the font size feature retains the original page formatting and doesn't touch the media on the page.
Related: How to Set a Default Zoom Level in Safari for Mac
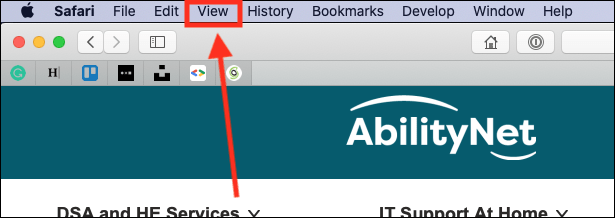
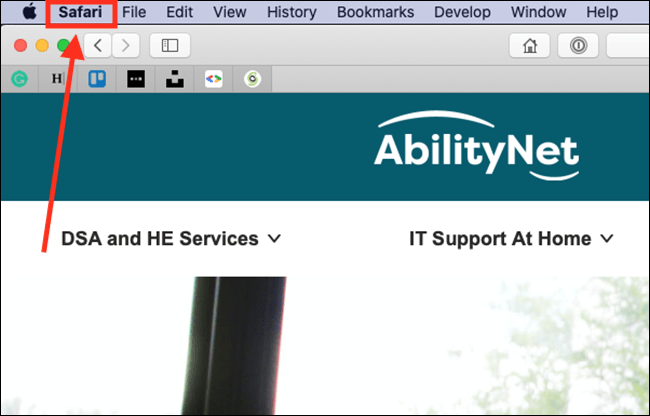
To get started, open the Safari browser on your Mac. Click "Safari" in the top menu bar and choose "Preferences" from the drop-down menu.
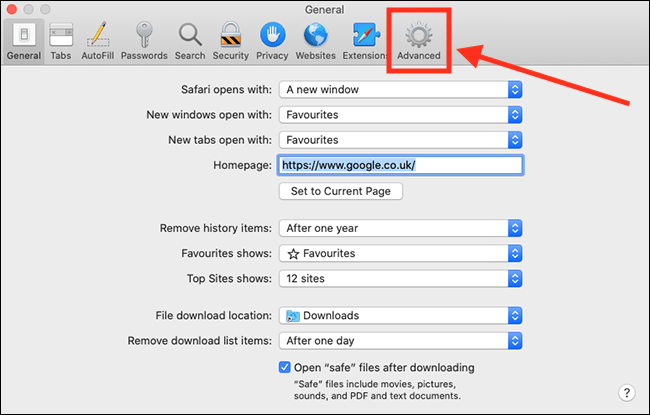
In Safari Preferences, click the "Advanced" tab.
In the "Advanced" tab, locate the "Accessibility" section and click the check mark next to "Never Use Font Sizes Smaller Than." In the drop-down menu, choose between "14," "18," or "24" -point font sizes.
If you find the text really hard to read, go with the 24-point font size, which will double the default text size for most websites. However, for some people, the 18-point size is the sweet spot.
Instantly, you will see the text in all open websites change to a larger size.
If you change your mind later and want the smaller font sizes back, click "Safari" in the menu bar and navigate to Preferences > Advanced, and then uncheck the "Never Use Font Sizes Smaller Than" option. Alternately, you can simply select a smaller font size from the menu.
If you'd like to do the same thing on your iPhone or iPad, you can't make a blanket change that applies to all websites, but you can increase or decrease the font size on any web page in Safari in just a few taps. Happy browsing!
Related: How to Change a Website's Text Size in Safari for iPhone and iPad
- Tech Gift Ideas for Mom
- Hot Tech Deals at Target Right Now

How to Modify Text Size in the Safari Browser on a Mac
You don't have to squint to read web pages in Safari
:max_bytes(150000):strip_icc():format(webp)/ScottOrgera-f7aca23cc84a4ea9a3f9e2ebd93bd690.jpg "make safari font larger")
In This Article
Jump to a Section
- Step-by-Step: Change the Font Size in Safari
Change the Zoom Level in Safari
Add zoom controls to the safari toolbar, enlarge safari pages on macs with a trackpad.
When viewing a web page in the Safari web browser for the Mac, the text and screen contents may be too small to see comfortably, especially if you use a small-screen laptop. In other situations, the screen contents may be too large.
Safari makes it easy to change the font size and zoom level of web pages so that you can view web pages comfortably.
These instructions apply to Safari versions 13 through 9, covering macOS Catalina through OS X El Capitan.
Change the Font Size in Safari
To make the text larger or smaller, adjust the web page's font size.
Open the Safari browser on your Mac and go to a web page.
To increase the font size, press Option + Command + + (the plus sign).
To decrease the font size, press Option + Command + - (the minus sign).
Alternatively, to increase the font size, go to View and select Make Text Bigger .
To decrease the font size from the menu, go to View and select Make Text Smaller .
Web sites stay at the font size you set. To return everything to its original state, go to the History menu item, select Clear History , and then select Clear History again.
Changing the zoom level on a web page is a little different from changing the text size because the tool increases or decreases the size of both text and images. Here's how to change the zoom level on a web page in Safari:
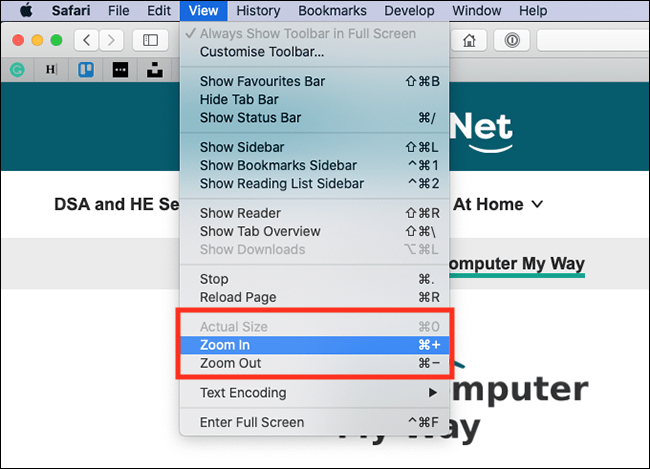
Go to the View menu at the top of the screen and select Zoom In to make all content on the current web page appear bigger. Repeat to make the content even larger.
Alternatively, use the keyboard shortcut Command + + (the plus sign) to increase the zoom level.
To make the web page content display at a smaller size in Safari, select View > Zoom Out .
Or use the keyboard shortcut Command + - (the minus sign) to make all content appear smaller.
To reset the zoom, go to View > Actual Size , or use the keyboard shortcut Command + 0 (zero). This command isn't available until you zoom in or out on the page.
Add a zoom icon to the Safari toolbar to make zooming in and out even easier. Here's how:
Go to View and select Customize Toolbar .
In the pop-up window, select the pair of buttons labeled Zoom and drag the buttons to Safari's main toolbar.
Select Done to exit the customization screen.
Two new buttons appear on the toolbar. Select the small letter A to zoom out, and select the larger letter A to zoom in.
Macs with a trackpad have more ways to change a web page's size. Place two fingers together on the trackpad and then spread your fingers apart to make a Safari web page bigger. Pull the two fingers back together to reduce the size of the web page.
A double-tap with two fingers on the trackpad zooms in closely on a section of the web page. A second double-tap returns the page to standard size.
Get the Latest Tech News Delivered Every Day
- How to Modify Text Size in Internet Explorer
- What Is Safari?
- How to Change the Font Size on Your Screen
- How to Change the Font Size on an iPhone
- How to Zoom In or Out With Your Keyboard
- How to Display Messages in a Larger Font in Apple Mail
- How to Zoom In or Out in Windows or macOS
- How to Increase Font Size and Make Text Bigger on the iPad
- The Top 10 Internet Browsers for 2024
- How to Clear Search History on iPhone
- How to Change Text Size on Android
- How to Activate Full-Screen Mode in Google Chrome
- How to Change Icon Size In Windows 11
- How to Print an Outlook Email in a Different Font Size
- How to Use Sticky Notes for Mac
- How to Use the Safari Web Browser on iPhone
How to Increase Font Size in Safari on iPhone and iPad

Gone are the days when you used the Safari feature “pinch-to-zoom” to increase the font size of a website on iPhone or iPad. With the latest features of iOS 13, Safari has got revamped! Right from managing your downloads to closing Safari tabs automatically , it just got easier to use Safari. And now, to make the text bigger on Safari is not a pinch-to-zoom game anymore!
While you can still read the content by zooming in or zooming out, you need to scroll either way as it doesn’t fit on your screen. But with the recent changes in Safari, you don’t need to scroll or zoom in to increase the font size of a website on the iPhone or iPad. Today, I am going to share a simple method through which you can make the text bigger on Safari.
How to Make Text Bigger in Safari on iPhone and iPad
Step #1. Launch Safari app on iPhone and open a website of your choice, say, for example, iGeeksBlog.com
Step #2. On the left top corner in the address bar, tap on “aA” symbol .
Step #3. Now tap on the larger “A” that appears on the right side and keep tapping on it until you get the text size of your desire. It can zoom in up to 300%.
Step #4. You can also decrease the font size of the web page by tapping on smaller “A” which is on the left side. It can zoom-out up to 50%.
That’s how simple it is to increase and decrease the font size in Safari on your iPhone and iPad running on iOS 13 and iPadOS 13 respectively.
If you do not want to repeat the same process for all the websites, you can simply specify a fix zoom percentage for all the websites you want to read regularly.
How to Set a Bigger or Smaller Text Size for All Websites in iOS 13 Safari App
You need not use the above method every time to make a text smaller or bigger in Safari. You can set a fixed zoom percentage for all the websites by just changing a few settings given below. Here you go!
Step #1. Open Settings App and head over to Safari option.

Step #2. Scroll down to “ Settings for Websites ” section and tap on Page Zoom option.

Step #3. Firstly, you’ll find a list of websites under “Page Zoom ON” which you have already zoomed-in or zoomed-out. Tap on that website to set font size.

Or head over to “Other Websites” section and tap on 50% or 100% or 200% or 300% whichever is suitable for better reading.

If you select a smaller font size, it might be difficult to read. So it’s recommended to always go above 100% font size for best reading experience in Safari on your iPhone or iPad.
Closing Thoughts!
This is so far the best feature I loved in Safari as it enhances my overall experience when I select a font size of my choice. Did you try this feature on your iPhone or iPad? If not, try it now by using the above-given guide.
Related Posts To Make Your Safari Experience Better!
- How to Manage Website Settings in Safari on iPhone and iPad
- Save a Webpage as PDF in Safari on iPhone and iPad
- How to Change Safari Download Location on iPhone and iPad
- How to change font size in Finder on Mac (Easiest way)
Do let us know in the comments if you face any issues while using this feature.
🗣️ Our site is supported by our readers like you. When you purchase through our links, we earn a small commission. Read Disclaimer .

Leave a Reply Cancel reply
Your email address will not be published. Required fields are marked *
Save my name, email, and website in this browser for the next time I comment.
How to make text bigger in Safari for all webpages
While there’s sort of an unofficial standard when it comes to text size for a webpage, you’ll come across one or two along the way that use a very small font. And even if you don’t, you might simply have a little trouble viewing the text on pages clearly.
What you might not realize is that with one simple setting, you can always see the text on pages in Safari in a larger size. Here’s how to do that on Mac, iPhone, and iPad.

Change Safari’s font size on Mac
Open Safari on your Mac and then follow these steps to change the text size:
- Click Safari > Preferences from the top menu bar.
- Choose the Advanced tab.
- Check the box next to Accessibility for Never use font sizes smaller than and pick a size from the drop-down box. You can try out different sizes and see the changes immediately within Safari. This lets you pick the right one for you.

Close the Safari Preferences and then enjoy browsing the web without squinting.
Change Safari’s font size on iPhone or iPad
The simplest way to change the font size in Safari on your iPhone or iPad is to use the View Menu button at the top. While this change will only apply to the site you’re visiting, the setting will be remembered each time you visit that domain, even if you close the tab and reopen it.
Follow these steps to permanently change the font size of a webpage in Safari on iPhone or iPad:
- With a webpage open in Safari on your iOS device, tap the View Menu button in the address bar. This is labeled as two A’s ( AA ).
- Tap the large A on the right to increase the size or the small A on the left to decrease it.

And remember, you can also use the Reader View and adjust the per-site settings for Safari on iOS.
Many people don’t take the time to explore the accessibility options on their devices unless they really need to. But some terrific features can make your device experiences so much better. And this is one of them.
Are you going to change the size of the font for Safari? Let us know if this is a setting you’ll change on your Mac or if you only plan to do it on your iPhone or iPad.
Related tips:
- How to increase text size on iPhone and iPad
- How to adjust iPhone text size separately for each of your installed apps
- How to increase the font size on Mac
- a. Send us an email
- b. Anonymous form
- Buyer's Guide
- Upcoming Products
- Tips / Contact Us
- Podcast Instagram Facebook Twitter Mastodon YouTube Notifications RSS Newsletter
How to Make Web Pages in Safari for Mac Easier to Read
To increase or decrease the zoom level of both text and images when viewing web pages in Safari, press Command and the + (plus) or - (minus) keys. You can also click on View in Safari's menu bar and select Zoom In or Zoom Out .
Alternatively, you can add zoom buttons to Safari's interface: Right-click (or Ctrl-click) on a space in the Safari toolbar and click Customize Toolbar... . Then drag the Zoom buttons in the dropdown to the space you just clicked on the toolbar. Click Done to finish.

Safari will remember your zoom and font size settings until you clear your History. To do so, click Safari in the menu bar, select Clear History... , then click the Clear History button.
Set the Zoom Level for a Specific Website
Once the zoom level is set up for a particular site, Safari applies it automatically whenever you visit it. Here's how it's done.

Set the Zoom Level for All Web Pages

Set Your Own Zoom Level With a Style Sheet
If none of Safari's zoom level increments sit right with your eyes, here's a way to set your own percentage.

From now on, Safari will default to the zoom level specified in your style sheet file, which you can edit at any time.
Force Websites to Use Bigger Font Sizes
Finally, there's an option in Safari that lets you force websites to display text using a minimum font size, without affecting the zoom level.

Get weekly top MacRumors stories in your inbox.
Top Rated Comments

Popular Stories

iPhone 16 Plus Rumored to Come in These 7 Colors

When to Expect a New Apple TV to Launch

Macs to Get AI-Focused M4 Chips Starting in Late 2024

iOS 18 Will Add These New Features to Your iPhone

iOS 18 May Feature All-New 'Safari Browsing Assistant'

Review: Six Months With the iPhone 15 Pro
Next article.

Our comprehensive guide highlighting every major new addition in iOS 17, plus how-tos that walk you through using the new features.

App Store changes for the EU, new emoji, Podcasts transcripts, and more.

Get the most out your iPhone 15 with our complete guide to all the new features.
A deep dive into new features in macOS Sonoma, big and small.

Revamped models with OLED displays, M3 chip, and redesigned Magic Keyboard accessory.

Updated 10.9-inch model and new 12.9-inch model, M2 chip expected.

Apple's annual Worldwide Developers Conference will kick off with a keynote on June 10.

Expected to see new AI-focused features and more. Preview coming at WWDC in June with public release in September.
Other Stories

1 day ago by MacRumors Staff

1 day ago by Joe Rossignol

1 day ago by Tim Hardwick

2 days ago by MacRumors Staff

2 days ago by Tim Hardwick
Tips & Tricks
Troubleshooting, how to increase font size in safari for iphone & ipad on ios 13 / ipados 13.

Ever wished you could increase the font size of text on any webpage in Safari on iPhone or iPad? Now you can easily adjust web text size with any iPhone or iPad running iOS 13 or iPadOS 13 or later.
When Apple announced iOS 13 earlier this year there was a lot for iPhone and iPad users to look forward to. The ability to increase the size of fonts when browsing the web is one feature that didn’t get all that much love, yet it’s one that could make a big difference to those who struggle to read their favorite websites, or if you’d just like a little more customization for how big (or small) text appears on webpages in Safari on your iPhone or iPad.
Just like on a Mac , changing the text size makes websites much easier to read. It’s a great little feature and one that certainly could have been used before iOS 13 as well. But now that it’s here, you’ll need to know how to use it.
How to Increase the Font Size in Safari on iPhone & iPad
- Open Safari and navigate to a website of your choice. We’d suggest osxdaily.com for obvious reasons
- Tap the button to the left of the address bar, it looks like two capital “AA” characters side-by-side, this will reveal a drop-down menu with display options for that webpage

- Now tap the larger “A” button to increase the size of the font. If you’d like to reduce text size, tap the smaller “A” button

- The page will immediately reflect your changes. Once you have your desired font size, tap anywhere on the page to close the menu and browse the web as usual
This text size setting is persistent, too. That means that the next time you visit the same website your font size settings will automatically be restored and you won’t need to change them again.
You can adjust font sizes for as many webpages or websites as you visit, so if you want one site to have larger text, and another to have smaller text, just customize it as shown above on a per-site basis.
Other Handy Options in the Same Safari Menu
There are some other handy options in the same menu, too. They include:
- Show Reader View: This opens the webpage in Safari’s Reader view, removing all formatting and ads and allowing you to customize the appearance of Safari reader view to your liking (this also worked as a way to increase Safari text size in older iOS versions )
- Hide Toolbar: This button removes all of the Safari interface, making it easier to see more of the website. Tap the top of the screen to restore it.
- Request Desktop Website: Tap this if Safari automatically displayed a mobile version of the website but you’d rather see the desktop version.
- Website Settings: This houses other settings specific to the current website including whether you want to use Reader mode or the desktop website every time you visit it.
You’ll obviously need iOS 13 or iPadOS 13 or later to have access to these new features in Safari, as earlier versions of iPhone and iPad system software do not include the same functionality.
Safari has received plenty of attention from Apple as part of the latest iOS 13 updates and it’s a more capable browser than ever. It’s arguably been the best mobile browser since the iPhone launched in 2007 and now it’s even better.
If you’re running the latest versions of iOS 13 or iPadOS on your device, give this great Safari text size trick a try yourself.
Enjoy this tip? Subscribe to our newsletter!
Get more of our great Apple tips, tricks, and important news delivered to your inbox with the OSXDaily newsletter.
You have successfully joined our subscriber list.
Related articles:
- How to Increase All System Font Size in Mac OS X
- How to Turn Off Split Screen in Safari for iPad? Exiting Safari Split Screen in iPadOS
- How to Increase Font Size in Safari on iPhone by Using Reader
- How to Change the Font of a Webpage in Safari on iPhone & iPad
» Comments RSS Feed
I’m not a gamer. How do I get the “Updates” icon back where it belongs.
Here is how you can update apps in iOS 13 and iPadOS 13 or later
https://osxdaily.com/2019/09/25/how-update-apps-ios-13-ipados/
I’m more interested in how to enable simple CSS rule:”‘overflow: scroll, overflow: auto, overflow: visible or overflow: hidden'”, in Safari for iPhone & iPad on iOS 13 / iPadOS 13?
Leave a Reply
Name (required)
Mail (will not be published) (required)
Subscribe to OSXDaily
- - How to Check Disk Health on Mac with smartctl
- - How to Enable Do Not Disturb on Apple Watch
- - 3 Mac Tips for Working with International Teams
- - How to Disable ChatGPT Chat History & Training Data Usage
- - What Does the Bell with Line Through It Mean in Messages? Bell Icon on iPhone, iPad, & Mac Explained
- - Opinion: Shiny Keys on MacBook Air & Pro Are Ugly and Shouldn’t Happen
- - MacOS Ventura 13.6.6 & Safari 17.4.1 Update Available
- - Using M3 MacBook Air in Clamshell Mode May Reduce Performance
- - First Beta of iOS 17.5, macOS Sonoma 14.5, iPadOS 17.5 Released for Testing
- - iOS 16.7.7 & iPadOS 16.7.7 Released for Older iPhone & iPad Models
iPhone / iPad
- - Fix a Repeating “Trust This Computer” Alert on iPhone & iPad
- - Create a Resume with Pages on Mac, iPhone, iPad
- - How Secure are Personal Hotspot Connections from iPhone?
- - You Can Play Flappy Bird in the Mac Finder
- - Fix “warning: unable to access /Users/Name/.config/git/attributes Permission Denied” Errors
- - How to Fix the Apple Watch Squiggly Charging Cable Screen
- - NewsToday2: What it is & How to Disable NewsToday2 on Mac
- - Why Did My iPhone Alarm Stop Automatically & Turn Itself Off?

About OSXDaily | Contact Us | Privacy Policy | Sitemap
This website is unrelated to Apple Inc
All trademarks and copyrights on this website are property of their respective owners.
© 2024 OS X Daily. All Rights Reserved. Reproduction without explicit permission is prohibited.
This website works best with Javascript.
If you are unable to turn on JavaScript, please use this site .
Call our helpline
How to make text larger in safari in macos 10.15 catalina, in this article.
Using keyboard shortcuts to make text larger in Safari Using the menu bar options to make text larger in Safari Using a double tap gesture to quickly zoom in and out in Safari Using a pinch gesture on a trackpad to make text larger in Safari Set the default zoom setting for websites viewed in Safari Increase the default minimum font size in Safari
Using keyboard shortcuts to make text larger in Safari
Press Ctrl and + (plus) to zoom in Press Ctrl and - (minus) to zoom out Press Ctrl and 0 (zero) to return to the default size
Using the menu bar options to make text larger in Safari
- Open Safari.
- Select Zoom In to increase the size of text and images.
- Select Zoom Out to decrease the size of text and images.
Use a double tap gesture to quickly zoom in and out in Safari
If you use an Apple Magic Mouse, Magic trackpad, or a built-in trackpad with your computer, you can zoom in and out with a double-tap gesture.
Using a pinch gesture on a trackpad to make text larger in Safari
If you use an Apple Magic trackpad or a built-in trackpad with your computer, you can zoom in and out with a pinch gesture.
- To Zoom In : Pinch two fingers apart.
- To Zoom Out : Pinch two fingers together.
Set the default zoom setting for websites viewed in Safari
Increase the default minimum font size in Safari
Note: If this does not work it could be because someone else manages your computer settings (an IT department or administrator). If this is the case, you will need to contact them to access these settings or for further help.
Not what you're looking for?
Was this content helpful, need some more help, need free it support at home.
Download Free
How to Adjust Text Size on Safari
It's free and super easy to set up
Safari is a popular web browser that comes pre-installed on all Apple devices. One of the features that makes it popular is its ability to adjust text sizes to make reading easier for users. In this article, we will show you how to adjust text size on Safari for both desktop and iOS devices. We will also explore common text size issues and give you some troubleshooting tips.
Understanding Text Size Options in Safari
Before we delve into how to adjust text size in Safari, it's important to understand the different options available. There are two main text size settings in Safari: the default text size and zooming.
The default text size is the size at which text is displayed on a webpage. It's usually set by the website designer, and it's not always ideal for all users. Safari has a range of default text size settings that you can choose from.
However, if you find that even the largest default text size is still too small for your liking, you can adjust the text size further by using the zoom feature.
Default Text Size Settings
Safari's default text size settings range from "Smaller" to "Larger." You can access these settings by going to Safari's "Preferences" and clicking on the "Advanced" tab. From there, you can select your preferred default text size.
It's important to note that changing the default text size will only affect the text on webpages that haven't explicitly set their own text size.
For example, if a website has set their text size to be a specific size, changing the default text size in Safari won't affect that website's text.
Zooming vs. Text Size Adjustments
When you zoom in on a webpage, everything on the page gets bigger, including text, images, and videos. This can be useful if you want to see the entire webpage larger, but it can also make the webpage harder to navigate if everything is too big.
Text size adjustments, on the other hand, only affect the size of the text. This means that other elements of the webpage remain the same size. This can be useful if you only want to make the text larger and not affect the overall layout and design of the webpage.
To adjust the text size using the zoom feature in Safari, you can use the keyboard shortcut "Command +" to zoom in and "Command -" to zoom out. Alternatively, you can go to the "View" menu and select "Zoom In" or "Zoom Out."
Overall, understanding the different text size options in Safari can help you customize your browsing experience and make it easier to read and navigate webpages.
Adjusting Text Size on Safari for Desktop
Adjusting text size on Safari for desktop is a straightforward process. You can do it using keyboard shortcuts, the Safari menu, or Safari's preferences.
Using Keyboard Shortcuts
If you don't want to use your mouse, you can use keyboard shortcuts to adjust text size on Safari. To do this, hold down the "Command" key and press the "+" key to increase the text size or the "-" key to decrease it.
Adjusting Text Size through Safari Menu
You can also adjust text size through Safari's menu. Click on "View" in the menu bar and select "Zoom In" or "Zoom Out" to increase or decrease the text size, respectively.
Using Safari's Preferences
If you want to make a permanent change to text size, go to Safari's preferences. Click on "Safari" in the menu bar and select "Preferences." Then, click on the "Advanced" tab and choose "Accessibility." You will see an option to set a minimum font size for web pages.
Adjusting Text Size on Safari for iOS Devices
Adjusting text size on Safari for iOS devices is just as easy as it is for desktop. You can use the Reader view, iOS settings, or the pinch-to-zoom gesture.
Using the Reader View
The Reader view is a handy feature built into Safari that removes distracting elements from a webpage, such as ads and pop-ups, leaving only the main content. You can adjust text size in the Reader view by tapping on "Aa" icon and selecting a font size.
Adjusting Text Size through iOS Settings
You can also adjust text size through iOS settings. Go to "Settings," tap on "Display & Brightness" and then "Text Size." You can drag the slider to adjust the text size.
Using Pinch-to-Zoom Gesture
The pinch-to-zoom gesture is a quick and easy way to adjust text size. Simply place two fingers on the screen and pinch them together to zoom in or spread them apart to zoom out.
Customizing Font and Text Appearance
Customizing font and text appearance is another way to make reading more comfortable on Safari. You can change default font settings or use Safari extensions for additional customization.
Changing Default Font Settings
To change default font settings, go to Safari's preferences and click on the "Fonts" tab. Here, you can choose a new font and adjust font sizes and styles.
Using Safari Extensions for Additional Customization
Safari has a range of extensions that can help you customize font and text appearance. Some popular extensions include "Readability" and "Mercury Reader." These extensions allow you to adjust font sizes, styles, and colors to your preferences.
Troubleshooting Common Text Size Issues
Despite Safari's advanced text size options, you may still encounter some common issues. These issues include text overlapping problems and inconsistent text size across websites.
Resolving Text Overlapping Problems
If you notice that text is overlapping on a webpage, try zooming out or adjusting the text size. You can also try using the Reader view to remove any unwanted elements.
Fixing Inconsistent Text Size Across Websites
Most websites have their own default font sizes, so text size can appear inconsistent across different sites. To fix this, you can use Safari's "Reader view" to standardize text size across all websites. You can also use Safari extensions for additional text customization options.
Adjusting text size on Safari is a simple and effective way to make reading a more comfortable experience. Whether you're using a desktop or iOS device, Safari's advanced text size options make it easy to adjust text size according to your preferences. By using the different text size options available, you can customize your browsing experience and make reading on Safari a breeze.
Let's set you up !
Working on the web!
Student Tips
Startup Tools
Browser Glossary
Browser Tips
How To Make Safari Bigger On IPhone

- Software & Applications
- Browsers & Extensions

Introduction
Safari, the default web browser on iPhones, is a powerful tool for accessing the internet on the go. Whether you're researching a school project, catching up on the latest news, or simply browsing for entertainment, Safari provides a seamless and user-friendly experience. However, sometimes the default settings may not offer the most comfortable browsing experience, especially when it comes to text size and screen visibility. Fortunately, there are several simple yet effective ways to make Safari bigger on your iPhone, ensuring that you can navigate the web with ease and comfort.
In this article, we will explore various methods to enhance your browsing experience on Safari. From adjusting text size to utilizing full-screen mode and customizing settings, you'll discover practical tips to make Safari more accessible and visually appealing. Whether you have difficulty reading small text or simply prefer a larger display, these techniques will empower you to tailor Safari to your specific preferences.
By the end of this guide, you'll have a comprehensive understanding of how to optimize Safari for a more enjoyable and personalized browsing experience. So, let's dive in and explore the simple yet impactful ways to make Safari bigger on your iPhone!
Adjusting Text Size
Adjusting the text size in Safari on your iPhone is a straightforward yet powerful way to customize your browsing experience. Whether you find the default text too small to read comfortably or simply prefer larger fonts for easier visibility, Safari offers a convenient solution to cater to your specific needs.
To begin, open Safari on your iPhone and navigate to a webpage with text content. Once you're on the webpage, you can easily adjust the text size to your liking by following these simple steps:
Pinch-to-Zoom Gesture : Using the pinch-to-zoom gesture, you can quickly adjust the text size on a webpage. Simply place two fingers on the screen and pinch them together to zoom in, making the text larger and more readable. Conversely, spreading your fingers apart will zoom out, reducing the text size.
Text Size Settings : Safari also provides built-in text size settings that allow you to customize the default text size for all webpages. To access these settings, tap the "AA" icon located in the address bar. This will reveal options to increase or decrease the text size, instantly altering the appearance of the webpage to better suit your preferences.
Accessibility Features : For further customization, your iPhone's accessibility features offer additional text size adjustments. Navigate to the "Settings" app, select "Accessibility," and then choose "Display & Text Size." Here, you can enable "Larger Text" and use the slider to adjust the text size system-wide, affecting not only Safari but also other apps and interfaces on your device.
By utilizing these methods, you can effortlessly tailor the text size in Safari to match your visual preferences and ensure a more comfortable reading experience. Whether you're browsing articles, reading online documents, or accessing various web content, having the ability to adjust text size empowers you to personalize your browsing experience according to your unique needs and preferences.
With these simple yet effective techniques, you can enhance the readability of text in Safari, making it bigger and more accessible on your iPhone. Whether you have difficulty reading small text or simply prefer a larger font for improved visibility, these methods provide the flexibility to customize your browsing experience to your liking.
Enabling Reader View
Enabling Reader View in Safari on your iPhone offers a streamlined and distraction-free reading experience, allowing you to focus on the content without the clutter of ads, pop-ups, and other webpage elements. This feature is particularly beneficial when browsing articles, blog posts, or lengthy web content, as it presents the text in a clean, easy-to-read format. To activate Reader View in Safari, follow these simple steps:
Accessing Reader View : When you visit a webpage with an article or text-based content, look for the Reader View icon in the address bar. It typically appears as a series of stacked lines, resembling a simplified book icon. Tapping this icon activates Reader View, instantly transforming the webpage into a clean, text-focused layout.
Customizing Reader View : Once in Reader View, you have the option to customize the appearance of the text and background for optimal readability. By tapping the "Aa" icon within Reader View, you can adjust the text size, font, and background color to suit your preferences. This level of customization ensures that you can tailor the reading experience to your comfort and visual preferences.
Enhanced Reading Experience : Reader View eliminates distractions such as advertisements, banners, and unrelated content, allowing you to immerse yourself in the main text without interruptions. This is particularly useful when reading lengthy articles or research materials, as it creates a focused and immersive reading environment.
Reader View on Multiple Pages : Safari also offers the convenience of automatically activating Reader View on subsequent pages of the same website. Once you enable Reader View on a particular webpage, Safari will remember your preference and apply it to other pages from the same site, ensuring a consistent and uninterrupted reading experience.
By utilizing Reader View in Safari, you can enjoy a clutter-free and visually optimized reading experience, making it easier to consume text-based content on your iPhone. Whether you're catching up on news, exploring educational resources, or simply indulging in your favorite articles, Reader View provides a valuable tool for enhancing your browsing experience.
In summary, enabling Reader View in Safari on your iPhone empowers you to immerse yourself in the content without distractions, customize the reading environment to your preferences, and enjoy a seamless and focused browsing experience. This feature exemplifies Safari's commitment to providing user-friendly tools for optimizing the way you consume web content on your mobile device.
Using Full Screen Mode
Utilizing full-screen mode in Safari on your iPhone offers a captivating and immersive browsing experience, allowing you to maximize the visibility of web content and eliminate distractions. Whether you're viewing images, reading articles, or engaging with multimedia, activating full-screen mode enhances the visual impact of the content and provides a more expansive view of the webpage.
To enter full-screen mode in Safari, simply rotate your iPhone to a horizontal orientation while browsing a webpage. This action automatically triggers full-screen mode, expanding the content to fill the entire display. By doing so, you can take advantage of the larger screen real estate, making it ideal for viewing images, watching videos, or reading text with enhanced clarity and immersion.
Once in full-screen mode, Safari optimizes the layout of the webpage, ensuring that the content is prominently displayed without any unnecessary clutter. This streamlined presentation allows you to focus on the core elements of the webpage, whether it's an engaging article, a captivating image gallery, or an interactive multimedia experience.
Furthermore, full-screen mode in Safari provides a seamless and uninterrupted viewing experience, as it eliminates distractions and maximizes the visual impact of the content. Whether you're exploring a photography portfolio, reading a long-form article, or enjoying a multimedia presentation, the immersive nature of full-screen mode enhances your engagement with the web content.
In addition to its visual benefits, full-screen mode in Safari also offers practical advantages for navigating webpages. With the expanded display area, you can effortlessly scroll through content, interact with multimedia elements, and explore intricate details with enhanced visibility. This level of immersion and interactivity contributes to a more dynamic and engaging browsing experience, allowing you to fully appreciate the richness of web content on your iPhone.
Overall, using full-screen mode in Safari on your iPhone elevates the browsing experience by maximizing the visibility of web content, eliminating distractions, and providing a more immersive and engaging viewing environment. Whether you're admiring visual media, reading informative articles, or exploring interactive web experiences, full-screen mode enhances the impact and enjoyment of browsing the web on your mobile device.
Zooming In and Out
Zooming in and out in Safari on your iPhone is a versatile and intuitive way to adjust the display of web content, allowing you to focus on specific details or gain a broader view of the entire webpage. Whether you're exploring intricate visuals, analyzing complex layouts, or simply adjusting the overall display, Safari's zooming capabilities provide a dynamic and customizable browsing experience.
To zoom in on a specific area of a webpage, simply use the familiar pinch-to-zoom gesture on your iPhone's screen. By placing two fingers on the display and pinching them together, you can instantly magnify the content, making it larger and more detailed. This feature is particularly useful when examining images, diagrams, or text with finer details, as it enables you to closely inspect specific elements with enhanced clarity and precision.
Conversely, zooming out in Safari allows you to gain a broader perspective of the webpage, reducing the display size to encompass more content within the screen. By spreading your fingers apart on the screen, you can seamlessly zoom out, providing a comprehensive view of the entire webpage layout. This functionality is beneficial when navigating through expansive webpages, reviewing overall page structures, or adjusting the display to accommodate various content types.
In addition to the pinch-to-zoom gesture, Safari offers a convenient alternative for zooming in and out. By double-tapping on the screen with your fingers, Safari intelligently zooms in to the tapped area, allowing you to quickly focus on specific content. This gesture is particularly effective for swiftly enlarging text, images, or interactive elements, providing a seamless and responsive zooming experience.
Furthermore, Safari's zooming capabilities extend beyond static content, as they also enhance the interaction with dynamic and responsive web elements. Whether you're engaging with interactive maps, exploring multimedia presentations, or navigating complex interfaces, the ability to zoom in and out empowers you to interact with web content in a more personalized and immersive manner.
By leveraging these zooming features in Safari, you can tailor the display of web content to match your preferences and optimize the browsing experience on your iPhone. Whether you're examining detailed visuals, adjusting the overall display, or interacting with dynamic web elements, Safari's intuitive zooming functionality ensures a versatile and engaging browsing experience.
In summary, Safari's zooming capabilities provide a dynamic and customizable way to adjust the display of web content, offering enhanced clarity, precision, and immersion. Whether you're focusing on specific details, gaining a broader perspective, or interacting with dynamic elements, Safari's intuitive zooming features empower you to personalize your browsing experience and engage with web content in a more immersive and interactive manner.
Customizing Safari Settings
Customizing Safari settings on your iPhone allows you to tailor the browsing experience to your specific preferences, ensuring that Safari aligns with your visual, privacy, and functionality requirements. By delving into the settings menu, you can unlock a range of customization options that empower you to personalize Safari according to your browsing habits and individual needs.
Privacy and Security
Within Safari's settings, you have the ability to enhance your privacy and security while browsing the web. By enabling features such as "Prevent Cross-Site Tracking" and "Block All Cookies," you can safeguard your online privacy and minimize the tracking of your browsing activities by third-party websites. Additionally, Safari offers the option to "Ask Websites Not to Track Me," providing an extra layer of privacy protection as you navigate the internet.
Content Blockers
Safari allows you to integrate content blockers, which are extensions designed to filter out unwanted advertisements, pop-ups, and other intrusive content while browsing. By accessing the "Content Blockers" settings, you can install and manage content blocker extensions, effectively enhancing your browsing experience by reducing distractions and improving page load times.
Reader View Customization
In Safari's settings, you can further customize the Reader View feature to align with your reading preferences. This includes the ability to adjust the font, font size, and background color within Reader View, ensuring that the text-based content is presented in a manner that suits your visual comfort and reading habits. By tailoring these settings, you can create a personalized reading environment that enhances the enjoyment of consuming articles and textual content.
Search Engine Selection
Safari offers the flexibility to choose your preferred search engine for conducting web searches directly from the address bar. By accessing the search engine settings, you can select from popular options such as Google, Yahoo, Bing, and DuckDuckGo, allowing you to customize your browsing experience by utilizing the search engine that best aligns with your search preferences and privacy considerations.
Website Settings
Safari's website settings provide granular control over individual website preferences, including camera access, microphone access, and location services. By managing these settings on a per-website basis, you can tailor the permissions granted to specific websites, ensuring a more secure and personalized browsing experience while maintaining control over your device's privacy and security settings.
By customizing Safari settings on your iPhone, you can elevate your browsing experience by prioritizing privacy, enhancing content readability, and tailoring the functionality of the browser to align with your preferences. These customization options empower you to create a personalized and secure browsing environment that reflects your individual needs and browsing habits.
Leave a Reply Cancel reply
Your email address will not be published. Required fields are marked *
Save my name, email, and website in this browser for the next time I comment.
- Crowdfunding
- Cryptocurrency
- Digital Banking
- Digital Payments
- Investments
- Console Gaming
- Mobile Gaming
- VR/AR Gaming
- Gadget Usage
- Gaming Tips
- Online Safety
- Software Tutorials
- Tech Setup & Troubleshooting
- Buyer’s Guides
- Comparative Analysis
- Gadget Reviews
- Service Reviews
- Software Reviews
- Mobile Devices
- PCs & Laptops
- Smart Home Gadgets
- Content Creation Tools
- Digital Photography
- Video & Music Streaming
- Online Security
- Online Services
- Web Hosting
- WiFi & Ethernet
- Browsers & Extensions
- Communication Platforms
- Operating Systems
- Productivity Tools
- AI & Machine Learning
- Cybersecurity
- Emerging Tech
- IoT & Smart Devices
- Virtual & Augmented Reality
- Latest News
- AI Developments
- Fintech Updates
- Gaming News
- New Product Launches
- AI Writing How Its Changing the Way We Create Content
- How to Find the Best Midjourney Alternative in 2024 A Guide to AI Anime Generators
Related Post
Ai writing: how it’s changing the way we create content, unleashing young geniuses: how lingokids makes learning a blast, 10 best ai math solvers for instant homework solutions, 10 best ai homework helper tools to get instant homework help, 10 best ai humanizers to humanize ai text with ease, sla network: benefits, advantages, satisfaction of both parties to the contract, related posts.

How To Zoom Out Of Safari On IPhone

How To Make Iphone Full Screen On Tv – HDMI

How To Get Hulu On Apple TV

How To Connect iPhone To TV (Wireless)

What Safari Version Do I Have On IPhone

How To Get Safari Back On My IPhone

How To Disable Safari On IPhone

How Do You Delete Safari
Recent stories.

How to Find the Best Midjourney Alternative in 2024: A Guide to AI Anime Generators

How to Know When it’s the Right Time to Buy Bitcoin

How to Sell Counter-Strike 2 Skins Instantly? A Comprehensive Guide

10 Proven Ways For Online Gamers To Avoid Cyber Attacks And Scams

- Privacy Overview
- Strictly Necessary Cookies
This website uses cookies so that we can provide you with the best user experience possible. Cookie information is stored in your browser and performs functions such as recognising you when you return to our website and helping our team to understand which sections of the website you find most interesting and useful.
Strictly Necessary Cookie should be enabled at all times so that we can save your preferences for cookie settings.
If you disable this cookie, we will not be able to save your preferences. This means that every time you visit this website you will need to enable or disable cookies again.
- Skip to primary navigation
- Skip to main content
- Skip to primary sidebar
- Skip to footer
News and Tips for Mac, iPhone, iPad, and All things Apple
How to Increase Font Size in Safari on iPhone & iPad
Last Updated on January 17, 2021 by GeeksModo Staff

How to Increase the Font Size in Safari on iPhone & iPad
Make text bigger in safari on iphone and ipad.
Follow these steps to make the text bigger on Safari on iPhone and iPad.
- Launch Safari app on your iPhone and navigate to a website of your choice, we suggest geeksmodo.com
- Tap the “aA” icon in the upper left corner of the screen.
- Now tap on the larger “A” that appears on the right side to increase the percentage and keep tapping on it until you get the desired text size. It can zoom in up to 300%.
- You can also decrease the percentage of font size of the web page by tapping on smaller “A” located on the left side. It can zoom-out up to 50%.
It’s that simple to increase and decrease the font size in Safari on your iPhone and iPad running on iOS 13 and iPadOS 13 respectively.
In case you don’t want to repeat the same steps for all the websites, you can just specify a permanent zoom percentage for all the websites you want to read regularly.
How to Set a Bigger or Smaller Text Size for All Websites in iOS 13 Safari App
You don’t have to use the above method every time to make a text smaller or bigger in Safari. You can set a permanent zoom percentage for all the websites by simply changing a couple of settings outlined below. Here is how to do it!
- Launch Settings App and navigate to Safari.
- Scroll down to “Settings for Websites” section and tap on Page Zoom option.
- You will find a list of websites under “Page Zoom ON” that you have previously increased or reduced the font size. Tap on that website to set font size of your choice.
You can also move to “Other Websites” section and change the font size depending on your preference
Selecting a smaller font size could render the text difficult to read. Therefore, it’s recommended to keep the font size above 100% for a better reading experience on your iPhone or iPad in Safari.
Final Thoughts!
This is so far my favorite feature in Safari as it improves my overall experience upon selecting my preferred font size. Have you tried this feature on your iPhone or iPad? If not, give it a shot now by following the above-given steps.
Let us know in the comments section below. We also have plenty of other articles that I suggest you check right now.
Recommended For You:
- How to Reset or Force Restart Your Apple Watch
- How to Enable Emergency & Government Alerts on your iPhone
- How to restart iPhone Without Home Button in 2022
- How to Measure a Person Height Using iPhone 12 Pro LiDAR Sensor
- How To Check iPhone 12 Battery Health And Charge Cycles

About GeeksModo Staff
GeeksModo Staff is a team of iPhone, iPad, Mac and Apple Watch experts led by Moses Johnson. We're passionate about all things Apple!
Reader Interactions
Submit a comment cancel reply, top sections, contact info.
- About GeeksModo
- Advertise On GeeksModo.com
- Editorial Guidelines
- Accessibility statement
- Terms Of Use
- Privacy Policy
- Copyright Notice
Search GeeksModo
This website is not owned by, is not licensed by nor is a subsidiary of Apple Inc. Apple and the Apple logo are trademarks of Apple Inc. Please follow this link to read the complete disclaimer.
How do I Increase Font Size on a Mac?

If you buy through affiliate links, we may earn a commission at no extra cost to you. Full Disclosure Here…
If you’ve ever tried to read an article only to find yourself squinting to read, don’t worry; you’re not alone. The font size on a Mac screen is determined by a few different factors, such as monitor size, font size, and zoom.
The good news is that you can easily change settings on your Mac to get the best view. Not only does this make for a better overall experience, but it also prevents damaging your eyesight from straining. Depending on what font you need to make bigger will dictate the approach you should take, which we will cover in-depth below.
What Is The Easiest Way to Increase Font Size on a Mac?
1. zoom in , 2. increase font size, 4. change resolution, conclusion:.

The easiest way to zoom on a Mac is with the “Pinch To Zoom” feature. This lets you quickly and easily make windows larger by spreading your fingers on a trackpad or Magic Mouse. Of course, the downside is that you have to have one of these devices.
Fortunately, most applications, like Pages, have a zoom function where you can make the text larger. There is also a reading function built into Safari, which cleans up the webpage and allows you to make the text larger. But don’t overlook the possibility that your resolution is set incorrectly if using a secondary monitor.
How to Increase Font Size on Mac: Methods and Steps
There are four primary ways that you can make content larger on a Mac. In fact, increasing the actual font size is just one way to make text larger, and it usually isn’t the best method. You should instead consider the other methods explained below, such as zooming in, scaling, or even changing the resolution.

Zooming in is the easiest way to make any page larger. You can do this on most windows and pages without it affecting any other settings. Best of all, this method works on much more than just documents, as you can also zoom in on pictures, videos, and even websites.
- On a MacBook, simply place two fingers on the trackpad close together and then move them apart. If done correctly, the desired page should get noticeably larger.
- If you are using an iMac or don’t have a trackpad, you can also use this method with a Magic Mouse. On the touch-sensitive portion, do just as you would with a trackpad and move two fingers apart.
- Unfortunately, this method cannot be done unless you have a multi-touch trackpad or mouse. However, there are a few mice available from companies like Logitech that allow you to set up a macro for pinch-to-zoom.

The next option we will cover is simply increasing the font size. This entails simply making a font larger when in a word processor, or similar application. While this will make the text larger, it will also distort the document. In some cases, this will not be a big deal, but if you need specific formatting, then this will not work.
- To increase the font size, start by opening an application like Pages. Once open, look on the menu bar for the font size. Then, make the number larger until you can easily read the text.
- Most word processing software, and even other applications like Excel, have a slider where you can make the page bigger. This is a much better option because it will not affect the formatting and will instead just make the page larger.

Scaling is a great option that is built into your Mac. It adjusts all of the content on the computer to make it larger without distorting or causing weird issues. It can take a little while to get used to, but it is worth it for many users.
- Open System Settings
The first thing you need to do is click on the Apple icon on the left side of the top menu bar. Then choose “System Settings” from the drop-down menu.
- Go to Display
Once System Settings is open, you need to find “Displays” on the left sidebar. It should be about halfway down the page, but you can also search for it.
- Choose a Scaled Resolution
On the “Displays” page, you should see a few different boxes with text inside them. It should be on default at first, but you need to select one of the boxes to the left to make everything larger. If you are happy with the selection, you can go ahead and close out the window.

In very few instances, changing the monitor’s resolution will help make the text easier to read. By default, a MacBook is set to properly display the operating system and all of its contents on the monitor. However, using a different monitor or a non-Apple monitor with a Mac Mini can throw off the settings and cause poor image quality.
- Determine Monitor Resolution
The first thing you need to do is look at your monitor and determine what its resolution is. A large number of monitors are 1080P, but they sometimes come with odd ratios, and many people are now opting for higher resolution.
- Check System Settings
If your text and icons are really small, then you are likely using a higher resolution monitor such as a 1440P or 2160P. If so, then you need to open “System Settings” and check the resolution. Do this by searching for “Resolution” and clicking on its button.
- Change Resolution
If you are using a higher-resolution monitor and it was automatically detected, then you will need to lower the settings. Try going back down to 1080P, which should look more appropriate. If that still doesn’t work, then you may want to try Scaling, which is covered above.
Check our article on Is MacBook an iOS Device?
The keyboard shortcut to increase the font size on a page is Command and + . Pressing the + button will increase the font size on a page by 10% every time it is pressed. Conversely, you can also use the shortcut Command and – which provides the opposite result and makes the font smaller.
As mentioned above, you can resize the text on your Mac by using the Command button in addition to the + or – key. This shortcut will not work on all applications, so you may need to use one of the alternatives mentioned above.
One of the great things about Mac computers is how intuitive they are. Providing multiple ways to make text larger is an example of how Mac computers are truly easy for anyone to use.
Pinch To Zoom is a great feature that was Brough over from the iOS platform. However, it isn’t perfect, especially for people who have vision problems. If you find yourself constantly needing to zoom into text, then it is best to use Scaling.
Scaling is another great feature used on iOS because it makes nearly all text and icons larger without distorting them. But if you are just having trouble with one program, then you should see if there is an option to enlarge just the content on it.
Christopher
Christopher is a freelance writer from Louisiana. He primarily covers topics related to electronics and gaming, with a passion for how technology can make a positive impact. Holding a bachelor’s degree in marketing and a master’s degree in hospitality, he also writes about various aspects of business and finance. Outside of writing, Christopher’s hobbies include woodworking and building LEGO sets. In addition to his enthusiasm for all things nerdy, he loves collecting and playing video games, particularly older ones.
Recent Posts
How to Run Internet Explorer On A Mac
Switching from a PC to Mac means that, apart from shifting from WindowsOS to macOS, you have to get used to a number of new applications. A Windows staple, Internet Explorer, now Microsoft Edge, is...
How to Mirror iPhone to MacBook Pro
Mirroring your iPhone to a MacBook Pro is a handy task you might find essential for presentations, media sharing, or simply managing your content. Thankfully, this connection isn't elusive; it can be...
Change the font size or zoom level of web pages in Safari
In Safari 10 on macOS Sierra, you can adjust the font size or zoom level to see web pages better.
Change the font size
You can increase or decrease just the font size of pages that you view in Safari on macOS Sierra. Safari will remember your settings until you clear your History.
- To increase the font size, press Option-Command-Plus sign (+)
- To decrease the font size, press Option-Command-Minus sign (-)
Or you can go to the View menu and hold down the Option key while you select Make Text Bigger or Make Text Smaller.
Change the zoom level
You can increase or decrease the zoom level – both text and images – of pages that you view in Safari on macOS Sierra. Safari will remember your settings until you clear your History.
- To increase the zoom level, press Command-Plus sign (+)
- To decrease the zoom level, press Command-Minus sign (-)
Or go to the View menu and select Zoom in or Zoom out.
Clear history to reset the font size and zoom level
If you clear your Safari history, websites will go back to their default font size or zoom level.
In the History menu, select Clear History. Then click Clear History again.
Information about products not manufactured by Apple, or independent websites not controlled or tested by Apple, is provided without recommendation or endorsement. Apple assumes no responsibility with regard to the selection, performance or use of third-party websites or products. Apple makes no representations regarding third-party website accuracy or reliability. Contact the vendor for additional information.

- SUGGESTED TOPICS
- The Magazine
- Newsletters
- Managing Yourself
- Managing Teams
- Work-life Balance
- The Big Idea
- Data & Visuals
- Reading Lists
- Case Selections
- HBR Learning
- Topic Feeds
- Account Settings
- Email Preferences
How to Make a “Good” Presentation “Great”
- Guy Kawasaki

Remember: Less is more.
A strong presentation is so much more than information pasted onto a series of slides with fancy backgrounds. Whether you’re pitching an idea, reporting market research, or sharing something else, a great presentation can give you a competitive advantage, and be a powerful tool when aiming to persuade, educate, or inspire others. Here are some unique elements that make a presentation stand out.
- Fonts: Sans Serif fonts such as Helvetica or Arial are preferred for their clean lines, which make them easy to digest at various sizes and distances. Limit the number of font styles to two: one for headings and another for body text, to avoid visual confusion or distractions.
- Colors: Colors can evoke emotions and highlight critical points, but their overuse can lead to a cluttered and confusing presentation. A limited palette of two to three main colors, complemented by a simple background, can help you draw attention to key elements without overwhelming the audience.
- Pictures: Pictures can communicate complex ideas quickly and memorably but choosing the right images is key. Images or pictures should be big (perhaps 20-25% of the page), bold, and have a clear purpose that complements the slide’s text.
- Layout: Don’t overcrowd your slides with too much information. When in doubt, adhere to the principle of simplicity, and aim for a clean and uncluttered layout with plenty of white space around text and images. Think phrases and bullets, not sentences.
As an intern or early career professional, chances are that you’ll be tasked with making or giving a presentation in the near future. Whether you’re pitching an idea, reporting market research, or sharing something else, a great presentation can give you a competitive advantage, and be a powerful tool when aiming to persuade, educate, or inspire others.
- Guy Kawasaki is the chief evangelist at Canva and was the former chief evangelist at Apple. Guy is the author of 16 books including Think Remarkable : 9 Paths to Transform Your Life and Make a Difference.
Partner Center
Major Russian air strikes destroy Kyiv power plant, damage other stations
- Medium Text
- Russia attacks Ukraine's energy system
- Moscow used more than 80 missiles and drones, Kyiv says
- Ukraine says a string of power facilities were damaged
- U.S. envoy says situation is 'dire'

BIGGEST ENERGY SUPPLIER NEAR THE CAPITAL
The Reuters Daily Briefing newsletter provides all the news you need to start your day. Sign up here.
Reporting by Pavel Polityuk, Anastasiia Malenko and Max Hunder; writing by Tom Balmforth; Editing by Devika Syamnath, Angus MacSwan, Ros Russell, Ron Popeski and Sonali Paul
Our Standards: The Thomson Reuters Trust Principles. New Tab , opens new tab

A Russia-installed official in Ukraine's southern Zaporizhzhia region said on Sunday that the death toll from shelling by Ukraine's military on the town of Tokmak had risen to 16 people.

World Chevron
The Dutch government on Sunday advised against all travel to Israel due to the uncertain security situation following overnight air strikes by Iran.

The governor of Russia's Kurgan region on Sunday urged people to evacuate flooded areas immediately, saying rain was exacerbating the already tough situation there and the coming night would be difficult.
IMAGES
VIDEO
COMMENTS
Safari will remember your settings until you clear your History. To increase the font size, press Option-Command-Plus sign (+) To decrease the font size, press Option-Command-Minus sign (-) Or you can go to the View menu and hold down the Option key while you select Make Text Bigger or Make Text Smaller.
To get started, open the Safari browser on your iPhone or iPad and visit the web page where you want to increase or decrease the text size. Next, tap the "aA" button on the left-hand side of the URL bar. Here, tap the "a" button to reduce the text size, or tap the "A" button to increase the text size. The default text zoom is set as 100%.
Click "Safari" in the top menu bar and choose "Preferences" from the drop-down menu. In Safari Preferences, click the "Advanced" tab. In the "Advanced" tab, locate the "Accessibility" section and click the check mark next to "Never Use Font Sizes Smaller Than." In the drop-down menu, choose between "14," "18," or "24" -point font sizes.
To make the text larger or smaller, adjust the web page's font size. Open the Safari browser on your Mac and go to a web page. To increase the font size, press Option + Command + + (the plus sign). To decrease the font size, press Option + Command + - (the minus sign). Alternatively, to increase the font size, go to View and select Make Text ...
How to Set a Bigger or Smaller Text Size for All Websites in iOS 13 Safari App. You need not use the above method every time to make a text smaller or bigger in Safari. You can set a fixed zoom percentage for all the websites by just changing a few settings given below. Here you go! Step #1. Open Settings App and head over to Safari option.
Open Safari on your Mac and then follow these steps to change the text size: Click Safari > Preferences from the top menu bar. Choose the Advanced tab. Check the box next to Accessibility for Never use font sizes smaller than and pick a size from the drop-down box. You can try out different sizes and see the changes immediately within Safari.
Changing the text size for all sites. If you'd rather change the default text size for all sites you visit using Safari, here is how. Go to Settings > Safari > Page Zoom. Here you can see the ...
Launch the app and navigate to a website, then tap the "aA" icon in the upper left corner of the screen. The text zoom options appear at the top of the Web View dropdown menu - tap the smaller A ...
Open the TextEdit application. Click New Document. In TextEdit's menu bar, select Format -> Make Plain Text. Copy and paste the following CSS code into the file, changing the zoom number to your ...
Introduction. When browsing the web, the ability to adjust text size is crucial for a comfortable and personalized experience. Whether you're reading an article, navigating a website, or simply perusing your favorite blog, having the flexibility to make text bigger on Mac Safari can significantly enhance your browsing experience.
How to Increase the Font Size in Safari on iPhone & iPad. Open Safari and navigate to a website of your choice. We'd suggest osxdaily.com for obvious reasons. Now tap the larger "A" button to increase the size of the font. If you'd like to reduce text size, tap the smaller "A" button. The page will immediately reflect your changes.
Increase the default minimum font size in Safari. Open Safari. Select Safari in the menu bar. Select Preferences from the menu. In the Preferences window, select the Advanced tab. On the Advanced screen, tick the checkbox for Accessibility. Select the drop-down menu for Never use fonts sizes smaller than and choose a new value.
Using Safari's Preferences. If you want to make a permanent change to text size, go to Safari's preferences. Click on "Safari" in the menu bar and select "Preferences." Then, click on the "Advanced" tab and choose "Accessibility." You will see an option to set a minimum font size for web pages.
To begin, open Safari on your iPhone and navigate to a webpage with text content. Once you're on the webpage, you can easily adjust the text size to your liking by following these simple steps: Pinch-to-Zoom Gesture: Using the pinch-to-zoom gesture, you can quickly adjust the text size on a webpage.Simply place two fingers on the screen and pinch them together to zoom in, making the text ...
Follow these steps to make the text bigger on Safari on iPhone and iPad. Tap the "aA" icon in the upper left corner of the screen. Now tap on the larger "A" that appears on the right side to increase the percentage and keep tapping on it until you get the desired text size. It can zoom in up. to 300%.
The keyboard shortcut to increase the font size on a page is Command and +. Pressing the + button will increase the font size on a page by 10% every time it is pressed. Conversely, you can also use the shortcut Command and - which provides the opposite result and makes the font smaller. 2.
For Windows 10, go to Start > Settings > Display. For Windows 11, press the Windows Key and open Settings > Accessibility > Text size. For increasing text, you use the slider bar and can preview ...
The problem is that iOS Safari doesn't scale rem units when the "Text Size" setting is used. One workaround I've seen on the web is to set: font: -apple-system-body; This solution does make iOS Safari respect the "Text Size" setting, which is great. But it introduces a new problem on macOS: it sets the value of 1rem to be 13px rather than 16px.
Select multiple photos from your chat composer. Tap Create album (you can also long press a photo in the chat and tap Create album) To add to an existing album, tap Add to album. To rename the album: Tap Album. Tap the three dot menu. Tap Edit Name. Confirm new album name. From there, everyone in the chat can view, add, delete and download ...
Independent browser companies in the European Union are seeing a spike in users in the first month after EU legislation forced Alphabet's Google , Microsoft and Apple to make it easier for users ...
Safari will remember your settings until you clear your History. To increase the font size, press Option-Command-Plus sign (+) To decrease the font size, press Option-Command-Minus sign (-) Or you can go to the View menu and hold down the Option key while you select Make Text Bigger or Make Text Smaller.
When in doubt, adhere to the principle of simplicity, and aim for a clean and uncluttered layout with plenty of white space around text and images. Think phrases and bullets, not sentences. As an ...
The Nets (32-49) were 1 1/2 games behind the 10th-place Atlanta Hawks after Dorian Finney-Smith and Dennis Schroder scored 20 apiece in their 112-107 win over the Sixers in Brooklyn on March 5 ...
The U.S. House of Representatives will make a change in its schedule to consider legislation that supports Israel and holds Iran accountable, House Majority Leader Steve Scalise said in a ...
The prospect of Gazans crossing into Egypt from the border town of Rafah to escape a military assault would make the resolution of the Israeli-Palestinian conflict impossible and cause an ...
Russian missiles and drones destroyed a large electricity plant near Kyiv and hit power facilities in several regions of Ukraine on Thursday, officials said, ramping up pressure on the embattled ...