- Executive Team
- Letter From The President
- Whitepapers
- Case Studies
- Testimonials

Creating a Customer Journey in Dynamics 365 CRM
Posted on: July 29, 2021 | By: Jim Bertler | Microsoft Dynamics CRM , Microsoft Dynamics AX/365
Microsoft Dynamics 365 is a great CRM solution that makes improving and strengthening your relationships with your customers simple and effective because it is a multidimensional platform designed to increase profitability and opportunity. Tracking and maintaining customer relationships and sales leads is at the heart of Dynamics 365 CRM. Because of this, Dynamics 365 CRM has a customer journey feature in the system that helps you create and track the journey from the discovery stage all the way to the purchasing stage.
Dynamics 365 CRM simplifies the customer journey so that you can create it using just two steps, the first being identifying the intended audience and the second being creating an exercise that best fits the target audience.
In order to create a customer journey on Dynamics 365 CRM, you need a segment that consists of all the contacts you want to target via email, as well as a marketing email that is valid and activated.
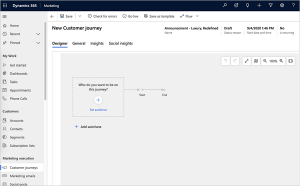
When you go to create a new customer journey, you have the option to choose between an array of templates, including: announcement, customer onboarding, event marketing, high touch marketing, monthly newsletter, and simple email journey. Aside from these choices, you also have the opportunity to create your own template and create the customer journey from scratch.
Once you’ve selected your desired template, Dynamics 365 CRM takes you to the customer journey designer, in which you create a pipeline that specifies each step within the journey. When designing your customer journey, you can select your intended audience using the segment of intent.
After specifying the audience for the customer journey, you can build email blasts into the journey. It is important to note that all s egments and email blasts built into the customer journey must be live before the customer journey itself can go live.
After you’ve finished designing your customer journey you can set beginning and end dates/times for the journey to specify when you want the processing of all contacts in the selected segment to start and stop.
Once this is all completed, you can check for errors and subsequently publish the customer journey by going live. Once this is activated, Dynamics 365 CRM will automatically begin the customer journey and begin processing contacts, performing actions, and collecting data and results from the journey that you can track for engagement and traffic.
If you want a comprehensive step-by-step tutorial on how to create a customer journey in Dynamics 365, check out this post by Microsoft.
Logan Consulting is a Microsoft Dynamics 365 CRM partner, and specializes in helping clients determine how this CRM system can best optimize their businesses in order to increase their profitability and efficiency. Contact us today if you are interested in learning more on how we can help you empower your business!
Related Posts
Automatic prepayments to vendors with microsoft dynamics 365 finance.
Posted on: April 24, 2024
In the modern business landscape, managing financial transactions efficiently and accurately is extremely important. Microsoft Dynamics 365 Finance offers an...
Read More ›
Enhancing Expense Management with Microsoft Dynamics 365 Finance: An Overview Guide
Posted on: April 22, 2024
Managing expenses efficiently in a dynamic business environment is important for maintaining budget control and ensuring financial compliance. Microsoft Dynamics...
Download Asset
News, tips, and resources from our experts to you. You’ll find everything you’re looking for right here.
Home > Blog > Guide to D365 Marketing Templates for Customer Journeys, Emails, Marketing Pages and Forms
Guide to D365 Marketing Templates for Customer Journeys, Emails, Marketing Pages and Forms
Microsoft Dynamics 365 Marketing comes with a wide variety of professionally designed templates. Each time you create a new email message, customer journey, marketing page, or marketing form, you start by choosing a template. Most of these templates include a column layout, color scheme, sample content, and sample images, whereas others provide a basic column layout without sample content. You can also start with a blank template.
The templates included with Dynamics 365 Marketing provide:
- A starting point to help you be more efficient with your time
- Advanced layouts based on responsive design techniques that help make the content look good at any screen size
- A color palette with a manageable number of colors that you can easily match your business's identity
- Designs that have been tested against a wide range of web and email clients to help ensure they will look great everywhere
This blog will walk through templates for Customer Journeys, Emails, Marketing Pages, and Marketing Forms.
When you create a template, the process is nearly the same as when you create an actual message, page, journey, or form. Within the Sitemap, in the Marketing Area, you’ll see a Marketing template section with the templates listed.

Select Journey Templates to start a Customer Journey with a template. The page will prompt you with different types of templates. You can also create a New template starting from scratch.

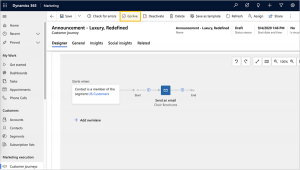
Let’s look at the Announcement customer journey template. This is used to send an announcement to your customers with marketing links. The customers who click will be sent a follow-up email and can be saved to a segment.
You start the journey by selecting a segment, or a group of related contacts that you want to target. Segments can be queried on demographic, firmographic, behavioral, and other data considerations. In this example, we created a Segment of Customers located in the US.

Next, you’ll choose the Email you want to be sent from the Email Templates . You can either select an existing Email Template or create a new one.

Once you select a template you’ll enter the following:
- Email Template Name which is populated in the head at the top of the page.
- A Subject for your email is very important because this is one of the first things recipients will see when they receive the email.
- The To field must contain an expression for finding each address the message will be sent to. This should almost always be the dynamic expression provided by default.
- From Name & Address to identify what recipients will see from the sender
Each of these settings is repeated on the Summary tab. Next, you’ll design your content in the body of the email in the template using the Toolbox on the right side of the template creator. The Toolbox provides design elements that you’ll use to construct your message. You can do things like drag a Text or Image box to the template.

Once you’ve completed your Email Template, the next step of the customer journey has a Yes or No path depending on if the customer clicks on the Email. In this example, if the customer clicks on the email, we have a Wait For condition. If the Customer does not click on the email, they have completed the customer journey.

Use the Toolbox to set the Wait For condition. You can use the Schedule tab to select what days of the week and time of day apply to the wait condition.

Once the Wait for step is completed, 7 Days in our example, then we have another Email step. You will follow the same process as earlier. Either add an existing email template or create a new one. Now that we’re completed with our Announcement customer journey template, we will save and close it.

We can now find our “Announcement” customer journey template and apply it to an active Customer Journey.
Marketing Pages and Form Templates
Marketing pages and forms within Dynamics 365 Marketing are powerful tools to be used in targeted campaign campaigns, events, and beyond. Marketing Pages allow customers to register for an offer, update their contact information, manage mailing list subscriptions, and more, whereas Marketing Forms define a set of input fields arranged into a form layout. It’s common to build a library of reusable forms that you can place on all your various marketing pages as needed. All the information submitted through a marketing page is automatically captured by Dynamics 365 Marketing and applied immediately to your customer base.
When using templates, the designer is like what we saw above in the Email Template designer. A simple drag and drop builder makes it easy for users to get pages and forms up and running in no time. Creating or modifying a template for Marketing Forms and Pages function very similarly. You’ll find the templates on the sitemap and once selected, you have the option to modify an existing template or create a new one.

Select an existing marketing form template from the list to make modifications. This will bring you to the Form Designer which allows you to easily drag and drop design elements and settings to modify the form template. Each element represents a specific type of content, such as a text element, image, or input form. The settings and features for each element vary by type.

You can also pull specific fields from the Toolbox to your form. Each element has properties that can be found next to the Toolbox. These will change depending on the element type you’re modifying.

Once you’re completed with your template, you can save and close. To create a form with your template, navigate to Marketing forms, and select new. The template dialog will pop up for you to select the form template you just modified. Click your template and click Select.

Give the form a name and save. You can now apply this Form to a Marketing Page.
Templates are a great starting point to help you work more quickly and efficiently. There’s a wide variety of professionally designed templates to take advantage of, or you can always choose to start from scratch and create your own template. Regardless of what path you start from, Dynamics 365 Marketing templates are customization to match your organization's identity. To learn more about the templates offered with Dynamics 365 Marketing reach out to the experts at Stoneridge .
Under the terms of this license, you are authorized to share and redistribute the content across various mediums, subject to adherence to the specified conditions: you must provide proper attribution to Stoneridge as the original creator in a manner that does not imply their endorsement of your use, the material is to be utilized solely for non-commercial purposes, and alterations, modifications, or derivative works based on the original material are strictly prohibited.
Responsibility rests with the licensee to ensure that their use of the material does not violate any other rights.
Start the Conversation
It’s our mission to help clients win. We’d love to talk to you about the right business solutions to help you achieve your goals.
Subscribe To Our Blog
Sign up to get periodic updates on the latest posts.
Thank you for subscribing!
Stoneridge Software respects your privacy. We will never share your information with others.

Dynamics 365 Customer Insights

Dynamics 365 Sales
See customer insights in action.

Deliver connected customer journeys
Get a richer view of customers.

Enrich data and predict intent

Create customer segments

Respect consent and privacy

Deliver real-time journeys

Boost engagement with AI

Nurture and share leads

Reach customers where they are

Get insights faster

Simplify audience targeting

Tailor content quickly

Create journeys easily

Gartner names Microsoft a Leader
Start where you want, add what you need.

Discover Microsoft partners

Get started with consulting services

Explore Dynamics 365 partner apps

FastTrack for Dynamics 365
Connected customer experiences across teams.
Real customers, real results
“I see that with Customer Insights and the use of Copilot we can achieve great success and results by improving the brand.”
“We’re accelerating the visibility of consumer insights and business intelligence.”
“Working with Microsoft Dynamics 365 enables us to deliver a well-crafted experience and empower our entire global team.”

“Once you bring different types of data into the mix, you can understand more about people.”

Find resources in your favorite formats

Leadership Compass, Customer Data Platforms

Putting personalization in the driver’s seat

Taking amusement parks to new heights

Lighting up personalized experiences

Customer Insights learning paths

Functional Consultant Associate

Microsoft Dynamics 365 Customer Insights (Data) Specialist

Try Dynamics 365 Customer Insights
Chat with a Dynamics 365 expert
Request a call back
Call a Dynamics 365 expert
[ 1 ] Gartner, Magic Quadrant for B2B Marketing Automation Platforms, Rick LaFond, Jeffrey L. Cohen, Matt Wakeman, Jeff Goldberg, Alan Antin, 20 September 2023.
Gartner is a registered trademark and service mark and Magic Quadrant is a registered trademark of Gartner, Inc. and/or its affiliates in the U.S. and internationally and are used herein with permission. All rights reserved.
Gartner does not endorse any vendor, product or service depicted in its research publications, and does not advise technology users to select only those vendors with the highest ratings or other designation. Gartner research publications consist of the opinions of Gartner’s research organization and should not be construed as statements of fact. Gartner disclaims all warranties, expressed or implied, with respect to this research, including any warranties of merchantability or fitness for a particular purpose.
[ 2 ] Unified People refers to a uniquely identified individual that is created through a collection of defined data source sets from multiple systems, represented by a profile.
[ 3 ] Interacted People refers to any Dataverse entity (such as a contact, lead, account or an Insights profile) that is interacted with. A person is considered interacted when they are interacted with via either an outbound interaction or an inbound one such as filling out a form via a marketing website. The interaction can be sent through the channels available in Customer Insights (such as emails, text messages, or push notifications), other Microsoft channels (such as Azure Communication Services), or external systems (such as other text-messaging providers).
Follow Dynamics 365
- Chat with sales
Available M-F 6 AM to 3 PM PT.
How to create a Customer Journey in Dynamics 365 for Marketing
Microsoft Dynamics 365 for Marketing has amazing capabilities that allows you to build from scratch a complete customer journey utilizing a simple drag-and-drop interface.
Marketing campaigns are one of the core activities needed to gather prospects and convert them into customers. The most popular practice to bring awareness of a brand or a newly released product is an Email Campaign . Companies usually acquire an email list from an online provider. In other cases, companies build an email database utilizing a newsletter approach.
However, having a massive email list doesn’t mean a campaign will be successful, obviously. There are several factors that determine its success but one of the most important is the design of the customer journey.
Today, I’m going to show you how to create a complete Customer Journey in Microsoft Dynamics 365 for Marketing .
1) Create a Segment
Segments are the contacts who you will engage with your Marketing Campaign. You cannot launch a Customer Journey within Dynamics 365 for Marketing without creating a segment first, so let’s get started:
On the main panel, go to the left menu and select Segments > New segment. Proceed to fill the required information in the General tab.

The Genera l tab information doesn’t impact the Segment. However, I do recommend utilizing a key name that you can recognize quickly, as the Segment will be saved in your Dynamics 365 for Marketing configuration.
Types of segment
Dynamic Segment: This type of segment follows a query designed to automatically bring the contacts from your CRM based on your search criteria. This is the best approach if you are planning a large email campaign (at least one with 100 or more contacts).
Static Segment: Manually choose each contact utilizing a filter. This one is recommended for small email campaigns (with less than 20 emails).
Compound Segment: This segment type allows you to combine one or more existing segments into a brand new one. This type is usually used when you want to start a new campaign utilizing multiple segments.
We are going to use a Dynamic Segment as an example.
Go to Definition > Designer .
This shows a simple query that allows you to choose each field and filter your segment accordingly. For this example, we are going to create a segment for all our contacts that live in Miami.

Once completed, click on Check for errors at the top bar and if everything is okay, click on Go live .
Our segment is ready to go!
1) Create the email
Go to the main dashboard of Dynamics 365 for Marketing and select Marketing Emails > New .

You can create an email from scratch utilizing the drag-and-drop designer canvas, however, Dynamics 365 for Marketing provides several email templates segmented by Market Type, Purpose or Visual Style . Let’s use a default template for this example:

Doble-click to change the email text from the template.
Click and use the search icon to upload or find images you want.
Remember to give the email a name and subject.
Once you finish personalizing your email, click on Check for errors and then on Go Live .

1) Create the Customer Journey
Now that we have our segment and our email, we are ready to launch a simple Customer Journey on Microsoft Dynamics 365 for Marketing.
In the main dashboard, go to the left bar and click on Customer Journey > New .

Just like emails, Dynamics 365 for Marketing provides several Customer Journey templates based on the goal and the market type, for this example, we are going to select a blank one and create a simple journey.

In order to facilitate user adoption, Dynamics 365 for Marketing has the same drag-and-drop designer canvas for almost every capability.
Drag the segment icon from the toolbox and drop it on the designer canvas. You must start with a segment in every Customer Journey.
Click on the segment and go to properties on the right. There, click on look for segment and select the one we just created.

We have defined who is going to receive our emails created with Dynamics 365 for Marketing, now, let’s build the journey.
From the Toolbox tab, drag and drop the Marketing Email icon. Just like we did with the segment, click it and in the properties tab, click on Look for Marketing Email . Then, select the one we just created.
With this information your Customer Journey is ready to go, however, Dynamics 365 for Marketing lets us add a Trigger .
Adding a Trigger allows the Customer Journey to automatically execute an action based on the prospect interaction of your criteria.
Select the Trigger tile on the toolbox and drop it into the canvas.
s you can tell, your email will be divided into two routes, you can assign criteria for each one. In this example, we are going to divide it as follows: prospects who opened the email and prospects who didn’t.
Click on the Trigger tile in your canvas and go to the properties tab on the right. Here, we can choose the criteria we want.

Timeout is how much time after the email delivery you want to wait for the trigger to act. For example, if we set 5 Days, this means the Trigger will act 5 days after the first email was delivered.
You can set several rules within Dynamics 365 for Marketing, such as clicks, opened or forwarded.
In this example, I’m setting Email Opened which means the contacts who opened the Email are going to the “Yes” route. The ones who didn’t, to the “No” route.
Dynamics 365 for Marketing lets you assign different actions such as reminders, contact creation or a follow-up email. I assigned a follow-up email to the “Yes” route and a different approach email for the “no” route.
Don’t forget to give it a name and schedule it using the start date and time tab at the top.
Click on Go Live and we are done! You have successfully created a Costumer Journey with Dynamics 365 for Marketing.
Hope this blog was insightful for you!
If you want to learn more about Dynamics 365 for Marketing or if you want to schedule a demo, feel free to reach out to us , one of our experts will gladly help.
Microsoft Dynamics 365 and Power Platform experts providing comparisons and opinions for the CRM selection process.

How to Build a Customer Journey Map with Microsoft Dynamics
Want to send highly targeted (and better performing) marketing campaigns? Start by mapping your customer journey.
The customer journey is broadly defined as the steps a potential buyer could take toward becoming your customer. For most brands, this will be comprised of Awareness, Consideration, Conversion, Loyalty, and Advocacy:

Taking the time to map your customer journey is a great way to help you better target your marketing, support the sales funnel, align sales and marketing to the same conversion plan, improve customer experiences, and identify problem areas in your funnel. Getting a map together can take time and effort, but the payoff is a stronger, data-driven marketing and sales strategy that everyone can agree on.
Download our step-by-step guide to building your customer journey with Microsoft Dynamics >>
Mapping Your Customer Journey with Microsoft Dynamics
Microsoft Dynamics is perfect for this exercise, given that Microsoft Dynamics is already designed to map data points along a sales funnel. Take a look at how each of the above steps might look with Microsoft Dynamics and your marketing automation platform (which serves as the data house for the Awareness stage):

Now that you’re thinking about Microsoft Dynamics as a guide for your customer journey, let’s talk about how to actually map and optimize your touchpoints.
Step #1: What’s Your Journey?
For the first step, document all the potential ways a person could be engaged with your brand, from marketing to sales, to customer success. This could be:
- Email (through marketing or through sales/direct)
- Social media (paid, organic, or both?)
- Events (webinar, trade show, networking, etc.)
- Customer support (automated and personal)
- Online content (your website, promoted profiles, partner sites)
- Phone calls
- Face-to-face, word of mouth, referral
Make note of where each of these touchpoints might happen in the document above so that it’s easy to reference what stage these touchpoints fall into later on.
Step #2: What’s in Dynamics?
For the second step, ask yourself if Dynamics is capturing marketing, sales, and support data. Basic marketing data you will need in Dynamics should include:
- Campaigns Entity: Leverage both Lead Source and Source Campaign
- Competitor Entity: Capture who you’re losing (and winning) to at the Lead and Opportunity stages
- Marketing Spend and Potential ROI
Having these tracking options in place will help you build a stronger, data-driven marketing budget that looks at marketing spend, the number of leads a campaign drives in, which types of marketing activities are most successful for your brand, and the potential and actual revenue of the campaigns you’re invested in. You’ll need these data points later—so even if you don’t have them in place now, be sure to ask for them.
Step #3: State Your Goals
These goals could be general or you might want to create a unique goal for each line of service you offer. Using previous Dynamics data, determine:
- How many opportunities did it take to get to your sales goals?
- What was your average deal size?
- How many leads did you need to meet those sales goals? Look for outliers and use average deal size.
- How many MQLs do you expect and at what rate do you turn them into SQLs?
Step #4: Start with the Best Lead Source
Now that you have data to support which of your lead sources drives the highest quality leads and biggest sales dollars (this is easy to do if you’re tracking Lead Source and Source Campaign for every single Lead), you can determine which source is your best source. Is it tradeshows? Paid search? Memberships? SEO?
Keep track of why you picked this Lead Source so that your sales and customer success teams understand why you’re starting with it.
Step #5: Get Your Team Involved
The short version of this is that you’ll want to invite every person who engages with any part of the funnel. For most organizations, this will include Marketing, Sales, Support, and Customer Success. The goal is to invite these people to a meeting where you can have a collaborative discussion about what’s actually happening at each stage—not just what the data says, but what the actual conversations are like.
Preparing for Your Customer Journey Mapping Session
As you prepare yourself and your team for your first customer journey mapping session, be sure to let everyone on the team know their role. You’ll have your most profitable lead source as your starting point, so be sure everyone who touches that lead source will be in attendance.
Next, drill down on a handful of good examples, and ask your sales team to do the same. Have them each bring examples of emails passed back and forth, notes from sales meetings, or remarks made in conversation that could be relevant to understanding what’s happening (versus what you think is happening). Sometimes it helps to pick a handful of opportunities you have won, lost, and have open in Microsoft Dynamics to frame the conversation on concrete examples.
Your meeting goals are to answer:
- What’s missing at each stage?
- Are we over/under communicating?
- Where is sales getting stuck? Can marketing help?
- Is there more opportunity in the pipeline?
- Are there broader goals marketing can support on the client side?
- Are we working hard enough to turn existing clients into advocates?
What Happens Next?
You should walk away from the customer journey mapping session with a clear understanding of what campaigns you need to create, where marketing needs to fill holes in the funnel, and how you can better support each team with marketing initiatives. Now you’ll want to build a campaign map to help you identify what data points you need in Dynamics to make these campaigns happen, like so:

Once you have mapped your best lead source, you will want to work your way down to your worst lead source. Keep in mind that most marketing strategies have many campaigns but fewer than a dozen tactics—stay focused on the big buckets (like conferences, digital ads, webinars, SEO) so that you don’t get lost in the weeds.
Learn more about the emfluence Marketing Platform's integration with Microsoft Dynamics and how it can improve your marketing strategy at each stage of the customer journey.
- Microsoft Dynamics' Role in Mapping the Customer Journey
- Turning Marketing Qualified Leads into Sales Qualified Leads (with a Little Help from Marketing Automation)
- Sales and Marketing Alignment with Marketing Automation
- Dynamics CRM: Improving Customer Relationships in an Over-Connected World
- Working with Data is Easy with Microsoft Dynamics CRM
1 thought on “How to Build a Customer Journey Map with Microsoft Dynamics”
Found this blog while doing the customer journey. It is great material to read. Thank you!
Comments are closed.
- 888-796-6783
- Follow Us on
- Sales: (303) 728-3335
- Support: (888) 796-6783
- Channel Partner
- Client Portal
Improving the Customer Journey with Dynamics 365
Home / Insights / Blog / Improving the Customer Journey with Dynamics 365
February 21, 2019 - by Kewal Shah
As the customer takes center stage in every industry, a transformational shift in the way businesses interact with customers is vital. With customer experience now becoming more important, the key to increasing customer loyalty is understanding the customer journey , mapping it correctly, and optimizing processes around for effective acquisition and retention of customers. A great start to devising an effective customer experience strategy is by working with the right tools; the Dynamics 365 customer journey offers a unified platform that enables businesses to quickly and easily engage with customers, empower employees, and improve service levels and responsiveness.

Not sure if you are ready to take the next steps towards Microsoft Dynamics 365? Here are 5 reasons that you should consider before moving forward.
What is the customer journey.
The primary goal of any organization is to constantly sign on new customers, in order to grow the business, revenue, and profit. As a result, sales and marketing teams come together to deliver the best possible buying experience for prospective customers; this includes mapping out the journey that the prospect will travel while engaging in the buying process. Creating a customer journey enables you to clearly understand how prospects progress from discovering your business, to learning about your product or service, to evaluating their options, and finally making a purchase.
Every interaction a customer has with your company, product, or service constitutes the customer journey. When a customer buys your product or service, it is a result of all the interaction he/she has had leading up to and following the purchase. According to Forrester , “The customer journey spans a variety of touch points by which the customer moves from awareness to engagement and purchase”. Developing a seamless experience that ensures each touch point interconnects and contributes to the overall journey is essential to ensure customer satisfaction.
Customer Journey in Dynamics 365
As businesses engage potential customers, Dynamics 365 streamlines the process by which customers start discovering a product, evaluate whether it meets their needs, look for a good offer, and finally make a purchase. The Dynamics 365 customer journey helps you guide your employees through the process by using automated messaging, activity generation, interactive decision points, and more. You can either simply identify a target segment and create a simple email campaign that addresses prospects of that segment or go out and create a detailed customer journey that helps you plan, automate, and monitor the entire journey as prospects travel from discovery, through nurturing, and on wards to becoming qualified leads.
- Choose from a variety of customer journey templates with pre-made structures and get started quickly.
- Build a collection of contacts or segments grouped according to some common attribute or explicit assignment.
- Schedule follow-ups and trigger workflows around marketing initiatives, decision points, or internal action items.
- Drag and drop tiles and create unlimited custom workflows, assigned to specific segments of contacts.
- Automate each stage in the journey to execute a step such as sending an email or closing a deal – either through scheduling, or when triggered by a particular customer action.
- Create and run online surveys and integrate them with your events, marketing emails, and customer journeys.
- Create inbound customer journeys for entirely new and unknown contacts that register for a newsletter, share your social media post, or engage with you through any platform.
- Invoke custom workflows at any point in the customer journey and advance a process stage, create alerts, and more.
- Create LinkedIn campaigns and sync your LinkedIn campaigns back to Dynamics 365.
- Get a real-time view of all the planned activities with respect to any customer engagement including phone conversations, emails, and meetings.
- Create leads and link it to the contact who created it or to the account that the contact belongs to.
- Get insight into contact interactions: from how many interacted with an email to how many did not engage as well as your journey’s performance in the form of dashboards.
- Set up recurring journeys to reprocess all contacts at regular intervals.
Standard Customer Journeys and How Dynamics 365 Optimizes Each Step
The best way to enable a seamless customer journey is by making customers happy at every touchpoint –before, during, and after the purchase; identifying the various touchpoints and offering customers what they need is extremely important for customer loyalty. Let’s look at the basic steps in a standard customer journey and how Dynamics 365 helps optimize the journey at each touchpoint:
1. Awareness
The awareness stage is when buyers identify their challenge or opportunity, they want to pursue and discover your business as an option that can fulfill their challenge.
Dynamics 365 allows marketers to generate leads across multiple sources like emails, LinkedIn, webinars, and events. If a prospect has been looking for a particular set of services, you could send them an email, offering just what they need. With contact information that is always up-to-date, you can easily take your leads into Dynamics 365 and create insights from your campaigns to increase effectiveness. This allows you to create content that targets the right people at the right time using the right campaigns, which in turn creates better conversion rates.
2. Consideration
The consideration stage is when buyers have clearly defined the goal or challenge and have committed to addressing it. They evaluate the various approaches or means available to achieve the goal or solve their challenge.
With Dynamics 365’s marketing automation, you can choose from a host of different ways to nurture leads: create a marketing list, one-time email, weekly offers or monthly newsletters – you can send personalized messages at timed intervals to keep customers in the loop. By entering prospects into the list, you can choose the appropriate means of communication to start their customer journey.
3. Purchase
The purchase stage is when customers make the decision: to buy or not to buy. The focus here is on the price, the ROI and the value proposition, and customers will more than likely want a face-to-face interaction at this stage. They also want to be assured that with the purchase, they have made the best decision.
Dynamic 365 enables sales professionals to track the most important information about the sales process: from notes, opportunities, quote documents, and invoices to the signed documents. This makes the purchasing process much easier for customers as they receive the right information at the right time. Advanced personalization reflects a customer’s order history, their preferences and other details that help increase engagement. You can use this data and turn it into actionable insights to make improvements and strengthen customer relationships. The lead management tools intuitively help track, score, and nurture leads more effectively.
4. Retention
In today’s service-oriented world, the customer buying process does not end with purchase. Retaining customers is far more important, but unfortunately many organizations end their relationship at purchase, when the customer is looking at a long-term experience with implementation of the product or service, and with after sale support.
Dynamics 365 enables you to offer the best possible experience throughout the customer journey leading up to ongoing service, and after-care support, ensuring you have a long-lasting relationships with your customers. It allows you to set follow-ups, and provides reminders and alerts to proactively engage with customers. Personalized email messages at regular intervals help deliver content in the form of news, offers, events, and other related content. Track every little detail about customers and have all customer related information in one place for easy traceability. And capture timely customer feedback through surveys to assess performance and take corrective measures.
The Road to Success
With customers becoming more informed and connected than ever before, the balance of power has shifted. Organizations no longer have control over their relationships with customers; it is the customers who are calling the shots. So, ensuring every customer experience is exceptional throughout the lifetime of the relationship has become imperative; this includes completing a journey map for each stage of the relationship – awareness, consideration, purchase and retention in addition to ongoing service as well as after-care support. Dynamics 365 enables you to create customer journeys from scratch by choosing from a collection of templates. Using the Dynamics 365 customer journey, not only can you only engage with customers across various touch points, but also continuously track and monitor each engagement to persistently improve customer experience and increase revenue and embark on the road to success.

Related Insights
Talk to experts, have a question let's talk.
- Privacy Policy
© 2024 Synoptek, LLC. All Rights Reserved.
Customer Journeys in Dynamics 365 Marketing
In Dynamics 365 Marketing, a Customer Journey is a curated, end-to-end customer purchase process, including all contact and decision-making points. With multifaceted campaign automation, it identifies leads and guides the target audience to move toward purchasing as they interact with your company.
One of its core elements is communication automation, triggered by both specific audience actions and their machine-generated scores based on customizable criteria. For example, our clients have been able to set up branching and responsive event communications based on customers’ behavior, including open and click rates, event sign ups, attendance, and more.
Table of Contents
Parts of a Customer Journey in Dynamics 365 Marketing
Video walkthrough of customer journeys.
- Benefits of Customer Journeys
- Use Cases of Customer Journeys
- Strategic Considerations for Customer Journeys
Limitations of Customer Journeys in Dynamics 365 Marketing
Further resources, customer journey: definition.
In general terms, a customer journey describes a prospect’s or a customer’s complete series of interactions with your company across all channels. For instance, a prospect might interact with your social post, browse your website, and sign up for your newsletter before ever talking to a salesperson or making a purchase.
A Customer Journey is essentially a complex marketing campaign in Dynamics 365 with functionality that creates branching maps of possible paths. It includes a drag-and-drop journey designer which contains a dynamic pipeline consisting of steps to send personalized email or text messages, schedule follow up activities for sales team members, trigger workflows, and execute campaign-related activities. As each member of the target segment progresses down the path, their reactions and interactions are tracked in the system, providing insight into the true reach and effectiveness of the marketing initiative.
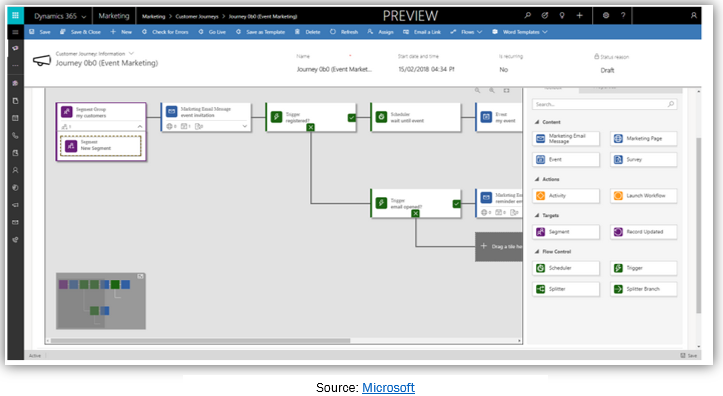
Core Customer Journey Tiles
Customer Journey tiles are the building blocks of all Customer Journeys. They include smart segmentation, automatic actions and scheduling sales activities, as well as if/then and split logic with wait and delay times.
- Wait For vs Wait Until
- If/Then Branches
- Communications
- Custom Channels (talk to your Dynamics 365 partners about development for unique needs)
Real-time Customer Journey Tiles
Real-time Customer Journey tiles are additional tiles that enable “moment-based” marketing, which provides the audience with immediate, personalized interactions based on their unique profile, changing needs, and journey frequency.
- Custom Branching
- Journey Repetition Frequency
- Custom Journey Exit Points
- A/B Testing and Reporting
- Text and Push Notifications
- AI-based Channel Engagement
- Custom Triggers
How to Create a Customer Journey in Dynamics 365 Marketing
- Go to Marketing > Marketing Execution > Customer Journeys.
- Click on “+ New” in the Command Bar.
- To start creating a completely new Customer Journey, click on “Skip” in the template selection dialog box.
- In the Customer Journey designer, click on the “+” or “Set Audience” link.
- Select the target “Segment” that is the audience of the Customer Journey.
- Click on the “+” in the canvas and select “Send an Email” from the menu.
- Select the email tile and then add the specific Marketing Email that you want to add to the Customer Journey.
- For emails that contain a link to secondary location like a Landing Page, go to the “Send an email” tile Properties to add the correct Page.
- On the Customer Journey canvas, add an “If/then” tile to the right of the “Send an Email” tile.
- Set the Source to the name of the Marketing Page in the “Send an email” tile and set the Condition to “have registration”.
- Set the “Wait up to” to the length of time you want the system to wait before executing the action based on no interaction (the “NO” path). This is the longest time the system will wait to execute an action since you will set the wait criteria of the positive (“the “YES” path) interaction in the next step.
- To the right of the “If/then” tile, add two “Send an Email” tiles. Place the one for the positive path at the top and the one for the negative path underneath it.
- Save the Customer Journey.
- Go to the “General” tab to name and schedule it.
- Click on “Check for Errors” for the system to generate any error notifications. If errors are found, click on the drop down next to the error notification to find and fix the errors.
- Click on the “Go Live” button on the Command Bar to publish the Customer Journey.
Benefits of Customer Journeys in Dynamics 365 Marketing
Customer Journeys automate the myriad of manual activities that marketers must create, execute, and maintain as Marketing and Sales teams interact with their audience. Marketers can see the specific effects of every executed action including click maps and behavior statistics so they can make informed edits in real-time.
For speedier set up, marketers can leverage basic templates as a foundation for their own journeys. Custom templates can also be created and reused for recurring marketing efforts such as annual events or similarly structured campaigns to ensure both accuracy and speed in the set-up process.

When the marketing team is ready to allow the Customer Journey to run without supervision, AI optimization watches past responses and path changes to predictively guide the right audience members through the right branches. (The journey can still be paused or edited whenever necessary.) This allows a smaller workforce to accomplish the tasks of large department, freeing them up to focus on campaign strategy.
Use Cases of Customer Journeys in Dynamics 365 Marketing
Customer Journeys are very helpful for companies that need to increase their marketing efficacy and increase both Marketing Qualified Lead (MQLs) and Sales Qualified Leads (SQLs) without increasing head count. These companies are interested in participating more strategically in the customer lifecycle to provide better overall service and create a faster path through the sales pipeline.
Likewise, companies who want to track digital marketing activities against actual revenue and understand which are the most effective at bringing in new customers will benefit from Customer Journeys.
Strategic Considerations for Customer Journeys in Dynamics 365 Marketing
Before you set up Customer Journeys, you should consider how your customers interact with your company and how you would prefer your teams interact. Understanding the variety of paths that a prospect or customer can take to assess and complete a purchase is important to design journeys that provide the proper reactions and next steps for the audience.
After you set up Customer Journeys, you should monitor changes in your lead qualification and opportunity win/loss rates. Then marketers can work backward through published Customer Journeys to find the exact points that are successful.
Ask an experienced Dynamics Partner to help you map the appropriate actions along your customer paths as well as create the tracking dashboards and notification mechanisms that allow your Marketing team to make critical decisions.
It’s important to be aware that Customer Journeys can’t create a map of your customer’s interactions for you, nor can it create optimal paths from scratch. Customer Journeys require understanding your prospects’ and your customers’ existing processes and designing paths that are right for each group.
Customer Journeys also do not create system workflows, but they can connect existing Power Automate workflows with the journey to add more complexity.
For broader context, read our Intro to Marketing Automation in Dynamics 365 . And for more foundational information on Dynamics 365 Marketing, read our What is Dynamics 365 for Marketing or Microsoft’s overview .
For help understanding how Customer Journeys can work for your company’s specific needs and processes, reach out to a skilled Microsoft Dynamics 365 Marketing Partner like Encore .
What are the steps in a CRM implementation? What are the biggest causes of failure? How long will it take?
CRM Implementation: 12 Key Questions Answered

Andrea Oklobdzija
Andrea is a Microsoft Certified Dynamics 365 Customer Service Functional Consultant, Dynamics 365 Sales Functional Consultant, and Power Platform Functional Consultant. She has experience in multiple industries, including information technology, energy and utilities, and environmental services. Andrea is skilled in business and system requirement gathering, analysis/design, development, and implementation.
Related Articles
Salesforce vs dynamics 365 crm solutions: what’s best for you, create an organization chart in dynamics 365 sales.
Tech Insights 6 min read
How To Create a Customer Journey in Dynamics 365 Marketing ?
If you are new to Dynamics 365 Marketing, and even otherwise, creating a customer journey in the platform could sound like a new buzzword to you. So, how do you create it?
Before I go into the details, I will like to brush up the basics. Let’s see what the customer journey in Dynamics Marketing 365 is.
Dynamics Marketing 365 Customer Journey, What Is It?
I will start with the customer journey first.
What Is A Customer Journey?
It is a story that sums up the buying pattern, behavior, and understanding of your users. It is a journey of your customer describing how they land on your website, what their goals are, and what you can do to improve their journey, so they keep coming back. In short, a customer journey is a variety of touchpoints through which the customer moves from the awareness stage to engagement and finally makes a purchase.
Forrester rightly describes the customer journey as a variety of touchpoints through which the customer moves from the awareness stage to engagement and finally makes a purchase.
So, Next Up, What Is Customer Journey In Dynamics Marketing 365?
In my view, Dynamics Marketing 365 simplifies the entire process of tracking the customer journey by providing a WYSIWYG platform. It streamlines the entire process by which customers discover your product and evaluate it for their needs before making a purchase. All the information gathered is tracked and folllows throughout the rest of the Dynamics 365 suite, providing a seamless experience for your team.
Dynamics 365 Marketing customer journey makes it easier for your employees to map out the various touchpoints that your customer go through, using automated messaging, interactive decision points, activity generation, and so on. Additionally, many actions can now be automated , which relieves your team of some redundant tasks.

What Are The Benefits Of Doing Campaigns And Quick Campaigns With Dynamics 365 Marketing?
The core advantage of using Microsoft Dynamics 365 is campaign management. For starters, the platform allows you to manage two different kinds of campaigns – Campaign and quick Campaign.
While Quick Campaign allows you to target a single list of contacts or customers, you can target multiple marketing lists with Campaign and make the best use of available templates and metrics.
That is to say, running Campaign and Quick Campaign in Microsoft Dynamics comes with a range of benefits, including:
- Understand your leads better
- Create graphical content to support marketing initiatives
- Make the most out of your LinkedIn business prospects
- Facilitate easy knowledge sharing between the teams
- Prioritize leads for more conversions
- Derive actionable outputs from surveys
- Easily track campaigns and evaluate results to build profitable long-term relationships
Dynamics 365 Marketing Customer Journey: References And Explanation Tiles

- Email: The email tile automatically sends an email to each contact that enters the customer journey.
Branches tiles help you exercise control over your pipeline, depending on your leads’ interaction record.
- If/Then: If/then tile holds contacts until a certain condition is made, or until a pre-set amount of time expires.
- Split: Splitter tiles provide a pathway to a random selection of contacts.
- Wait for: This tile holds comtact for a certain period of time before passing them to the next tile in their journey. This tile could be used to introduce a delay between sending an initial marketing message and then sending a reminder.
- Wait until: This tile holds contact until a certain date is reached, say Dec 20.

Actions tiles trigger a new action or launch a workflow within Microsoft 365. These tiles, essentially, help you to follow up on crucial touchpoints during a customer journey.
- Create Lead: This tile, quite predictably, builds a new lead for each contact that enters this tile. However, this tile will not cross-check if the lead is already existing, and will always create a new one.
- LinkedIn Campaign: This tile passes each contact which comes in contact with it to a specific LinkedIn campaign, thus making it easier for the next tile to get triggered if any of the lead gen forms belong to the concerned campaign on LinkedIn.
- Launch Workflow: A launch-workflow tile is used to invoke a custom workflow, irrespective of the position of a customer in their customer journey. You can use these workflows to create alerts, and more, according to the needs of your marketing campaign and strategy.
Sales Activities
These tiles record the completed or planned real-world activities. For instance, when a contact enters a Task, a Phone Call, or an Appointment task, the tile generates a new actvitity respective to that contact.

Custom Tiles
Custom content tiles, essentially, provide you with the same set of features as the other tiles mentioned above. The difference, however, is that these tiles are created by partners and third-party developers.
Legacy Tiles
- More often than not, an event tile is positioned under email tiles, where they contain a link to the website being talked about in the email content.
- Marketing-Form
- A marketing-form tile is an embedded form generally hosted on a third-party website. You can append this form towards the end of your email and place it at the start of the journey to activate an inbound campaign.
- Marketing-Page
- This tile represents a native page designed in Dynamics 365 and running on a Dynamics 365 platform.
How To Create A Customer Journey In Dynamics 365 Marketing
In this section, I will teach you how to create a customer journey in Dynamics 365 Marketing. But before I start, I recommend you have these two things:
- A segment that contains the contacts you will send the email to.
- A marketing email that is live and valid.
Next, here are the steps you need to follow for creating Dynamics 365 Marketing customer journey:
- Head on to Marketing > Marketing Execution . Next, click Customer Journeys > New .
- This will open the New Customer Journey page with a dialog box that says Select a Customer Journey Template . You can use this template to design a customer journey. If you want to start from scratch, click Skip .
- You will be taken to the customer journey Designer . Here, can create a pipeline representing each step of the journey.
- Select Set Audience , or click Select + . You will find Audience properties pane on the right side of the page. Leave the default settings as it is.
- From the segment lookup field, select the segment you want to target with your campaign.
- As you select the segment, the segment name will be populated in the first tab, and the Audience pane will display the corresponding segment properties.
- Next, click Select+ , and select Send an Email .
- Select the email tile and the message that you want to send on the canvas.
- This will populate the Send an Email tile with the email name. Segment preview and properties will be displayed in the Send an Email properties pane.
- Switch to the General tab from the Designer tab and enter the name, start date time, end date time, time zone, and define the content settings.
- Now, save the work you have done so far.
- To ensure that everything is in line with your requirements, click Check for Errors in the command bar. Fix any errors if indicated. If not, your journey is ready to go.
Generating Activities From A Dynamics 365 Marketing Customer Journey
Yes, you can also generate activities from a customer journey. Activities can be used to record customer interactions, such as appointments, phone calls, and tasks. You can get these activities from your customer journey the same way you created a customer journey with signups. Follow the same procedure and then append an Activity tile to the trigger that triggers the phone-call task associated with each contact who submits the registration form.
Automate Your Campaigns in Dynamics 365 Marketing With Customer Journeys
Dynamics 365 Marketing is a storehouse of customer journeys. You can generate as many as you want by visualizing and automating the paths that your customers will adopt to make a purchase.
A customer journey could be extremely simple, like the one only involving a short interaction, like a single email campaign. On the other hand, a more complex journey could include a complete process from discovery to getting converted to a lead.
How To Design Your Journey
You can view and create your customer journeys by going to Marketing > Marketing Execution and clicking on Customer Journeys. A marketing-form and marketing-page tile can be nested under an email tile to activate triggering. You can also place it at the beginning of the journey to create an inbound campaign. Event tiles are nested below the emails to trigger a set of events.
I understand that creating a Dynamics 365 Marketing customer journey could be overwhelming, especially when you have tons of other tasks to take care of. This is when GestiOnTheGo helps you create awesome customer journeys that track each step of your customer through various touchpoints and provides you with the required data and insights.
Got any queries or stuck anywhere? Contact us today .
Liked what you just read? Sharing is caring.
December 09, 2020 by Frédéric Charest by Frédéric Charest VP of Marketing
Data-driven Growth Marketer with a Passion for SEO - Driving Results through Analytics and Optimization
Related resources
Tech Insights 9 min read
What are the benefits of Power BI?
Tech Insights 24 min read
An Overview of the Different Modules of Microsoft Dynamics 365
Tech Insights 15 min read
What is Power Apps (Microsoft Power Platform)?
Tech Insights 4 min read
What are the different types of security roles in Dynamics 365 ?
- Engagement Tracking
- Certification
- Subscriptions
- Microsoft Dynamics 365
- Microsoft Power Platform
- Dynamics 365 for Sales
- Dynamics 365 Customer Insights
- Marketing Automation
- Association
- Accreditation
- Small Business
- Cloud Migrations
- Implementations
- Support & Managed Services
- Microsoft Licensing
- Project Rescues
- Customer First Approach
- Transparent Contracts
- Careers & Culture
- Current Job Openings
- Customer Support
- Partnerships
- Customer Case Studies
Using Microsoft Marketing Forms + Customer Journeys in D365
Capturing the right information from customer prospects for your sales team is a universal challenge. Today, I want to show you how Microsoft Marketing Forms and Customer Journeys in Dynamics 365 Marketing can help your team get the right data early with “top-of-funnel” prospects and compress your sales cycle. In this post, I will walk you through how to setup a Landing Form page in Microsoft’s Dynamics 365 Marketing, how to embed the form to your website, and then how to set it up to generate leads automatically with Customer Journeys.
Let’s start with a quick overview of the tools we’ll use.
What are Microsoft Marketing Forms?
Microsoft Marketing Forms are the form fields, button(s), graphics, and configuration settings used to create customized form templates within Dynamics 365 Marketing. There are three different marketing form types in D365 Marketing (landing page, subscription, and forward to a friend) and each has unique features and customization possibilities.
For this article, I will focus on a landing page form since they are such a common, general-purpose option for creating new contacts or updating existing contacts in your CRM while they are still early in the sale cycle.
What are Customer Journeys in Dynamics 365 Marketing?
The Customer Journeys tool in Dynamics 365 Marketing allows you to create highly customized maps for automated interaction with prospects and current contacts or customers. Once you’ve built a Customer Journey, D365 Marketing users can monitor the effectiveness of their map, refine based on additional data that has been collected and sophisticated AI suggestions and insights.
There are many additional possibilities for Customer Journeys in Dynamics 365 Marketing when used seamlessly in conjunction with Customer Insights, but for this demonstration, let’s just focus on a solid, baseline integration with a sample Microsoft Marketing Landing Page Form.
Step 1: Create a Landing Page Form in Dynamics 365 Marketing
To start out, go to the Marketing Forms entity on the left-hand side navigation. Select “New.” You can select an existing form template or go with a blank template. Whether you’re using a template or starting from scratch, you will be able to use the powerful, intuitive Form Designer and Toolbox. Now, give your form a name and select the Form Type as ‘Landing Page’.
Step 2: Create the Basic Design for Your Microsoft Marketing Landing Page Form
In the Designer, you can select from a variety of tools. These include text boxes, submit buttons, fields, subscription lists, or a ‘Do Not Email’ checkbox. To add these any of these items to your form, navigate to the right-hand side and select ‘Toolbox’. Use the drag-and-drop functionality to configure which elements you want in the form, but be sure to include a submit button.
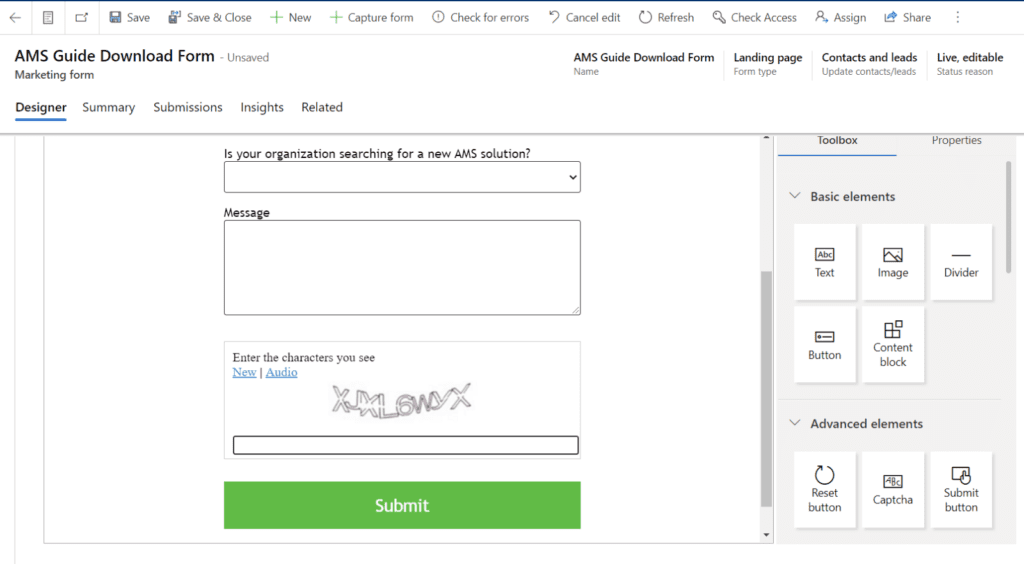
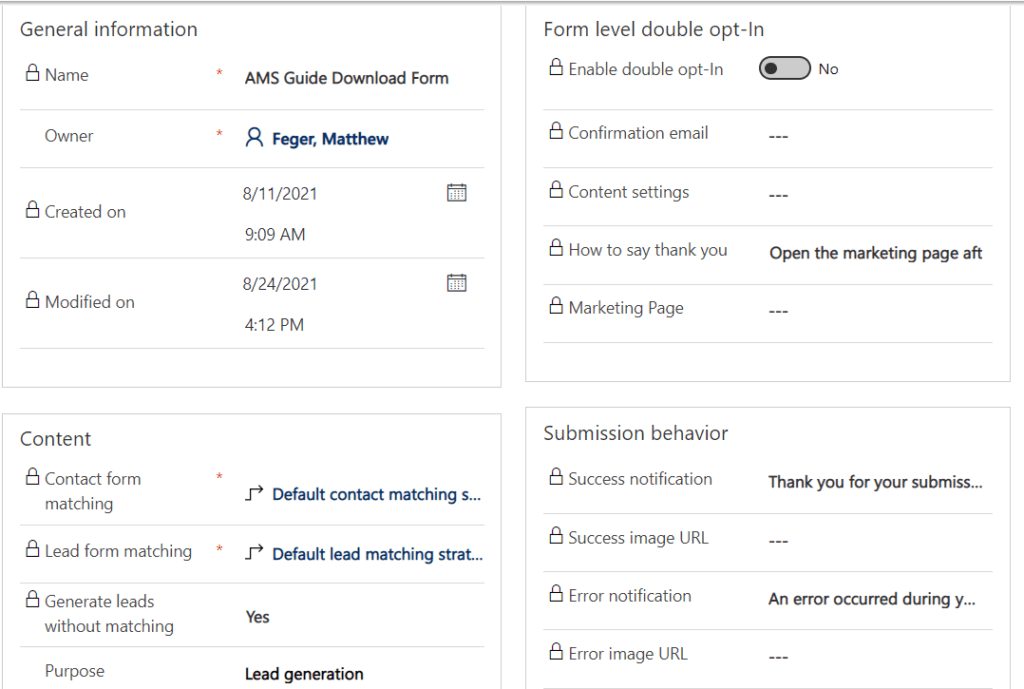
Step 3: Configure Your Landing Page Form
Now that your form is setup is completed, you can use the Summary tab to rename your form and configure the settings. This includes Contact and Lead matching , Error notifications, Redirect URLs, and Double Opt-In.
Contact and Lead matching has a default setting that will map the data back to CRM based on the form submission. If the data exists in CRM, the Contact/Lead will be updated accordingly. If it does not exist, then a new record will be created. These settings are highly customizable to the ways you want your form to behave.
Step 4: Embedding a Microsoft Marketing Form on Your Website
Once you have configured the form, click ‘Check for Errors’ using the button on the top ribbon. After this has been complete, click ‘Save’ and then click ‘Go Live’ on the top ribbon. Your form setup is now complete, but now you need to get it on your website.
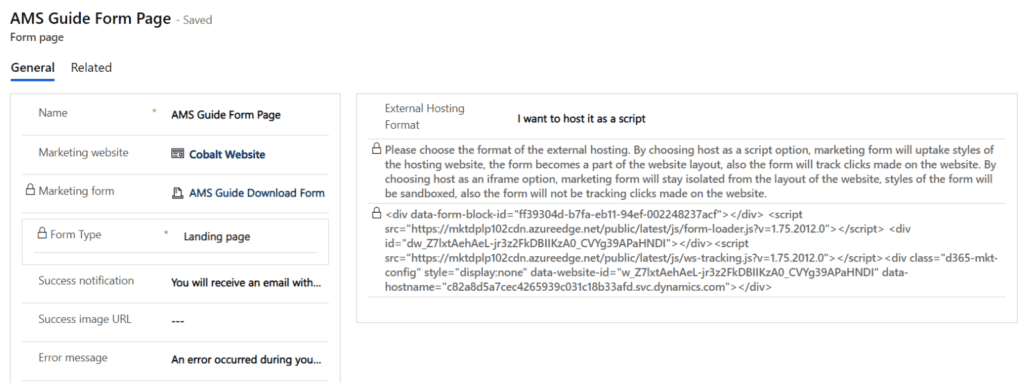
In the Related Entities drop down, click ‘Form Pages’. It will bring you to the Form Pages view. Click ‘New Form page’. By default, it will bring you to a ‘Quick Create’ page to add a Form page. Enter in the required fields and click ‘Save and Close’.
Navigate to the Form page you just created. On the right-hand side, for the External Hosting Format, choose ‘I want to host it as a script’. Below that field, you will find the script that you will use to embed your form on the website. Copy and paste that script into the HTML for the page you’ve selected on your website, or into a block editor of WordPress or your Content Management System.
Step 5: Create a Customer Journey in Dynamics 365 Marketing
Now that you have your Microsoft marketing landing page form configured and embedded on your website, let’s tie it all together by creating a Customer Journey in D365 Marketing. This will allow you to use submissions to your new form to create new or updated contacts in your CRM. Then you can configure your Customer Journey to automate subsequent interactions that will turn this inbound lead into a prospect in your sales cycle.
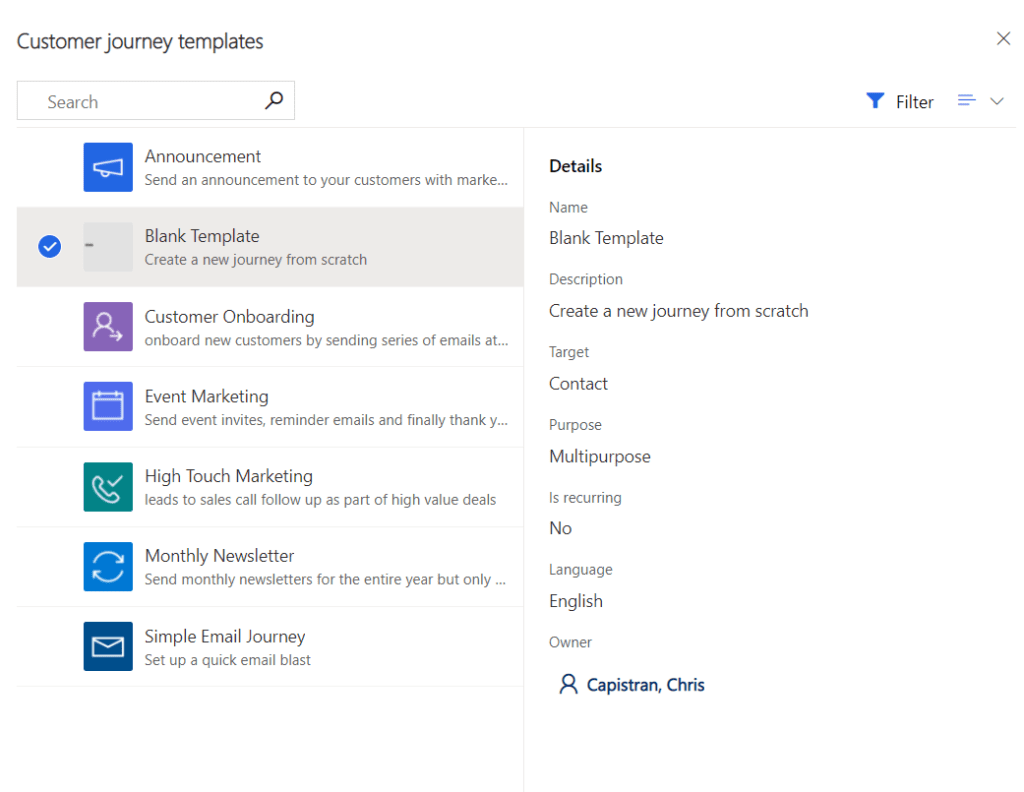
Go to Customer Journeys and select ‘New’. Setup a Blank Template and press ‘Select’.
Step 6: Design & Configure Your Customer Journy in Dynamics 365 Marketing
In the Customer Journey Designer, you can set the Audience to determine who should be placed into your Customer Journey. The Audience is the target segment that your Customer Journey will start with. In this case, we will be making our segment source ‘Submitted a Form’.
This Segment will be the submissions from the form you created earlier in this process. Select ‘Set Audience’, and then set the Source Type to ‘Submitted a Form’. In the box below, search for and select your Marketing Form.
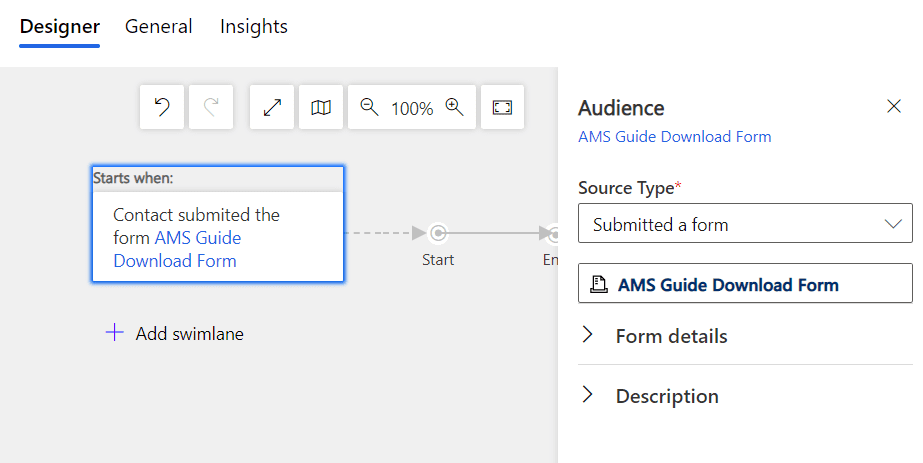
When a potential new customer submits that form embedded on your website, the form submission will kickstart the Customer Journey.
Now that you have your Customer Journey segment, you can now add tiles and actions to the journey. These include data creation tiles, sales activities, sending emails, running workflows, or even your own custom tiles.
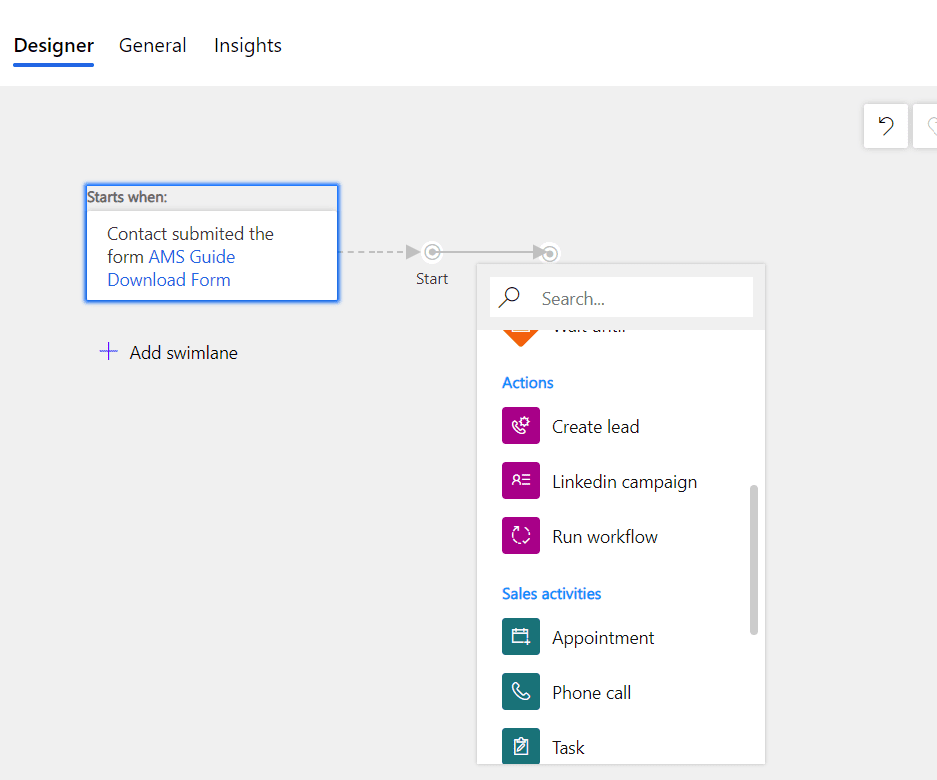
These tiles determine where you want the customer journey to go. In our example, we are sending an email for the customer regarding our Cobalt’s Definitive Guide to Choosing a New AMS/CRM , but there are many ways you may approach the Customer Journey functionality. There is no “right” way; ultimately it you should tie your Customer Journeys to your ideal Sales process. In this helpful guide from Microsoft , you’ll find brief overviews of four common maps for Customer Journeys: Current State, Day-in-the-Life, Future State, and Service Blueprint.
Step 7: Finalize, Save, and Deploy Your New Customer Journey
After you have configured your Customer Journey, you can ‘Save’ and then click ‘Check for errors’ on the top ribbon. This will get you ready to Go Live. Clicking ‘Go Live’ will take a minute or two, but once that passes you are ready to go!
Final Thoughts
If this is your first time exploring this corner of Microsoft Dynamics 365 Marketing’s functionality, I hope you are excited about the possibilities for team. Dynamics 365 Marketing and Dynamics 365 Sales are some of the most powerful and seamlessly integrated tools for available for organizations today.
Our team at Cobalt is constantly expanding the 20+ years of Microsoft CRM and 365 knowledge we have established so teams like yours can truly get the most out of your CRM investment. I would love to help you see additional ways to use Microsoft Marketing Forms and Customer Journeys in Dynamics 365 Marketing. Send me your questions, comments, or feedback.
James Rathgeber Software Product Generalist, Cobalt
Schedule Your Product Showcase
Add cobalt and transform what is possible for your organization.
Customer Insights — Journeys — Email
Email is a vital marketing channel for most modern organizations. It is also a core feature of Customer Insights — Journeys, which provides tools for creating graphically rich marketing emails with dynamic, personalized content. In this video titled Creating Emails you will learn the fundamentals of email marketing.

Supporting Resources for these videos
- Create real-time marketing emails
- Leverage Artificial Intelligence to kickstart email creation
Navigation Menu
Search code, repositories, users, issues, pull requests..., provide feedback.
We read every piece of feedback, and take your input very seriously.
Saved searches
Use saved searches to filter your results more quickly.
To see all available qualifiers, see our documentation .
- Notifications
trial-signup.md
Latest commit, file metadata and controls, sign up for a free customer insights - journeys trial.
[!INCLUDE azure-ad-to-microsoft-entra-id ]
Customer Insights offers a free 30-day trial. After a quick sign-up, you'll have access to many of the Customer Insights - Journeys and Customer Insights - Data apps' key features. The trial allows you to test the app with sample data and even try out your own customer data. Learn more about Dynamics 365 Customer Insights - Journeys features
The trial now includes the Dynamics 365 Customer Insights - Journeys and Dynamics 365 Customer Insights - Data applications installed on the same Dataverse environment. Prior to September 2023, these were two separate trials on two separate environments.
To sign up for the self-service trial :
- If your tenant admin doesn't block self-service trials on your tenant, go to the trial overview page and select the Try for free button.
- To sign up for a Customer Insights trial, you need to use a work or school email address. If you don't have a work or school email address, your tenant admin doesn't allow self-service trials, or if your school or work account isn't managed by Microsoft Microsoft Entra ID , sign up for a free Office 365 E5 trial , then use the email address associated with your Office 365 E5 trial to sign up for the Customer Insights trial.
- For the Customer Insights - Data app, you start in a demo experience. To enable Customer Insights - Data on the same Dataverse environment as Customer Insights - Journeys, select the Start Trial button in the upper right corner. This completes the installation of the Customer Insights - Data application.
- To sync the segmentation data between Customer Insights - Journeys and Customer Insights - Data, in the Customer Insights - Journeys app area switcher go to Settings > Data Management > Customer Insights data connector and select Connect .
- Customers can have only one concurrent self-service trial on the tenant at a time. They can also have an additional admin (subscription-based trial) on the tenant concurrently if they have an admin trial license. Users on the same tenant who sign-up for the self-service trial are added to the existing self-service trial environment if one is already active. The trial can be converted to a production type environment once a paid license is on the tenant. To start the trial over, delete the trial environment in Power Platform Admin Center and sign-up for a new one. Trials nearing expiration can be extended one time by selecting a self-service button.
To setup an admin trial
- If your tenant admin doesn't allow self-service trials, they can get an admin trial license through the Microsoft Admin Center or through the Microsoft salesperson.
- On the Environments page in Power Platform Admin Center , select New and fill out the environment details. Select Subscription-based Trial as the type of environment. To ensure you can install apps on the environment, toggle Allow D365 Apps .
- On the Resources page, find Dynamics 365 Customer Insights or Dynamics 365 Marketing, select the ... ellipsis, then select Manage to open the installation management page.
- To manage installation of trials, select Trials . You'll see the subscription-based trial environment you created and you can then install Customer Insights - Journeys and Customer Insights - Data.
Customer Insights - Data trial
To install only a Customer Insights - Data trial on the same environment as the Customer Insights - Journeys trial, go to the Get Started page in Customer Insights - Journeys and select the Launch Customer Insights - Data button on the top banner. This allows the Customer Insights - Data application to know your environment ID and user ID and add the Customer Insights - Data application to the existing trial environment. Select the Start Trial button in the upper right to complete the Customer Insights - Data app installation.
To sign up for a separate Customer Insights - Data trial, go to the Customer Insights - Data trial sign up form and follow the prompts.
What if the standard trial doesn't meet your needs?
If you need to test enterprise-scale concepts prior to committing to a long-term agreement, you can directly purchase a month to month subscription and cancel it at the monthly renewal date if you find the application doesn't meet your needs. Visit the Microsoft Admin Center and search for Customer Insights in the purchase catalog to find the different subscription options.
What to try
Your trial environment includes many of the same features as the paid version. The links below guide you through some of the key features.
- Create a marketing email and go live
- Target the right customers using the query assist copilot
- Use Copilot to create journeys by describing them in their own words
- Create forms
- Send a targeted email blast
Additional resources
- Dynamics 365 Customer Insights free trial sign up page
- Explore Microsoft Learn training
- Watch videos on the product playlist
[!INCLUDE footer-include ]

- Business Decision Makers
- News and product updates
- Dynamics 365 Customer Insights
2024 release wave 1: Transforming experiences with Microsoft Copilot and Dynamics 365
- By Lori Lamkin, Corporate Vice President, Customer Experience
- Release wave
- Dynamics 365 Sales
- Microsoft Copilot for Sales
- Content type
In this extraordinary age of AI, we find ourselves on the brink of a profound revolution. Companies are looking for generative AI to solve longstanding problems around customer connection, loyalty, and seller productivity. Businesses are on a journey to become a digital-first business, not only to connect with customers, but to benefit from the advances in AI.
Both winning and retaining customers requires a unified customer understanding and ability to orchestrate experiences across sales, marketing, and service. To deliver exceptional experiences, businesses need a solution that breaks down data silos between applications and departments so sellers, marketers, and service agents can get the right information in the right interface at the right time.

Dynamics 365 2024 release wave 1
Release wave 1 brings new innovations and capabilities to transform your business.
Imagine if your sellers could effortlessly collaborate with contributing stakeholders and had the exact right information at the exact right time to make a persuasive sales pitch that speaks to the needs and wants of each individual customer to cement the sale.
Imagine if your marketing team could create the perfect end-to-end campaign, one that aligns input across departments, that pulls in the perfect target audiences, that includes campaign assets aligned with your brand identity. And instead of doing so in months, being able to create a good draft…in minutes.
Imagine if each time customers interacted with your company, no matter what department or touchpoint they engage with, they felt known, and each interaction built on the last.
With generative AI and our Microsoft Dynamics 365 customer experience solutions, these “imagine ifs” are reality.
The innovative capabilities that are coming to you in Microsoft Copilot for Sales, Microsoft Dynamics 365 Sales, and Microsoft Dynamics 365 Customer Insights will help you elevate the seller experience through AI-driven process transformation, optimize the buying journey with the power of data, and personalize every customer interaction.
Elevate the seller experience through AI-driven process transformation
A recent study of sales professionals showed that up to 70% of their time is used for administrative and non-selling tasks that reduce the quality of their interactions with customers.
With Copilot for Sales and Dynamics 365 Sales, we enable innovative AI-enriched experiences to support sellers as they move through the sales process. We help transform sales teams from just following leads and opportunities into being trusted advisors who can predict and support customer needs.
Copilot for Sales is designed to be an invaluable assistant helping drive productivity and improve sales efficiency. It combines all the unique role-based sales capabilities with Microsoft Copilot for Microsoft 365 to deliver a unified and highly relevant seller experience right within the Microsoft 365 suite of applications, keeping the seller in their flow of work. Sellers can use chat to identify answers to top sales questions, whether it’s to find out more about an account or opportunity, or to view the sales pipeline. We deliver relevant sales context using natural language and prompt-based actions.
Let’s look at some of the newest features within Copilot for Sales , an application for sellers who use either Dynamic 365 Sales or Salesforce but prefer to work within their Microsoft 365 productivity apps to manage their day:
- Enhance email summaries and replies to minimize app switching and provide a response that’s aware of the customer context. Insight related to sales such as buying intent is emphasized, and suggested changes such as updates to sales stages, opportunity budgets, or estimated close dates appear in the side panel allowing instant updates.
- Easily create meeting preparation reports that give you the information you need to engage your customers confidently. You can share the meeting prep with your team members so everyone can be on the same page with knowledge about the customer and the account. Using the power of Copilot in Word combined with Sales insight from your customer relationship management (CRM) application.
- Get immediate AI-generated tips, suggestions, and advice in Microsoft Teams meetings to help sellers concentrate on the meeting dialogue and ensure they can respond quickly to requests and possible challenges, such as competitor references, by surfacing relevant information when and where they need it.
- Generate post-meeting follow-up quickly and easily allowing sellers to follow-up with tasks and notifications that are generated from the Teams intelligent recap screens and review the key questions that need to be answered. Follow-up work with their team members can be managed using deal rooms and planner activities to review task suggestions and assignments ensuring no follow-up is missed.
- Keep systems up to date without the pain of manual effort. Copilot for Sales allows for quick creation of records, such as leads and opportunities, right in the Microsoft 365 surface area. In the Copilot side panel, create new records and update fields using pre-filled suggestions without leaving the screen.
Dynamics 365 Sales continues to be our market-leading CRM solution designed to streamline sales processes, cultivate customer relationships, and expedite deal closures for businesses of all sizes. We bring the power of generative AI right inside this surface area and help sellers transform their CRM interactions to support customer conversations and land deals. With the latest release we’re helping sellers to:
- Transform the CRM sales experience by using the immersive full-screen Copilot view right in Dynamics 365 Sales. Get all key information in one place including pipeline, suggested actions, deals in progress, and real-time insights on key accounts. Sellers can query that information to get further details and insights using natural language and suggested prompts. Use it to get started every day as a homepage for all sellers using Dynamics 365.
- Make the best use of prospecting time with intelligent lead management to make sure that sales development teams are using their time wisely and focusing on leads that have a higher chance of closing quickly. In this release, we’re adding qualification criteria that incorporate signals to help show how interested the customer is. The distribution of those leads is then improved based on seller capacity and our new notification alerts make sure that sellers don’t lose the opportunity to interact when the timing is right.
Optimize the buying journey with the power of data
It all starts with data. Generative AI takes what used to be specialized and trained roles and democratizes them so customer experience (CX) professionals can use and take advantage of the data, insights, and workflows from their CRM system. Generative AI will autonomously assist customers and sellers in their day-to-day experiences to:
- Elevate customer experiences in real time : With Dynamics 365 Customer Insights, CX professionals can now ensure customer profiles and associated insights are updated in real time based on data signals, allowing them to provide the most targeted and personalized experience as they engage with your website or mobile app, which will foster loyalty, increase engagement, enhance satisfaction, and drive higher conversion rates.
- Know your account better with AI-generated account summaries in Dynamics 365 Sales : With integrated data from Dynamics 365 Customer Insights, sellers can now quickly access a comprehensive overview of each account, enabling them to prioritize their work effectively and engage with customers in a more personalized and targeted manner.
- Maximize sales success with AI-suggested past successful deals : In Dynamics 365 Sales, sellers now have the ability to use the collective intelligence from past successful deals to identify and pursue similar opportunities effectively. This AI-driven feature simplifies the decision-making process and increases the likelihood of closing deals quickly. By analyzing personal success stories and industry-specific data, sellers can make well-informed decisions that enhance sales effectiveness. The strategic use of AI suggestions not only improves efficiency but also significantly raises the chances of winning deals, thereby boosting overall sales performance.
Personalize every customer interaction
Marketers and CX professionals are being empowered to go beyond automated spam to creating cross-channel cohesive, conversational experiences that drive loyalty and retention. The innovative capabilities in Dynamics 365 Customer Insights that are releasing in this wave enable CX professionals to:
- Take campaigns from concept to launch in minutes using Copilot in Customer Insights Journeys : With Copilot, instead of breaking down a series of fragmented work items, the team begins by telling Copilot the outcome they want to achieve . In minutes, they’re presented with the new project board, curating ideas for every component central to the campaign: such as segments, content, and journeys, all ready for review. It’s fueled by unified data from all sources of customer data, brand guidelines, past campaigns, and creative briefs.
- Generate unique on-brand creative assets in minutes : No more scouring media libraries or resorting to use of stock images. You can ensure images are on brand and personalized for each audience, generated by Copilot using the new Typeface integration. Copilot allows you to generate variations that then can be used for personalization —no special photo editing abilities required.
- Personalize omnichannel experiences with no code using Optimizely : Dynamics 365 Customer Insights and Optimizely now unlock omnichannel personalization and experimentation capabilities, enabling marketers and citizen developers to personalize every customer touchpoint with no code or prior expertise required. By combining insights and segments from Customer Insights with Optimizely audiences, you can create experiences that are tailored to your customer’s browsing activity, their loyalty, past engagement history, and other real-time signals. Moreover, you can continue the conversation or re-target your visitors by delivering the same consistent experience through customer journeys, based on which Optimizely treatment cohort the customer was part of.
With generative AI and Copilot, we’re revolutionizing the workflow for sellers and CX professionals. First, sending personalized content at every stage of the marketing campaign, improving the quality of sales leads, and next, optimizing the productivity of sellers and enhancing every single engagement with their customers, helping them to close deals faster, all thanks to Copilot. There has never been a more exciting and productive time to be a seller or marketer. We can’t wait for you to experience it.
Learn more about 2024 release wave 1 capabilities
The future of customer experience is here, and it’s driven by cutting-edge AI technology that empowers businesses to better connect with their customers, drive sales, and improve overall satisfaction for both customers and employees. This release wave is truly driving transformative change for customer-facing roles, so get your organization set up today.
To see how all of this comes to life, watch the CX overview segment of the Business Applications Launch Event and check out the 2024 release wave 1 plans to read more about these game-changing capabilities.

Related posts

Early adopters of Microsoft Copilot in Dynamics 365 Guides recognize the potential for productivity gains

Microsoft unveils AI features for manufacturers at Hannover Messe 2024

AI-powered innovations enhance customer service with 2024 release wave 1

2024 release wave 1 kicks off with hundreds of AI-powered capabilities for Microsoft Dynamics 365 and Microsoft Power Platform
This browser is no longer supported.
Upgrade to Microsoft Edge to take advantage of the latest features, security updates, and technical support.
Add dynamic content to email messages
- 2 contributors
If you’d like to try Dynamics 365 Customer Insights for free, you can sign up for a 30-day trial .
This article only applies to outbound marketing .
Dynamic content gets resolved just before a message is sent to a specific individual. You'll typically use dynamic content to merge information from the recipient's contact record (such as first and last name), to place special links, and to place information and links from the content settings. If you're comfortable working in code, you can also create custom logic that includes conditional statements, for-each loops, and more. You can use dynamic content anywhere in your message body and can also use a few types of dynamic values in the message header fields (subject, from address, and from name).
Use content settings to set up repositories of standard and required values for email messages
Content settings are sets of standard and required values that are available for use in marketing email messages. Each includes a subscription-center link, a forward-to-a-friend link, social-media links, your postal address, and other information that can be placed into the message as dynamic values by using the personalization feature.
Dynamics 365 Customer Insights - Journeys is delivered with a single default content-settings record, which is preconfigured to use the default subscription center (also included out of the box). You can customize this record as needed, and you can also create additional records. You'll set up each customer journey to use a specific content-settings record, which means that all messages sent by that journey will use the same record. However, each journey can use a different record, which means that you can use an identical marketing-email design in two or more customer journeys, each specifying a different content-settings record. If you have more than one content-settings record, exactly one of them will be the default and will be applied automatically to each new customer journey that you create.
The values for content settings are first evaluated at send time, which means that you can edit a content-settings record at any time, and all pending and future email messages will automatically use the latest values.
Each content-settings record that you use must be available to the external marketing services, which manage email assembly and delivery. Therefore, you must publish your content-settings records by choosing Go Live whenever you create a new one.
If you have other types of values that you often use in email messages, and/or that you want to manage at the customer-journey level, then you can add them as custom fields to the content-settings entity just as you can for other types of entities in Dynamics 365. However, in the current release, all custom fields for the content-settings entity must be of type text (string). More information: Customizing Customer Insights - Journeys
To view, edit, or create a content-settings record:
Go to Outbound marketing > Marketing templates > Content Settings .
A standard list page opens where you can view, sort, search, and filter the list to find a specific record and use buttons on the command bar to add or remove a record. Select a record to open it for editing or select New on the command bar to create a new one.
The Content Settings form opens. If you're editing a record that is already live, you must choose Edit in the command bar before you can edit it. If you're creating a new one, you can just start filling in the fields.

Make the following settings, as needed:
- Name : Enter a name for the customer-settings record. This is the name shown when you're assigning content settings to a customer journey or email-message preview.
- Owner : Shows the Dynamics 365 Customer Insights - Journeys user who created the record.

- Default : Set to Yes to make the current content-settings record the default for all new customer journeys. There must always be exactly one default; if you change the default, the existing default will automatically be changed to No .
- Default for owning business unit : This setting is only available when business unit scoping is enabled. Set this to Yes to make the current content-settings record the default for all new customer journeys within the business unit. There must always be exactly one default content setting for the business unit scope; if you change the default, the existing default will automatically be changed to No .
- LinkedIn URL , Twitter URL , Facebook URL , Instagram URL , YouTube URL , and Google Plus URL : For each of these social-media services, enter the URL for the landing page for your organization.
Select Save in the bottom-right corner of the window to save your settings.
If you're editing a content-settings record that was already live, then the record is republished automatically when you save it. If you're creating a new record, then select Go live on the command bar to publish it to the marketing services so you can start using it.
Use personalization to place dynamic field values
Personalization helps you construct valid dynamic expressions to position field values from recipient contact records, the message content settings, and other database values. This button is provided on the text formatting toolbar whenever you select a text element in the graphical designer. The button is also provided for some settings fields, such as the subject, from-address, and from-name fields.
The personalization dialog only shows entities and relations that are synced with the marketing-insights service. If you need to show information or use relations for one or more entities that aren't listed, then ask your admin to add the relevant entities to the marketing-insights service. If you are an admin, then see Choose entities to sync with the marketing-insights service for instructions.
Use personalization to place a dynamic expression
To use personalization:

Do one of the following:
- Contact : Places a field value, such as a first name, from the recipient's contact record. These values vary by recipient.
- ContentSettings : Places a field value from the content settings. Values such as a subscription center URL, forwarding URL, and the sender postal address are available here. These values can vary according to the customer journey where the message is used.
- FormDoiSubmission : Places a dynamic field for form double opt-in . This field doesn't require a relationship value, as discussed below.
- Message : Places values that relate to the message itself; currently, this includes the open-as-webpage URL and the various dynamic values used in double opt-in emails .
- Select an option (top combo box): Select the entity (such as event or account). To search for an entity, place your cursor in this box and start to type its name until the entity you want is shown.
- Choose a record (bottom drop-down list): Select the specific record by name. This list shows all records from your selected entity. As with the entity, you can also search here.
Now you must identify the specific field you want to place. Do one of the following:
- Select relationship : The relationship defines which second entity you want to hop to, and the path you'll take to get there. To search for a relationship, place your cursor in this box and start to type its name until the relationship you want is shown, and then select it. For more information about how to understand the way relationships are represented here, see the next section .
- Select field : Choose the field name you want to show. As with the relationship, you can also search here. This drop-down list is only available if you've chosen an N:1 relationship .
At the bottom of the dialog, you now see the final expression . Select Insert to place that expression.

Lists created using for-each loops are not rendered in a particular order and are not sortable by any field.
How personalization presents database relationships
When you're selecting a relationship in personalization, the options are displayed using one of the following naming conventions:
- FieldName (PrimaryEntity) -> SecondaryEntity When the primary entity is in parentheses and shows a field name, it’s a many-to-one (N:1) relation that leads to a single record from the secondary entity. You should therefore usually use the second drop-down list to choose a field from the secondary entity to display with your expression.
- PrimaryEntity -> FieldName (SecondaryEntity) When the secondary entity is in parentheses and shows a field name, it’s a one-to-many (1:N) relation that can lead to multiple records from the secondary entity. You therefore can’t choose a field (the second drop-down list is disabled) and must instead use this relation as part of a for/each loop to display values from each available related record.
- PrimaryEntity -> SecondaryEntity When neither entity is in parentheses, it’s a many-to-many (N:N) relation, which can connect multiple records in both directions. You therefore can’t choose a field (the second drop-down list is disabled) and you can't use this relationship for personalization. This is because the relationship is maintained by an intermediate entity, and you can only traverse to the intermediate entity from the primary entity.
- PrimaryEntity is an entity at the starting side of the relationship. It's always shown on the left side of the arrow. This is the entity you chose on the previous page of the personalization dialog. For example, a Contact (primary entity) can be related to an Account (secondary entity) through the contact's Company Name field (field name); this would be shown as: Company Name (Contact) -> Account .
- FieldName is always shown next to an entity name (which is in parenthesis). This is the name of the field through which the relation is established. The named field belongs to the entity in parenthesis, and displays a value from the entity of the other side of the arrow (but actually contains the ID of the related record that value is drawn from). In some cases, you'll notice a relationship between the same two entities, each of which flows through a different field.
- SecondaryEntity is the destination of the relationship. It's always shown on the right side of the arrow. The value(s) that you display with your final expression will come from a field belonging to the secondary entity.
For N:N relations, no field value is shown. That means that if you have more than one N:N relation between the same two entities, you'll see multiple identical-looking relations in the drop-down list. This situation is very rare, but if you see it, you'll have to use trial-and-error to identify the correct relation to use. To confirm, you can check the resulting expression to see if it looks like you chose the right relation (relations are shown differently here and may provide a clue), or set up a test message that includes both versions of the N:N relation and use a test customer journey to deliver it to yourself.
Here are a few examples:
- Company Name (Contact) -> Account : This relationship is used by the Contact entity to display information from the Account entity in a contact record's Company Name field. In other words, it links to the company (account) that the contact works for.
- Managing Partner (Contact) -> Account : This relationship is used by the Contact entity to display information from the Account entity in a contact record's Managing Partner field. In other words, it links to the company (account) that is the managing partner for a contact.
- Contact -> Primary contact (Account) : This relationship is used by the Account entity to display information from the Contact entity in an account record's Primary Contact field. In other words, it finds all of the accounts where the current contact is assigned as the primary contact.
- Contact -> Contact (Event Registration) : This relationship is used by the Event Registration entity to display information from the Contact entity in an event-registration record's Contact field. In other words, it finds all of the event registrations made by (or for) the current contact.
Expressions created by personalization
Personalization creates an expression that uses a format such as the following:
- {{EntityName.FieldName}}
- {{EntityName(RecordID).FieldName}}
- {{EntityName.RelationshipName.FieldName}}
- {{EntityName(RecordID).RelationshipName.FieldName}}
Note that the notation used for relationship names in the resulting expressions doesn't match the way they're represented in the personalization dialog. Here are some examples of resulting expressions:
- {{contact.firstname}} Places the recipient's first name.
- {{msdyncrm_marketingpage(3343053c-8daf-e911-a85e-000d3a3155d5).msdyncrm_full_page_url}} Places the value of the msdyncrm_full_page_url field from the marketing page record specified by the GUID in parenthesis. You might typically use an expression of this form in a content settings record to specify a subscription center or forward-to-a-friend page.
- {{msdyncrm_contentsettings.msdyncrm_subscriptioncenter}} Places the URL for the subscription center page identified in the content settings configured for the customer journey that sends the message.
- {{msdyncrm_contentsettings.msdyncrm_forwardtoafriend}} Places the URL to the forwarding page identified in the content settings configured for the customer journey that sends the message.
- {{Message.ViewAsWebpageURL}} Places the URL for opening the current message in a web browser.
- {{msevtmgt_event(8a519395-856c-4e22-b560-650ce6d6a79d).msevtmgt_webinarurl}} Places the webinar URL for the event identified by the specified event ID (in parentheses).
- {{msdyn_survey(39128da2-c968-4627-9595-f030b6571be4).msdyn_name}} Places the name of the survey identified by the specified survey ID (in parentheses).
- {{contact.contact_account_parentcustomerid.name}} This expression finds the name of the account for the company where a contact works.
- {{contact.contact_account_msa_managingpartnerid.name}} This expression finds the name of the managing partner for the account for the company where a contact works.
Once you have an expression that works, you can copy and paste it anywhere. You don't have to use personalization every time.
You can have, at most, two hops (periods) in your field expressions. Don't try to create more complex expressions by adding more hops to the expressions produced with personalization.
If you require the types of data that are supported by personalization, then it's usually best to use the personalization feature to place the code rather than try to type it from scratch. This will ensure that the entity, relation, and field names match those used in the database and will help you avoid misspellings.
Dynamics 365 Customer Insights - Journeys email sending functionality does not support calculated fields.
Dynamic values in To, From-name, From-address, and Reply-to fields
On the Summary tab of the Marketing Email form, you can make various non-content-related settings for your message in the Sender and receiver section. This includes values and expressions for establishing the to, from-name, from-address, and reply-to values the message will use.

One typical way to take advantage of this feature is to set the From name and From address to the owner of the contact record. Then, by assigning the owner of each contact record to the salesperson managing that contact, recipients will receive marketing emails that show a from address of somebody they may know, which can greatly increase open rates. Here's how:
- If your Customer Insights - Journeys instance isn't already set up to sync the User (systemuser) entity with the marketing-insights service, talk to your admin about setting this up. If you're the admin, then see Choose entities to sync with the marketing-insights service for instructions.
- Open your email message and go to the Summary tab.
- On the first page of the personalization dialog, select Contextual and set it to Contact . Then select Next .
- Set the top drop-down list (relationship) to Owning User (Contact) -> User .
- Set the bottom drop-down list (field) to Full name .
- Select OK to place the expression, which should be: {{contact.contact_systemuser_owninguser.fullname}} .
- Set the bottom drop-down list (field) to Primary email .
- Select OK to place the expression, which should be: {{contact.contact_systemuser_owninguser.internalemailaddress}} .
You can use similar techniques to place the owning user's name or email address anywhere in the message content. You could do this using personalization, or copy/paste the handlebar expressions, or even type the handlebar expressions manually.
Use dynamic values to choose an image source or link
You can likewise use personalization to help construct a dynamic expression for setting a Link destination for the image.
The Dynamics 365 Customer Insights - Journeys files library generates a unique GUID-based file path for each image you upload, which means that the images in the files library have unpredictable URLs that don't include your original file name. Therefore, to use the technique described here, you must host your images on your own website or any third-party hosting service where the URLs are predictable and can include a value that you can easily extract from a Dynamics 365 field.
Find record IDs
Non-contextual field expressions (which use the form {{EntityName(RecordID).FieldName}} ) require a record ID to identify the specific record the value must come from. Usually, personalization helps you find these IDs, but sometimes you might need to find an ID manually while you're designing dynamic features for a message. To find the ID for any record:
- Open the record you want to reference.
- Look at the URL shown in your browser's address bar, which should show a URL such as: https://<MyOrg>.crm.dynamics.com/main.aspx?appid=c8cba597-4754-e811-a859-000d3a1be1a3&pagetype=entityrecord&etn=msevtmgt_event&id=5acc43d5-356e-e811-a960-000d3a1cae35
- Find the part of the URL that starts with &id= , which is followed by the ID number of your current record. Copy that number (the value only) and use it in your expression.
Advanced dynamic content
You can add advanced logical processing to your email designs, which can make the content even more responsive to recipients, demographics, and context. This type of customization requires you to have a basic understanding of scripting and programming.
As you've seen in previous examples, dynamic content is surrounded by double braces ( {{ and }} ). This includes both standard field values that you add using the personalization feature, and the more advanced programming constructs described in this section.
If you want to display double braces in a message, rather than use them to denote the start or end of a code block, then prepend (escape) the first brace with a backslash, such as \{{ or \}} . The slashes won't appear in your final, rendered message, but the double braces will.
Conditional statements and comparisons
Conditional (if-then-else) statements display content depending on whether one or more conditional expressions resolve to true or false. You can add the code required to create these statements by placing it within a text element, or by placing custom-code elements in between the other design elements. More information: How to enter advanced dynamic content in the designer
Conditional statements take the following form:
- The conditional block must always open with {{#if … }} .
- Conditional expressions must be contained in parentheses.
- Conditional expressions start with an <operator> , which must be one of the values listed in the following table. It establishes how the first value is to be compared to the second value.
- <value1> and <value2> are values to be compared by the conditional expression, and each can be either dynamic or constant values. If either <value1> or <value2> is a constant string value (not a number or expression), then it must be surrounded with single quotes ('); for real numbers, use a period (.) as a decimal delineator.
- If <value1> is a Boolean field (also known as a two options field in Dynamics 365), then don't include an <operator> , <value2> , or the parentheses. Boolean fields always have a value of either true or false, so you should just use them directly to establish the condition, such as: {{#if contact.is_vip}} .
- {{else}} and {{else if … }} clauses are optional.
- The conditional block must always close with {{/if}} .
The following table lists all the operators that you can use in your conditional expressions. Other operators aren't currently available, nor can you use complex Boolean expressions (such as with AND or OR operators) in your conditional expressions.
For example, this conditional statement could be used to establish the language used in a message salutation based on the country of each message recipient:
Here's an example of a conditional statement based on a Boolean (two options) field called is_vip ; note that because Boolean fields always return a value of true or false, no operator, comparison value, or parentheses are included in the condition:
You can test for empty field values by using:
Where '' is two single quotation marks, not a double quotation mark. This finds empty fields, but not null fields.
Though you can't use complex Boolean expressions in your conditional expressions, you can implement similar functionality as follows:
Not supported:
Is equivalent to (supported):
Not supported:
When you are testing for values that are stored as an option set in the database, use the index values for the option set, not the display values. For example, you might have a field called contact.customertypecode , which holds an integer to identify the type of customer it is. Each customer type code also has a display name, such that 0 = "copper", 1 = "silver", and 2 = "gold". In this case, you must set up your expression to use the index (integer), not the matching display value. Therefore, if you're looking for gold customers, you should use:
When you are testing large numerical values, such as "1,932,333", then leave out the thousands separator (,) in the comparison statement, even though you might often see these presented in the UI. To test for this value, your expression should therefore look something like:
For-each loops
For-each loops let you step through a collection of records that are related to a specific current record—for example, to provide a list of all the recent transactions associated with a given contact. You can add the code required to create these statements by placing it within a text element, or by placing custom-code elements in between the other design elements. More information: How to enter advanced dynamic content in the designer
For-each loops take the following form:
- The loop block must always open with {{#each … }} .
- Entity.RelationshipName identifies the set of related records that the loop will iterate over.
- The loop starts with the first available related record, and repeats for each available related record until all related records have been listed. Note that the related records will be returned in an arbitrary and unpredictable order.
- {{this.RelatedField<n>}} identifies a field name from the related record. The "this" part of this expression refers to the related record being processed in the current loop iteration, and must be followed by a valid field name for the related entity. You can include any number of fields in each loop.
- The loop block must always close with {{/each}} .
For example, your database could include a list of products that a contact has ordered. You could list these in an email message using code such as:
In this example, the Dynamics 365 Customer Insights - Journeys system has been customized to include a custom entity called product , which is set up with a 1:N relationship between the contact and product entities on the productid field. For the product entity to be available to your email messages, it must also be synced with the marketing-insights service (as usual).
Only the first 1,000 related items are added to the relationship for email rendering purposes. Using relationships with more than 1,000 items is not supported in email templates and might lead to unexpected results.
Also note that second level relationships are not supported. Therefore, the following syntax is not allowed:
How to enter advanced dynamic content in the designer
You must be careful when entering advanced dynamic code in the designer because there are many, sometimes unexpected, ways to get it wrong, which will break your code. Here are some tips for how to enter and test your code:

- When you enter code into a text element on the Designer tab, any extra spaces and carriage returns that you add will create and <p> tags in your code, which can break it. Always go to the HTML tab afterwards, where you'll see all of these extra tags, and be sure to remove them.
- When you enter code into a text element, all of your dynamic-content code must either be contained within a set of start and end tags (such as <p> and </p> ) or within an HTML comment (for code that is entirely separate from displayed text). Don't place code outside of comments or valid HTML tag pairs (or custom-code elements), as that will confuse the editor (especially if you switch between the HTML and Design tabs). You must work on the HTML tab inspect and correct the HTML within your text elements.
- Don't place carriage returns between code elements that are part of the same expression (such as in a for-each loop) unless you enclose each line within its own set of HTML tags (as illustrated in the for-each loop example given after this list).
- The personalization feature is often helpful for constructing expressions that fetch values from your database because it helps you find database table, field, and relation names. This tool is available when working within a text element on the Designer tab, and when entering values is certain fields that support it (like the email subject). Personalization isn't available when working on the HTML tab or within a custom code element, so you can instead start by using personalization in any text element, and then cut/paste the resulting expression into your custom-code element or HTML.
- The relationship name that you use when creating loops or placing lookup values must match the one used in the marketing-insights service. This relationship name isn't necessarily the same as the one used to customize Dynamics 365. To find the correct relationship name, use the personalization feature.
For example, you could set up the salutation line of an email message by entering the following onto the HTML tab of the designer (either inside or outside of a text element):
The following example (also shown previously) shows how to use comments to enclose code that exists entirely outside of displayed content (also on the HTML tab):
Additional resources
IMAGES
VIDEO
COMMENTS
To edit a template, select the relevant template name in the list to open the standard customer journey editor. Make the required settings and then save. To reactivate an inactive template: Go to Customer Insights - Journeys > Marketing templates > Journey templates. Open the system-view selector and switch to the Inactive customer journey ...
The New Customer Journey page opens with the Select a Customer Journey Template dialog box shown. Each template provides a starting point for designing a particular type of customer journey. ... Many entities in Dynamics 365 Customer Insights - Journeys provide an Insights tab for analyzing the results of your marketing initiatives. For example
Dynamics 365 Customer Insights - Journeys can help you visualize and automate the journey that customers take on their way to making a purchase. A simple customer journey could include a short interaction, such as a single email campaign. ... The Customer journey templates dialog box provides a categorized overview of templates and a search ...
8 AM to 5 PM Central Time. Have a Dynamics 365 sales expert contact you. Send a request. Available Monday to Friday. 8 AM to 5 PM Central Time. Call 18552700615. Meta description: Find out what customer journey mapping is, learn the benefits, and get step-by-step guidance on how to create a customer journey map.
In order to create a customer journey on Dynamics 365 CRM, you need a segment that consists of all the contacts you want to target via email, as well as a marketing email that is valid and activated. When you go to create a new customer journey, you have the option to choose between an array of templates, including: announcement, customer ...
With Dynamics 365 Customer Insights, you'll unify your behavioral, transactional, and demographic data to get the AI-driven insights that help you better understand your customers and how they'll interact with every facet of your business. Gain a holistic view with unmatched time to insight that helps you optimize every customer journey.
Customer Journey Tiles. Audience: The audience tiles begin a customer journey and determine who will be sent along the journey. Segment - Audience members grouped by common attributes or explicitly assigned to a given segment. Segments are easy to create with Dynamics 365 Marketing segment builder.. Form submitted - Anyone who submits a given form, whether they are existing or new contacts.
We can now find our "Announcement" customer journey template and apply it to an active Customer Journey. Marketing Pages and Form Templates. Marketing pages and forms within Dynamics 365 Marketing are powerful tools to be used in targeted campaign campaigns, events, and beyond.
The interaction can be sent through the channels available in Customer Insights (such as emails, text messages, or push notifications), other Microsoft channels (such as Azure Communication Services), or external systems (such as other text-messaging providers). Create engaging experiences by uniting customer data with real-time journeys and ...
In the main dashboard, go to the left bar and click on Customer Journey > New. Just like emails, Dynamics 365 for Marketing provides several Customer Journey templates based on the goal and the market type, for this example, we are going to select a blank one and create a simple journey. In order to facilitate user adoption, Dynamics 365 for ...
As you've seen, each time you create a new email message, customer journey, marketing page, or marketing form, you start by choosing a template. Dynamics 365 Customer Insights - Journeys includes sample templates to get you started, but you'll probably want to build your own to match your own organization's requirements and graphical identity.
Brands that recognize the fundamental shift in customer expectations are boosting their customer experience capabilities. Learn how the new customer journey orchestration capabilities in Dynamics 365 Marketing can make one-to-one experiences a reality. Visit the Dynamics 365 Marketing website and sign up for a free trial.
Step #4: Start with the Best Lead Source. Now that you have data to support which of your lead sources drives the highest quality leads and biggest sales dollars (this is easy to do if you're tracking Lead Source and Source Campaign for every single Lead), you can determine which source is your best source.
Dynamics 365 enables you to create customer journeys from scratch by choosing from a collection of templates. Using the Dynamics 365 customer journey, not only can you only engage with customers across various touch points, but also continuously track and monitor each engagement to persistently improve customer experience and increase revenue ...
How to Create a Customer Journey in Dynamics 365 Marketing. Go to Marketing > Marketing Execution > Customer Journeys. Click on "+ New" in the Command Bar. To start creating a completely new Customer Journey, click on "Skip" in the template selection dialog box. In the Customer Journey designer, click on the "+" or "Set Audience ...
A marketing email that is live and valid. Next, here are the steps you need to follow for creating Dynamics 365 Marketing customer journey: Head on to Marketing > Marketing Execution. Next, click Customer Journeys > New. This will open the New Customer Journey page with a dialog box that says Select a Customer Journey Template.
Learn the process of creating a customer journey email send in Dynamics 365 Marketing. Find out more at stoneridgesoftware.com
A tutorial for how to create an interactive customer journey featuring signups and conditions in Dynamics 365 Customer Insights - Journeys. ... Consider choosing a non-blank email template this time. These templates not only have sample content, graphics, and column layouts, but also include all mandatory elements such as the subscription ...
Step 1: Create a Landing Page Form in Dynamics 365 Marketing. To start out, go to the Marketing Forms entity on the left-hand side navigation. Select "New.". You can select an existing form template or go with a blank template. Whether you're using a template or starting from scratch, you will be able to use the powerful, intuitive Form ...
Email is a vital marketing channel for most modern organizations. It is also a core feature of Customer Insights — Journeys, which provides tools for creating graphically rich marketing emails with dynamic, personalized content. In this video titled Creating Emails you will learn the fundamentals of email marketing. Customer Insights ...
Customer Insights - Journeys offers a free 30-day trial. After a quick sign-up, you'll have access to many of the app's key features. The trial allows you to test the app with sample data and even try out your own customer data. Learn more about Dynamics 365 Customer Insights - Journeys features \n. To sign up for the trial: \n \n
Go to Outbound marketing > Marketing Execution > Customer Journeys. On the command bar, select +New to create a new journey. The Customer Journey templates dialog box opens. Choose the Skip button to work without a template (and create a customer journey from scratch). Select the the Audience tile to set it up.
The innovative capabilities that are coming to you in Microsoft Copilot for Sales, Microsoft Dynamics 365 Sales, and Microsoft Dynamics 365 Customer Insights will help you elevate the seller experience through AI-driven process transformation, optimize the buying journey with the power of data, and personalize every customer interaction.
Name: Enter a name for the customer-settings record. This is the name shown when you're assigning content settings to a customer journey or email-message preview. Owner: Shows the Dynamics 365 Customer Insights - Journeys user who created the record. Address main: Enter the main part of your organization's postal address. All marketing email ...
After years of uncertainty from supply chain disruption and increased customer expectations, to changes in consumer demand and workforce shortages, manufacturing remains one of the most resilient and complex industries. Today, we are witnessing the manufacturing industry enter a transformative era, fueled by AI and new AI-powered industrial solutions. This AI-driven shift is prompting many...