- Get Great Eclipse Photos with Your Phone
- The Best Noise-Canceling Headphones to Buy

How to Childproof Your iPad Using Parental Restrictions
Make your iPad kid-friendly using parental restrictions
:max_bytes(150000):strip_icc():format(webp)/DanNations-b3e3901c63b544bf8588ac2fc6231f60.jpg "ipad safari kid safe")
- University of Texas at Arlington
- The Ultimate Guide to Parental Controls
What to Know
- Go to Settings > Screen Time , create a 4-digit passcode, then tap Content & Privacy Restrictions to enable parental controls.
- Set the Installing Apps , Deleting Apps , and In-app Purchases options to Don't Allow .
- To restrict certain apps, tap Allowed Apps and move the sliders next to any app you don't want your child to access to the Off position.
This article explains how to set up iPad child restrictions using the iPad Screen Time feature, which was introduced in iOS 12 .
Turn on Restrictions on iPad
The first step to a kid-friendly iPad is to turn on restrictions , the feature that limits which applications are permitted on the iPad. Restrictions are enabled through Screen Time , which you can get to through Settings > Screen Time .
To set up restrictions:
Tap Settings on the iPad Home screen.
Select Screen Time in the left panel.
Tap Use Screen Time Passcode in the main screen.
Enter a 4-digit passcode to protect the restrictions you set up and prevent your child from making changes.You must enter this code to make changes in the future. It can be different from the passcode used to unlock the iPad.
On the Screen Time screen, tap Content & Privacy Restrictions .
Move the slider next to Content & Privacy Restrictions to the On/green position.
Make selections in the iTunes & App Store Purchases , Allowed Apps , Content Restrictions , Privacy , and Allowed Changes sections.
iTunes & App Store Purchases Restrictions
The first section you come to in the Content & Privacy Restrictions screen is iTunes & App Store Purchases . Tap it.
Elect to either Allow or Don't Allow each of the following:
- Installing Apps
- Deleting Apps
- In-app Purchases
For young children, Don't Allow may be the wisest choice for all three of these options, particularly for in-app purchases.
While you are in this screen, select whether you want to require a password for additional purchases after making a purchase. Again, for young children (and maybe for older ones too) the best choice may be Always Require.
In-App Purchases
Some parents miss turning off in-app purchases in this step, and that can come back to haunt your wallet. In-app purchases are common in free apps, meaning that your child might download something free only to spend a lot of money buying things within the app.
One example is with freemium games , which are iPad games that are priced for free but stacked with in-app purchases. These purchases, which are often currency, levels, items, or food within the game, can easily add up to a high price tag.
This makes it all the more important for parents to turn off in-app purchases on a child's iPad. Sometimes, an in-app purchase is valid, such as for an expansion to a game that provides real content. Many times, in-app purchases are shortcuts that can be obtained by playing the game and achieving certain goals. Often, a game or app is designed around enticing users into in-app purchases.
When you disable in-app purchases, the option to buy these extras within games and other apps is disabled. This means no surprises when the iTunes bill comes in your email.
Installing and Deleting Apps
It doesn't take even a two-year-old long to learn how to use an iPad . This includes finding their way onto the App Store and purchasing apps. By default, the App Store will prompt for a password for even a free game or app, but if you've recently typed in your password, there's a grace period where apps can be downloaded without being verified.
If the iPad is primarily used by kids, especially toddlers, it may be a good idea to turn off the App Store. Not only does this give you peace of mind that your child isn't downloading apps, but they also can't browse through the App Store and beg for a fun game they find.
If you decide to turn off the App Store, you may also want to turn off the ability to delete apps . Remember, it takes the intervention of a parent to download apps to the iPad, so if your child deletes a game because they're tired of it or simply by accident, you'll need to re-enable the App Store, re-download the app or game , and then restrict the App Store again.
Allowed Apps
Many of the apps that come with the iPad, including email, FaceTime, the camera, and the Safari browser, are in this section:
On the Content & Privacy Restrictions screen, tap Allowed Apps .
Move the sliders next to each app or feature to the On/green or Off/white position. For young children, Off may be the best choice.
Content Restrictions
This screen is a treasure trove of options you can use to personalize the iPad content for children.
While it might be easier to simply disable the App Store for a younger child, when it comes to someone older like a pre-teen, you might prefer to give them a bit more access.
You may not mind if your teen listens to music, but prefer Explicit content is not included. You may prefer to allow G movies, but not PG-13 movies. You can do that and much more from the Content Restrictions screen
In the Apps categories, you can restrict content by age. The categories are 4+, 9+, 12+ and 17+. You can limit adult websites or forbid explicit language in general.
To enable one or all of these age restrictions on the iPad:
Tap Content Restrictions on the Content & Privacy Restrictions screen, and then make selections in each category to allow it or set limitations.
Restrict Safari Web Browser
Apple has included a setting that allows you to have full control over what your child can view on the web. You can get to this setting via Screen Time > Content & Privacy Restrictions > Content Restrictions > Web Content .
By default, iPad allows all websites to be displayed, but you can set the web content limit to Limit Adult Websites or Allowed Websites Only to choose specific sites from a pre-populated list (including Disney, PBS Kids, Time for Kids, or a custom URL).
The Privacy section of the Content & Privacy Restrictions is the place where you allow (or not) your child to have access to Location Services, Contacts, Calendars, Share My Location, and other Apple services.
In most cases, tapping each service presents you with a simple choice of Allow Changes or Don't Allow Changes.
Allowed Changes
In the Allowed Changes section, it may be best to select Don't Allow for the listed options, which include Passcode Changes, Account Changes, and Cellular Data Changes, for all children. You may want to make exceptions for older children for Do Not Disturb While Driving, Volume Limit, or Background App Activities.
How to Download Apps to a Childproofed iPad
Now that your iPad is kid-friendly as you define it, you may want to make it kid-fun by downloading some appropriate apps or games. How do you do this with all those restrictions you put into place?
You use your passcode and temporarily turn on Installing Apps in the iTunes & App Store Purchases section of the Content & Privacy Restrictions screen. Download the app or game and turn off Installing Apps again.
Gifting Apps to Your Child's iPad
Apple discontinued the iTunes Allowance feature in 2016. Another way to handle adding apps to a child-friendly iPad is to set up the iPad with its own iTunes account and remove the credit card from it. You then have the option of gifting apps to the iPad, which allows you to monitor what is installed.
The ideal iPad for a kid depends on what they're looking for, your budget, and their age, but the iPad Air is a good all-around tablet for teenagers.
The term " iPad Kid " refers to very young children that are depicted as always being on their parents' iPhone or iPad—often to the point of their reliance on tech having a measurable effect on their personality.
Get the Latest Tech News Delivered Every Day
- How to Turn on Restrictions and Enable iPad Parental Controls
- How to Block Websites on the iPhone
- How to Turn Off Parental Controls on iPhone
- How to Block Websites on Your Android Phone or Tablet
- How to Set up and Use Restrictions on an iPhone
- How to Turn Off AirDrop
- How to Turn off In-App Purchases on the iPad or iPhone
- The 8 Best Parental Control Apps and Services of 2024
- The Best Phones for Kids in 2024
- How to Block YouTube on iPad
- How to Set up Parental Controls on iOS
- How to Use Safari Parental Controls
- Apple Music Parental Controls: How to Block Explicit Songs
- How to Turn Off In-App Purchases on iPhone
- Childproof Your Android: How to Make It Kid-Friendly But Safe
- The 8 Most Fun Online Games for Kids in 2024
Expanded Protections for Children
At Apple, our goal is to create technology that empowers people and enriches their lives — while helping them stay safe.
As part of our commitment to protect children in a changing online landscape, we introduced new features in December 2021 that are designed to help keep children safe.
Communication Safety
Children will be warned when they receive or attempt to send images or videos containing nudity in Messages, AirDrop, Contact Posters in the Phone app, FaceTime video messages, and the system Photos picker. Communication Safety is enabled by default for children and can be adjusted by the parent in Settings > Screen Time > Communication Safety.
When receiving this type of content, the photo or video will be blurred and the child will be warned, presented with helpful resources, and reassured it is okay if they do not want to view the photo or video. Similar protections are available if a child attempts to send photos or videos that contain nudity. In both cases, children are given the option to message someone they trust for help if they choose.
The operating system analyzes image and video attachments and determines if the content contains nudity without sending information off the device. The feature is designed so that no indication of the detection of nudity leaves the device. Apple does not get access to the messages, and no notifications are sent to the parent or anyone else.
The Sensitive Content Analysis framework enables third-party developers to integrate Communication Safety in their apps. The framework allows developers to detect if content that children receive or attempt to send in their apps may contain nudity, and developers can add protections in their apps when sensitive content is detected.
This feature requires that both the parent and child be part of a family group in iCloud. Learn more about how to set up Family Sharing here . *

Expanded guidance in Siri, Spotlight, and Safari Search
Apple has also expanded guidance in Siri, Spotlight, and Safari Search by providing additional resources to help children and parents stay safe online and get help with unsafe situations. For example, users who ask Siri how they can report child exploitation will be pointed to resources for where and how to file a report.
Siri, Spotlight, and Safari Search have also been updated to intervene when users perform searches for queries related to child exploitation. These interventions explain to users that interest in this topic is harmful and problematic, and provide resources from partners to get help with this issue.


Our expert, award-winning staff selects the products we cover and rigorously researches and tests our top picks. If you buy through our links, we may get a commission. Reviews ethics statement
How to make your Apple iPad kid-friendly
Everything from cases and apps, to privacy settings that keep your child's iPad (and your credit card) safely locked down.

Turning your iPad into a kid-friendly device should be quick and painless.
Giving a kid an Apple iPad , even a used hand-me-down model, opens up a wide world of videos, games and educational apps. But taking just a few minutes to run through the settings menus goes a long way toward protecting their safety and your peace of mind.
Apple has conveniently built powerful parental controls into iOS. Called Restrictions, they both protect a child's privacy and keep them safe from explicit content. They also help protect your credit card, by preventing unauthorized in-app purchases . It's all fast to set up, easy to maintain and simple to edit if you ever feel like changes need to be made.
Enable restrictions
Enabling restrictions on the iPad is easy:
- Open the Settings app
- Tap on General
- Select Restrictions
- Tap Enable Restrictions
- Set a passcode
The passcode should be different from the one you use to unlock your screen and, just to be clear, don't share the Restrictions passcode with your child.

Step 1: Enable Restrictions
The next step is to work through all the privacy settings to customize what kids can and can't see. Restrictions are sectioned into five categories: allow, allowed content, privacy, allowed changes and Game Center. Here's what to look for in each section:
Adjust what they're allowed to do
The "allow" section dictates what children can access. Most of them control how they can communicate or send data using the iPad (FaceTime, AirDrop), as well as what type of information or content they're allowed to access (Safari, News, Podcasts).
The big restrictions you need to worry about here are your child's access to the iTunes store and in-app purchases. If you don't want to see your credit card bill flooded with in-app purchases or iTunes downloads without permission, these are the two settings you definitely need to disable.

Choose what type of content is acceptable viewing.
Manage what's watchable
Here you'll find what content you can restrict, including controls for if music podcasts, news, and books with explicit content are allowed, as well as what kind of ratings are appropriate for movies, TV shows and websites. This is an easy way to make sure kids are not watching mature or adult content.
Another important restriction in this section is websites. You can choose to give your child access to: all websites, websites with limited graphic content or specific websites. You can also add individual websites to a personal blacklist.
When setting up an iPad for younger children, it's especially important to pay close attention to these settings. This is where you can severely restrict what type of content kids can view. You may not have the same control over your TV at home, but you can definitely enforce the rules here.
Protect their privacy
The privacy section allows you to lock down the iPad's communication with the outside world. This is where you can disable social media apps like Facebook and Twitter, the microphone and location services. If you don't want anyone to be able to geotrack this particular iPad, make sure to disable both the location services and "Share my location" options.

Protect younger ears by lowering the maximum volume setting.
Give (or take) a little freedom
This section limits what your child can modify on their device. Maybe you're handing down an older tablet to a teen rather than a toddler. The "allow changes" section gives them a little more leeway on what they can do on the iPad when it comes to adding events to the calendar or changing the iTunes account password. For younger ears, the "volume limit" option is useful to make sure your child won't listen to audio louder than they should.
Ensure safe gaming
Last, but not least, are the game center options. Here you can easily disable multiplayer games, the ability to add friends and screen recording. Gaming is one of the biggest reasons kids want an iPad. These settings go a little further than the regular privacy settings to make sure your kids are safe when gaming.
While securing the settings on the iPad is a good start, here are a few more tips on how to make sure it's fully locked, loaded and kid-ready:
Everyone's capable of dropping and breaking a handheld device like the iPad, especially when in the possession of small hands.
Buying a protective case is an easy way to help avoid cracked screens and physical damage like scratches or dinged corners. A foamy, cushioned, shock-proof case like this one found on Amazon is a good option for younger kids. If that one doesn't suit your needs, there's a large variety of different cases available to choose from .

Kid-friendly apps are easy to find in the Apple App Store.
Download age-appropriate apps
Choosing to restrict your kid from downloading their own apps means you have to do it for them. The Apple App Store also has an entire section dedicated to kid-friendly and parent-approved apps.
The App Store sorts kid apps into three sections:
- Kids ages 6 and under
- Kids ages 6-8
- Kids ages 9-11
Here's a few popular favorites that work for all ages: YouTube Kids , PBS Kids and Nick Jr.
Deleting the stock apps that come with iOS, or dragging them into a folder and onto a different page, are also options to simplify the home screens or free up storage space.
A fully locked and loaded iPad
Enabling Restrictions, buying a case and downloading kid-friendly apps on a kid's iPad should be fast and straightforward. While they might complain about not downloading apps for themselves or having a frumpy case, the main goal is to protect them. With the right apps, protection and restrictions in place, you and your child can both rest easy while they play away on their very own iPad.
Computing Guides
- Best Laptop
- Best Chromebook
- Best Budget Laptop
- Best Cheap Gaming Laptop
- Best 2-in-1 Laptop
- Best Windows Laptop
- Best Macbook
- Best Gaming Laptop
- Best Macbook Deals
- Best Desktop PC
- Best Gaming PC
- Best Monitor Under 200
- Best Desktop Deals
- Best Monitors
- M2 Mac Mini Review
- Best PC Speakers
- Best Printer
- Best External Hard Drive SSD
- Best USB C Hub Docking Station
- Best Keyboard
- Best Webcams
- Best Laptop Backpack
- Best Camera to Buy
- Best Vlogging Camera
- Best Tripod
- Best Waterproof Camera
- Best Action Camera
- Best Camera Bag and Backpack
- Best E-Ink Tablets
- Best iPad Deals
- Best E-Reader
- Best Tablet
- Best Android Tablet
- Best 3D Printer
- Best Budget 3D Printer
- Best 3D Printing Filament
- Best 3D Printer Deals
- Dell Coupon Codes
- Newegg Promo Codes
- HP Coupon Codes
- Microsoft Coupons
- Anker Coupons
- Logitech Promo Codes
- Western Digital Coupons
- Monoprice Promo Codes
- A4C Coupons
Is Your Kid Safe on the iPad or iPhone? Here Are 18 Ways to Make Sure

iPads and iPhones: Where would we parents be without them? They help our kids with everything from reading and writing through to learning about dinosaurs and chemistry ; they provide a way for them to chat with their friends; and, let’s face it, they sometimes keep them entertained when we are trying to answer some emails or cook dinner!
Of course, they have their downsides too. Sometimes it’s easy to forget that these devices that we let our kids play on are fully-fledged, Internet-connected computers. How can we make sure that they’re safe while they’re using them? For that matter, how can we make sure that our devices and data are safe from our little ones’ inquisitive tinkering?
In this article you’ll discover 18 things you can do to help kid-proof your iPad or iPhone, and make it safer for your child to use. Let’s start by taking a look at the Restrictions feature built into iOS, which gives you lots of ways to protect your device.
1. Enable Restrictions
Most of the tips and tricks you’ll read in this article focus on iOS’s Restrictions feature, so the first thing you’ll want to do is enable it. Restrictions let you do things like prevent your kid installing and deleting apps; disable in-app purchases; block websites; lock down privacy settings, and lots more.
To enable restrictions, first open the Settings app and choose General > Restrictions to display the Restrictions window. Now tap the Enable Restrictions button at the top of the window. You’ll be prompted to enter a four-digit Restrictions Passcode:

To use the Restrictions feature, you first need to enable it by setting a passcode.
This passcode lets you change the Restrictions settings, so make sure your kid doesn’t know it! You might want it to be different from your device passcode too.
Once you’ve set a passcode, Restrictions are turned on. You can change any of the settings in the Restrictions window to enable or disable certain features. As soon as you leave the Settings app, the restrictions apply to the device.
If you want to change your Restrictions settings, just go back to the Settings app, choose General > Restrictions, and reenter your Restrictions passcode.
To remove Restrictions entirely, tap the Disable Restrictions button at the top of the Restrictions window, and reenter your Restrictions passcode. Be careful with Disable Restrictions! It not only removes the Restrictions passcode, but it also loses all of the Restrictions settings you’ve specified, including deleting all of the websites you may have added under Allowed Content > Websites (of which more in a moment). So only do this when you really do want to remove Restrictions on a semi-permanent basis.
2. Prevent your kid switching between apps
One of the most effective ways to keep your kid safe on an iPad is to use Guided Access. This feature lets you lock the iPad to the currently-displayed app. With Guided Access enabled, your kid won’t be able to close the app, start or switch to another app, or cause mayhem in the Settings app. The downside, of course, is that your kid may become bored with using one app, so this option works best with deep, engaging apps that will keep your kid entertained for more than a couple of minutes.
To use Guided Access, follow these steps:
- Enable Guided Access. Open the Settings app, then choose General > Accessibility. Under the Learning group, tap Guided Access, and flip the switch to On. You’ll also want to tap Set Passcode to create a passcode that you can then use to turn off Guided Access when you want to use other apps. (Note that this is separate from the Restrictions passcode that you created earlier.)
- Open Guided Access. Open the app that you want your kid to use, then triple-click the device’s Home button (click the button quickly three times in a row). You’ll see the Guided Access options appear, like this:

When you open the Guided Access feature, you’ll see various options appear.
- Choose options. As well as preventing your kid leaving the app, Guided Access also disables the Sleep/Wake and Volume buttons by default. To change this, tap the Options button below Hardware Buttons . You can also turn touch and motion controls on or off (you’ll probably want to leave them on).
- Disable areas of the screen, if desired. You might not want your kid interacting with certain areas of an app. For example, if they’re playing a web-based game, you might want to block off all the Safari controls except the main browser window, so they can’t head off to other websites. To do this, just tap and drag a circle or rectangle around the controls you want to disable, then adjust the mask as necessary using the little grey circles around the mask:

Using Guided Access to disable areas of the screen.
- Start Guided Access. Tap the top-right Start button to start Guided Access. Your kid will now only be able to use the current app. Feel free to give the device to your kid now!
- Finish Guided Access. To stop Guided Access so that you can use other apps, triple-click the Home button again. Enter your Guided Access passcode, then tap the top-left End button.
3. Block a specific website
Is there a certain website — or a list of websites — that you don’t want your kid visiting? iOS’s Restrictions let you block websites so that your kid can’t visit them in Safari.
To use this feature, first make sure you’ve enabled Restrictions as described earlier. Now open the Settings app and choose General > Restrictions. Tap the Websites button under the Allowed Content group. This displays a list of options: All Websites, Limit Adult Content, and Specific Websites Only.
Tap Limit Adult Content, and iOS will now block most well-known adult websites automatically. Now tap Add a Website… under the Never Allow group, and type in the URL of the website you want to block (such as www.example.com ):

To block websites with the Limit Adult Content feature, add them to the Never Allow list.
To be on the safe side, you might also want to add variants such as example .com and m.example.com too.
With Limit Adult Content, you might find that Safari gets a bit overzealous and blocks perfectly innocent websites. If this happens, you’ll see a message like this appear:

When Safari blocks a website, you’ll see a message like this appear.
Simply tap Allow Website, then enter your Restrictions Passcode to add that site to the whitelist. You can also add any safe sites you like by tapping the Add a Website… button under the Always Allow group in Settings > General > Restrictions > Websites.
To remove a website from the Always Allow or Never Allow list, swipe left on the site and tap Delete.
Bear in mind that this only works in Safari, so if the device has another browser installed then your kid will still be able to visit any website in that browser.
4. Allow only some websites
Rather than blocking a website or two, you can take things a stage further and only allow access to a set list of websites. This is obviously safer than blocking sites, since you know that your child won’t be able to stray onto a new unsavoury website that isn’t in your block list.
To set up a list of allowed websites, make sure Restrictions is turned on, and open the Settings app. Choose General > Restrictions > Websites as you did for blocking websites, but this time, tap Specific Websites Only. You’ll see a list of Apple-approved websites appear:

Using the Specific Websites Only feature, you can use — and add to — a whitelist of approved sites to keep your kid safe.
Your kid can now browse only these websites in Safari; all other websites on the internet are blocked.
If you don’t agree with Apple’s choices and want to alter this list, you can tap Add a Website… at the bottom of the list to allow another site. You can also remove a site from the list by swiping left on the site and tapping Delete.
As with Limit Adult Content, note that this feature only works in Safari. If your kid uses another browser, they’ll be able to visit any website.
5. Block apps, music, movies, TV shows and books
What’s the most reliable way to prevent your child stumbling on content that’s too old for them? Don’t put that content on the device in the first place, of course! However, if you share your device with your kid then this can be inconvenient. Perhaps you want to take a couple of grown-up movies with you to watch on a trip, but you don’t want your kid watching them when they should be playing Toca Town .
No problem! Restrictions in iOS allows you to set age limits on different types of content, from movies through to apps, TV shows, books and music.
To use this feature, open the Settings app and choose General > Restrictions. Under the Allowed Content group, choose the type of content that you want to restrict, such as Apps. Tap the maximum age range that you want to allow. For example, to block any apps that are unsuitable for kids under 12, tap the 9+ button:

The Allowed Content group under Restrictions lets you set age limits for apps, movies and more.
When you block content, it’s simply hidden from the device. For example, age-inappropriate apps vanish from the home screen, and movies disappear from the Videos app.
To make the content reappear on your device, either select the appropriate “Allow All” option in the list, or disable Restrictions altogether.
6. Keep Siri in check
Siri, iOS’s virtual assistant, springs into life when you click and hold the Home button. Your kid can use Siri to dictate text, search the web, launch apps, and more.
Generally Siri is squeaky-clean, but if it thinks it hears a rude word it will dutifully display it onscreen. You can prevent this happening by choosing General > Restrictions in the Settings app, tapping Siri in the Allowed Content group, and deselecting Explicit Language:

Keeping Siri polite with iOS Restrictions.
While you’re there, you can also prevent Siri searching the web by deselecting Web Search Content.
If you prefer, you can block Siri entirely by turning it off in the Allow group in the General > Restrictions window.
7. Check if an app is safe
As a parent, you’re probably on the lookout for apps for your child that are kid-friendly and safe. How can you make sure that an app is going to keep your kid safe before you purchase it? Here are some things you can do:
- Look it up on Common Sense Media. Common Sense Media is an excellent database containing thousands of apps, movies and more. For each app, you’ll find a suggested age rating, a mini-review, and an indication of the app’s quality, helping you make an informed decision. If the app you’re interested in is even vaguely popular, chances are you’ll find it in their database.
- 4+ is for apps with no objectionable content.
- 9+ apps may contain “mild or infrequent occurrences of cartoon, fantasy, or realistic violence”, and/or “infrequent or mild mature, suggestive, or horror-themed content” that may not be suitable for kids younger than 9.
- 12+ apps may contain more intense violence, as well as infrequent mild swearing and possibly simulated gambling.
- 17+ apps are for adults only, and can contain a lot of swearing, as well as frequent, intense violence, sexual content, drug use and so on.
In addition, many App Store apps now include a target age range, such as “Made for Ages 5 and Under”, which can give you a good idea if an app will be appropriate for your kid.

The App Store includes an age rating on each app’s page. (Did I mention that I like Toca Town?!)
- Look out for in-app purchases. Many apps these days include in-app purchases, where you can purchase additional content or pay to unlock extra features from within the app itself. Depending on the type of app or game, you might find in-app purchases to be a problem. For example, if a game requires an in-app purchase to get past a certain level, or to buy more in-game coins, expect to be nagged incessantly by your child! To check if an app has in-app purchases before you buy, look for the phrase Offers In-App Purchases on the app’s page in the App Store. You can also block in-app purchases using iOS’s Restrictions feature. You’ll look at this in a moment.
- Check for email and message functions. Some apps and games include the ability to send an email or text message within an app, and currently there’s no way to disable this in iOS 7’s Restrictions. You might not want your kid sending random messages to your friends and colleagues! Often an app will mention such a feature on its App Store page, and Common Sense Media also often mentions whether an app has the ability to send messages, so take a look in those places if you’re concerned.
- Read some good app review blogs. There are many great blogs that constantly review new kids’ apps and games, and they can be a great way to find out if an app will be appropriate for your kid. Check out Apps Playground , Smart Apps For Kids and Best Apps For Kids , to name but a few.
8. Make searching safer
Web searching can be a bit of a double-edged sword with kids. On the one hand, it provides an easy way to find out information on any topic under the Sun. On the other hand, the search results can sometimes contain adult-related content that you’d rather your kid didn’t see!
There are a few things you can do to limit this problem:
- Enable Google SafeSearch. Assuming you’re using the default Google search engine in Safari, you can enable Google’s SafeSearch mode , which filters out most (but not all) adult content from search results. If you want to lock SafeSearch so that it can’t easily be turned off, visit your Search Settings page, click the Lock SafeSearch link, and sign in with your Google Account if necessary.

To enable Google SafeSearch, visit your Search Settings page and select the “Filter explicit results” checkbox.
- Block search entirely. If SafeSearch isn’t comprehensive enough for you, you might want to block web searching altogether on the device. You can block various search engines using iOS Restrictions (see “Block a specific website” earlier in the article). For example, to block Google, add google.com to the Never Allow list. (Depending on your country, you may also need to add your country-specific Google domain, such as google.co.uk or google.com.au .)
- Block Safari entirely. If your kid mainly uses the device for playing games and using apps, the safest option is to disable Safari so that they can’t surf the web at all. To do this, open up the Settings app, choose General > Restrictions, and turn off Safari in the Allow group.
9. Manage YouTube viewing
When it comes to keeping your kids safe on the internet, YouTube can be a big problem. If your kids are anything like mine, you’ve probably found them watching something they shouldn’t on YouTube at least once!
YouTube videos don’t come with any sort of age rating, and there are lots of unsavoury videos just a click away. However, there are some things you can do to keep your kid safe from such videos:
- Enable YouTube’s Safety Mode. YouTube has a Safety Mode that can filter out inappropriate videos from searches and suggestions. It’s not foolproof, but it’s better than nothing. As with Google SafeSearch, by default this setting is only temporary; if you want to lock Safety Mode, log into YouTube on the device using your Google Account, enable Safety Mode, then follow the “Lock safety mode on this browser” link at the bottom of every YouTube page.

To filter YouTube, press the Safety button at the bottom of any YouTube page, then turn Safety Mode on.
- Block YouTube entirely. To prevent access to YouTube entirely, you can use iOS Restrictions to block youtube.com , www.youtube.com and m.youtube.com (see “Block a specific website” earlier in the chapter), and remove the YouTube app if you’ve installed it.
Meanwhile, Google is reportedly developing a version of YouTube for kids , so keep an eye on that one!
10. Stop your kid spending your money
When you hand over your iPad to little Johnny, the last thing you want him to do is rack up a $50 bill on the App Store. Fortunately, there are a few ways you can lock down the device to prevent purchases:
- Always require a password for purchases. The iTunes Store asks for your Apple ID password (don’t give this to your kids!) when purchasing an item, but there’s a loophole: By default, a purchase made within 15 minutes of the previous one doesn’t require the password to be reentered. If you’re letting your kid loose on your device, I strongly recommend opening the Settings app, choosing General > Restrictions, finding the Require Password setting in the Allowed Content group, and changing this setting from “15 minutes” to “Immediately”. Once you’ve done this, your password will need to be entered every time a purchase is made:

Make sure that your Apple ID password is always needed for purchasing apps and other content.
- Turn off purchases altogether. To be on the safe side, you may want to disable all purchases on the device. To do this, open the Settings app and choose General > Restrictions. In the Allow group, turn off iTunes Store, iBooks Store, Installing Apps, and In-App Purchases.
- Remove your payment method. As a last resort, you can always remove your payment method from your iTunes Store account. No credit card means no purchases!
11. Stop your kid deleting your apps
Younger kids often inadvertently delete apps from mobile devices. This can be doubly annoying if your app had a lot of saved data, since it will all be deleted along with the app!
To prevent your kid deleting apps from the device, open the Settings app and choose General > Restrictions, then turn off Deleting Apps in the Allow group.

Turn off the Deleting Apps setting to stop your kid deleting apps from your device.
12. Prevent apps from sending personal information
By default, it’s possible to allow iOS apps and games to upload quite a lot of personal content onto public servers, including the device’s location, contact details, photos, and sounds recorded with the devices microphone. Naturally you want to be careful about what information your kid is sharing with the world.
You can lock down various privacy settings using the Privacy group under General > Restrictions in the Settings app. These settings mirror the general iPad privacy settings available under Settings > Privacy, and they control which apps have access to which features of the device. Here are some of the settings you’ll probably want to tweak:
- Location Services controls which apps can access the device’s location.
- Contacts controls the apps that can use the contacts on the device.
- Calendars determines which apps can access your calendars on the device.
- Photos controls access to the photos taken and stored on your device.
- Microphone controls which apps can access the device’s mic and record sound.
For each one of these features, you can tap on its button to reveal a window showing all the apps that have access to that feature. Turn off any apps that you don’t want to access the feature, then tap the Don’t Allow Changes button at the top to prevent your kid from allowing any other apps to access it in future:

You can use the Privacy restrictions to control which apps have access to features like photos and the microphone.
In addition to the above privacy settings, you may also want to disable both the camera and FaceTime chat to prevent your kid uploading pictures of themselves or video chatting using FaceTime. To do this, turn off both Camera and FaceTime in the Allow group under General > Restrictions.
13. Keep your accounts safe
If they happen to wander into the iOS Settings app, it’s fairly easy for your kid to wreak havoc with your mail, contacts, calendars and iCloud accounts. They can mess around with the account settings and passwords, or even remove the accounts from the device.
To protect your accounts, choose General > Restrictions in the Settings app, then tap the Accounts button in the Allow Changes group, and tap the Don’t Allow Changes button:

Use General > Restrictions > Accounts to lock down your mail, contacts, calendars and iCloud account settings.
When you do this, a little lock icon appears next to the Accounts button, and various other sections in the Settings app, such as iCloud, the Mail accounts, Messages and FaceTime, become greyed out.
14. Protect those little ears
If your kid listens to loud music through headphones or earbuds for long periods of time, they can potentially damage their hearing . Did you know that the iPad and iPhone let you set an upper limit on music volume? To set it, open the Settings app, then choose Music > Volume Limit and drag the Max Volume slider down to a level you’re comfortable with:

Set and lock your device’s volume limit to protect your kid’s hearing.
Once you’ve done that, you can lock the volume limit so that your kid can’t bump it back up again. To do this, choose General > Restrictions in the Settings app, then tap the Volume Limit button under the Allow Changes group, and select Don’t Allow Changes.
15. Turn off Game Center’s social features
Game Center is Apple’s service that allows gamers to friend each other, play turn-based games and compete for the highest scores. Game Center is fairly safe for your kid to use, since it doesn’t really have any sort of chat system built into it at present. However, if you want to be sure your kid is safe you can turn off a couple of Game Center features under General > Restrictions > Game Center in the Settings app:
- Turn off Multiplayer Games to prevent your kid requesting a turn-based game match, sending or receiving invitations to play games, or adding new Game Center friends.
- Turn off Adding Friends if you just want to stop your child making or receiving friend requests. They can still play with existing friends if Multiplayer Games is turned on.

iOS’s Restrictions let you control the social aspects of Game Center.
16. Keep an eye on your kid’s device usage
Technological restrictions are all very well, but at the end of the day your clever kid will probably find a way around most of them! The best way to be sure they’re safe is to monitor their iPad or iPhone usage. Here are some tips to help with this:
- Device usage in the open. As with TV and computers, it’s best to make sure your child uses the mobile device in a place where you can keep an eye on them, if possible. This means using the device in the living room, not under the blanket in bed!
- Find out what they’re doing on the device. You don’t have to be a super-spy here; just take a look over their shoulder now and again, ask them about the games they’re playing, and join in too if you can! (I also find it helps to keep one ear open for any unsavoury sounds or bad language emanating from the device!)
- Keep the device locked. Set a passcode that your kid doesn’t know, or set up Touch ID with just your fingerprints. That way, your kid has to ask you to use the device, making it easier for you to keep an eye on things.

Keep an eye on how your kid is using the iPhone or iPad.
17. Talk to your kid about appropriate usage
A really important way to keep your kid safe on devices and online is to educate them about online safety and screen time . Here are some things to talk about:
- Setting limits on content. Explain clearly what types of websites, videos and apps you’re happy for your kid to use, and what types you aren’t happy with.
- Setting limits on screen time. Talk about why it can be good to limit screen time; for example, it frees up time to do other stuff, like exercise, reading and playing with friends.
- Teach them to find their own limit. Many kids start to “zone out” after too much continuous time on a game. Teach your kid to recognise when they’re getting tired or bored, so that they can take a break.
- Explain online safety concepts. Discuss why you have to be careful about sharing personal information online, and talk about how not all content online is suitable for kids.
- Talk about different ways of using devices. Some ways can be more useful and fun for your kid than others; for example, building a city with a friend in Minecraft: Pocket Edition will probably be a lot more fulfilling than simply watching Lego Star Wars gameplay videos on YouTube!

Talk to your kid about safe ways to use computers and mobile devices.
18. Follow Brightpips to keep your kid safe!
Here at Brightpips we regularly publish articles on kid-friendly and kid-safe apps and websites, and talk about different ways to keep your kid safe and happy online. To keep up to date on the latest news and articles on kids, technology and safety, you can follow Brightpips on Facebook , Twitter or Google+ , or subscribe to our regular newsletter using the form below.
I hope this article has given you some ideas for keeping your kid safe on iPads and iPhones. If you have any other suggestions, I’d love to hear them in the comments below!
Also, if your kid plays Minecraft then you might also like to check out my list of kid-friendly Minecraft YouTube channels , as well as my list of family-friendly Minecraft servers where your kid can play safely online.
Thanks for reading!
[Image credits: Feeding the ducks by FaceMePLS ( CC BY ), cropped ]
Get Free Updates
Enjoyed this article? Get the latest news and great ideas on technology, kids, and learning sent straight to your inbox!
10 comments on “ Is Your Kid Safe on the iPad or iPhone? Here Are 18 Ways to Make Sure ”

I’m loving common sense media. I didn’t know about it before, but it’s already proving really useful! Thanks!

Thanks for your comment Catherine! Yes, CSM is a great resource for checking out age suitability. 🙂

We block the app store totally … because even when you block apps based on age, the kids can still go to the app store and see the inappropriate apps. True the ‘buy/get’ is greyed out, but they can still see the apps. I’d like to see the app age restriction, block them from even seeing the apps on the app store.
Thanks for your comment Paul. That’s a good point!

Is there a way to stop iPad after a certain hour like have it block or shut down after 9pm i have a preteen that I have to keep punishing for using it to late
iPad doesn’t have a time limit system built in. You could maybe set up your router to block access to certain sites after 9pm, and there are also third-party apps that can block online access after a certain time. However, I don’t think there’s an easy, software-based way to limit your kid using the iPad offline (games etc).
We have a rule with the kids whereby they need to stop using screens at least 1 hour before bed. With my 7-year-old, I showed him a video on YouTube where a doctor explained how screens keep you awake at night, and that was enough to convince him!

The true short answer to the titular question is: NO.
The iphone is NOT kid friendly so long as you cannot prevent contacts from being added. This is truly the MOST significant feature of a PHONE. The ability to control WHO calls/texts/facetimes your child and when trumps any other considerations. There is no combination of settings that restricts adding contacts. Another phone will have to be used.

Consider adding that FaceTime/chat/email account to the device the parent uses (e.g. their iPhone/macbook) that way all contacts/chats are shown to the parent

Licia…I was recently introduced to a great parental app called OurPact. I gives you complete control over when your child can play games. You have immediate access to block the ipad or you can create a schedule when the games come on and go away.

Anyone know how to prevent the exchange of photos though texting? I would like my kids to be able to use their phones to text but not to send or receive pictures? Thank you
Space Book for Kids

Discover Outer Space in a Whole New Way!
Space: A Brightpips Guide is a truly interactive kids' eBook for iPad® and Mac®. Read, watch and play as you learn. Find out more .
Follow Brightpips
Search Brightpips
Recent posts.
- Scratch Lets Your Kid Learn Coding Online, for Free! Here’s How.
- Kids’ Space Book Now Available!
- Kids’ Space Book: Teaser Trailer Now Available!
- The Weirdest Moons in the Solar System
- Awesome Science YouTube Channels to Watch With Your Kids
- Privacy & Legal
Setting Up iPhone and iPad Parental Controls and Security Settings
Here’s how to keep your youngster’s iPhone or iPad kid-friendly and safe to use.
Parent’s Apple ID or New Apple ID?
- Screen Time
Content Filters
Ask a child or teenager which phone or tablet they want, and nine times out of 10 they’ll say iPhone or iPad. Youngsters like iPhones and iPads. Maybe it’s the smooth graphics, or the simplicity of the OS, or just the fact that everyone in school has one. Whatever the reason, Apple has positioned itself as the top mobile device choice for kids and teenagers.
As parents, that actually works in our favor. Apple knows what it’s doing when it comes to protecting users’ privacy and digital well-being . That includes offering a robust set of resources for controlling how our kids use their devices so we can better protect them.
But how do we set up those parental controls? Where do we even begin? Let this be every parent’s guide to setting up iPhone and iPad parental controls.
Whether you bought your youngster a new Apple device or upgraded yours and gave them the old one, the first step is to set up the Apple ID. But here’s where most folks get confused: Should they use their Apple ID to sign in or create a new one for their child?
For the purpose of setting up parental controls, the most ideal route is to create a new Apple ID for the child but only through the Family Sharing feature. Apple’s terms of use actually don’t permit children under 13 to create an Apple ID for themselves, 1 so the parent or guardian has to set it up. For verification, the parent must set up Family Sharing through a device logged in with their own Apple ID. Don’t worry, we’ve outlined how to do this with step-by-step instructions below.

Here’s how to create an Apple ID.
- On your iPhone or iPad, open the Settings app.
- Go to “Family” under your Apple ID.
- Select “Add Family Member” in the upper-right corner of the screen.
- Tap “Create Child Account.”
- Enter the child’s name and date of birth.
- Follow the rest of the on-screen instructions to finish setting up.
Pro Tip: Be sure to enter the correct birthdate, because you can’t change it once the Apple ID has been created. When your child turns 13, they will be given more control over their Apple ID and iCloud account.
After creating your child’s Apple ID, you can set up some parental-control features then and there. That’s part of the seamless experience iPhones and iPads provide. You can, for example, set app download permissions, create screen-time limits, and set up other security features.
Don’t worry, we’ll go through those features one by one. The next section is about Screen Time, an Apple feature that goes a long way toward keeping your child’s iPhone or iPad kid-friendly.
Screen Time: The Gateway to Parental Controls
Screen Time is Apple’s ultimate parental-control tool. Its primary function is setting a screen-time limit, but it also lets you create content filters to protect your kid online .
Start, of course, by turning on Screen Time in the Settings. Just scroll down to Screen Time, turn it on, and follow the on-screen prompts. You can do this from your iPhone or iPad or from your child’s device.
At the end of the process, you’ll set up a Screen Time passcode. You’ll use the passcode to edit your Screen Time settings, so it should be different from the passcode used to unlock the iPhone or iPad. You should also keep the Screen Time passcode under your hat to prevent your tech-whiz youngster from changing the settings.
Once Screen Time is on, you’ll gain access to content restrictions. The ability to filter content is one of the reasons parental control is necessary, so you should set aside some time to customize this feature.
A smartphone or tablet is your youngster’s gateway to the internet, and it can go downhill very fast if you don’t set up content filters. They’ll be able to download apps that are not age-appropriate or even apps that are dangerous to them. Inappropriate search results may turn up even from seemingly innocent search keywords. Even Siri, with all its wisdom, can give disturbing answers to random questions.
Did You Know? Siri has a flirtatious side, and asking questions a child may be curious about may trigger a suggestive response. Turning off Siri on a younger child’s iPhone or iPad may be a good idea.
One thing to remember is that content filters on Screen Time affect only Apple’s services, which includes the App Store, iTunes content, Safari, and Siri. It doesn’t affect content from third-party apps such as Netflix, Chrome, and YouTube Kids.
There are actually two ways to edit content filters. While setting up Screen Time, it will ask you to set up high-level restrictions. Alternatively, you can set your child’s age using the slider and it will adjust the settings to recommended levels.

If you want to really get into it, you can skip the part above and access more detailed content-filtering settings once Screen Time is set up. Just open Screen Time in the Settings app and look for Content & Privacy Restrictions.
You’ll be able to fully customize the restrictions. You can set up age restrictions for downloadable content; allow or deny access to location, microphone, and other device features; and much more. We recommend going through the entire list of restrictions one by one to make sure you’re in full control, but here are a few ideas for things to set.
- Web content: You can limit Safari to allow only a list of websites hand-picked by you. For older kids, Safari can filter adult websites but allow everything else.
- Turn Siri on or off: If you’re worried Siri may be bad for your kid, you can turn it off completely. Otherwise you can restrict Siri from being used to search the web or have it filter explicit language.
- Online games: Game Center lets your kid play multiplayer online games with other iPhone users online, but you can limit with whom they are allowed to be paired to just friends. You can also turn off multiplayer matching completely.
- Location services: See which apps have access to the iPhone or iPad’s location data, and edit their permissions as well. You can also turn off location services for all apps.
- App Store purchases: You can set whether installing apps, deleting apps, and making in-app purchases is allowed on your child’s device. You can also set it so a password is required when buying or installing apps.
Did You Know? In 2020, a child reportedly spent $16,000 on in-app purchases without his parents’ knowledge. 2 To prevent this from happening to you, it’s best to turn off in-app purchases completely.
The next part is for your child’s digital well-being. We can all agree that too much screen time is bad for their mental and physical health, so setting limits is a must.
With Apple devices, screen-time limits are taken to the next level. You can schedule Downtimes, for example, a period of time wherein the iPhone or iPad’s features are limited only to what you allow. You can use it to create a regular bedtime routine for your kids, especially on school nights.
Once Downtime is turned on, the prompt pictured below will appear when they try to open an app.

By default, they can keep ignoring the time limit by pressing “Ask For More Time,” but you can prevent that by turning on Block at Downtime. Here’s how:
- Go to Settings and open Screen Time.
- Select Downtime.
- Enter your Screen Time passcode.
- Toggle the “Block at Downtime” button.
After that, they will only be able to extend the screen time once for one minute in case they’re doing homework or something important. If they attempt to bypass the limit again, they’ll need your Screen Time passcode.
FYI: You can allow your kid to use certain apps during Downtime. They can still use FaceTime or Messages, for example. You can, however, limit with whom they are allowed to communicate during Downtime. For instance, you can set it so they can still call or text you but no one else.
Aside from Downtime, you can limit how much time your youngster spends on an app, which is really useful in limiting their use of social media and mobile games.
This feature is under Screen Time in the “App Limits” section. The apps are categorized for your convenience, and you can even limit entire categories at once.
Next you’ll have to set how much time they are allowed to spend on an app or type of app per day. You can also customize the time limit per day, such as fewer hours on weekdays and an extra hour on weekends.
Once they reach the limit, a prompt will appear similar to the Downtime prompt.
Conclusion: Are iPhone and iPad Parental Controls Enough?
Apple devices have some of the most comprehensive parental controls among mobile operating systems, but they’re far from perfect.
Teenagers know to use third-party browsers to bypass Safari web filters, for example. Of course, you can tighten the grip and take away their iPhone’s ability to download apps, but remember: Setting parental controls isn’t about being in control. It’s about keeping our children safe. If you catch your child trying to bypass parental controls, discussing why these features are in place may yield better results than just adding more restrictions.
Overall, iPhone and iPad parental controls are enough for most, but there are plenty of parental-control software options available in the App Store if you need a tighter handle on things.
FAQs About iPhone and iPad Parental Controls
Read on for our take on some of the most frequently asked questions about iPhone and iPad parental controls.
Yes, you can monitor their device usage by heading to Settings, then Screen Time. The graph at the top tells you the average device usage time per day, and tapping “See All Activity” shows you a more detailed breakdown of how much time they spend on each app.
Yes, you can track your child’s location if they are a part of Family Sharing and location sharing is turned on. This feature, however, requires that your child’s iPhone or iPad be connected to the internet.
You can’t remotely pilot your child’s iPad, but you can turn on Screen Time remotely using your device. You can even activate Downtime at will.
The parental controls on iPhones and iPads are designed to keep your child safe online, and there are a few features that will help you protect their identity, personal information, and privacy. You can set up app restrictions, for example, to prevent them from downloading apps that may compromise their data. You can also turn off features such as location services and microphone, or edit apps’ access to these features.
Unfortunately, you can only manage iPhone and iPad parental controls from another Apple device. You can still set up parental controls on their device, but approving apps and time-limit extensions, for example, requires another Apple device with your Apple ID signed in.
Apple. (2022, Nov 29). Create an Apple ID for your child . support.apple.com/en-us/HT201084
Apple Insider. (2020, Dec 13). Child spends $16K on iPad game in-app purchases . appleinsider.com/articles/20/12/13/kid-spends-16k-on-in-app-purchases-for-ipad-game-sonic-forces
- Apple Watch
- Accessories
- Digital Magazine – Subscribe
- Digital Magazine – Log In
- Smart Answers
- M3 MacBook Air
- New iPad Air
- iPad mini 7
- Next Mac Pro
- Best Mac antivirus
- Best Mac VPN
When you purchase through links in our articles, we may earn a small commission. This doesn't affect our editorial independence .
5 things to do before giving an old iPhone or iPad to your kid

Like it or not, little kids love iPhones and iPads. They love to look at them, they love to tap and swipe the screen, they love playing iPhone games, and most of all, they love watching videos on them. (“Curious George” is my daughter’s favorite—for this week at least.)
Giving your little ones a hand-me-down iOS device is an easy way to satisfy their desire for a screen of their own—my kid is the proud owner of an iPhone 3GS and a third-generation iPad.
That said, you shouldn’t hand over your old iPhone or iPad without doing some kid-proofing first. Read on for five ways to prep an aging iPhone or iPad for your youngster, from wiping your data and setting up a child’s iCloud account to blocking web access and keeping her from racking up in-app charges on your credit card.
Wipe your old data
Before you hand over your old iPhone to your kids, you’ll want to make sure any and all of your personal data has been wiped clean. The best way to do so is to perform a “factory” reset, which wipes the iPhone’s storage and returns it to its factory settings.

Make sure to back up and then wipe your data before handing over your old iPhone to your child.
Naturally, you should first make sure you’ve backed up any old iPhone or iPad data you want to preserve. You may already have taken care of this step if you’ve previously upgraded to a new iPhone or iPad and restored your data from iCloud. If not, tap Settings, tap your iCloud profile, then tap iCloud > Backup > Back Up Now . You can also back up your old iPhone or iPad by connecting it to your Mac or PC and syncing it with iTunes.
Once you’re satisfied that your data is safe and sound, go ahead and wipe the device. Tap Settings > General > Reset > Erase All Content and Settings . Once the reset is complete, your old iPhone or iPad will return to its factory settings, just like the day it came out of the box.
Create a child’s iCloud account
While it may seem a little soon to, say, create an Apple ID for a toddler, take it from me: it won’t be long before your onesie-clad cutie is walking, talking and pleading for an iPhone upgrade—and when that happens, it’ll be easier to migrate her data and apps if she already has her own iCloud account.

Just because your child is under 13 doesn’t mean she can’t have her own iCloud account and Apple ID.
Even if your kid is younger than 13 years old, she can still have her own iCloud account and Apple ID. All you need to do is create the account under iOS’s “Family Sharing” umbrella. With her iCloud account, your child will be able to sign in to an old iPhone or iPad, download apps, and even purchase items from the App Store—only with your approval, of course.
Also, keep in mind that just because she has an iCloud account, your daughter or son won’t be able to start web surfing, tweeting, or posting selfies on Instagram without your say-so. (More on iOS’s parental controls in a moment.)
You can create a child’s iCloud account directly on your own iPhone or iPad. Just tap Settings, tap your iCloud username, then tap Family Sharing > Add Family Member > Create an Apple ID for a child .
You’ll need to enter your kid’s birthday, agree to some disclosures and legalese, choose a payment method for App Store purchases (which, again, you can control and/or block), then choose an Apple ID username and password.
By default, your kid’s new iCloud account won’t let her make App Store purchases without your consent. To double-check the “Ask to Buy” setting, tap Settings, tap your iCloud account name, then tap Family Sharing and your kid’s name.
Control what your kid can—and can’t—do on her iPhone or iPad
Once you’ve got your old iPhone or iPad set up with your child’s new iCloud account, it’s time to make some decisions on which iOS features will be fair game for your kid, and which will be off-limits.

Don’t want your child surfing the web or snapping photos on her hand-me-down iPhone? You can block those activities in iOS’s Restrictions settings.
Tap Settings > General > Restrictions > Enable Restrictions , then create a Restrictions passcode.
Next, scroll down and disable all the iOS features that you’d rather your kid not mess with. You’ll probably want to disable Safari and the iTunes store right away. You may also want to block your child from installing apps, and if you don’t want your little one snapping a million photos of their crib, you might want to nix the Camera app, too.
In the “Allowed Content” section, make sure to disable in-app purchases, as well as block music with explicit music and any grown-up movies, TV shows and books.
In the Privacy section, you can control which apps can access location services, contacts, the microphone, and more on your kid’s iPhone.
At the bottom of the Restrictions screen, you can also disable access to multiplayer games, friend adding, and screen recording for any Game Center-ready games.
Hide Settings, Mail, and other Apple apps
Even after you’ve thoroughly managed all of iOS’s Restrictions settings, you may still see some home-screen icons on your kid’s iPhone or iPad that you’d rather she not mess with. For example, the Settings icon should probably stay out of her hands, as well as the Mail app, Game Center, and the App Store.

You can hide the Mail, App Store, and other Apple apps in a folder, preferably on its own home screen in the back.
Here’s what I did before I gave my daughter my old iPhone: I hid all those various Apple apps in a “Hidden” folder in the very last iOS home screen. To create a home screen folder, drag one app icon on top of another, name the folder, then start dragging other app icons into the newly created folder.
Naturally, older kids who are a bit more iOS savvy may quickly sniff out the “Hidden” folder. My five-year-old, for example, knows exactly where I’ve tucked away the Settings icon, but she doesn’t really care—probably because tapping Settings won’t get her any closer to Curious George.
Turn on Airplane mode
One way to make sure your little one doesn’t wander into a grown-up corner of the Internet on her iPhone is to cut off Internet access altogether, and the easiest way to do that is to turn on Airplane mode. (Of course, you can kiss Airplane mode goodbye once your children start clamoring for the streaming PBS Kids video app, which they’ll do once they hit about 3 or so.)
Just tap Settings, then flip on the Airplane Mode switch.

Turning on Airplane mode is an easy way to keep tiny iPhone users off the Internet.
If your old iPhone or iPad is running on iOS 6 or later, you may also want to disable home-screen and in-app access to Control Center, the flip-up control panel that includes an Airplane Mode button, To do so, tap Settings > Control Center , then switch off the Access on Lock Screen and Access Within Apps settings. That won’t completely disable Control Center, but at least it’ll make it a tad more challenging to find.
Author: Ben Patterson , Senior Writer

Ben has been writing about technology and consumer electronics for more than 20 years. A PCWorld contributor since 2014, Ben joined TechHive in 2019, where he covers smart speakers, soundbars, and other smart and home-theater devices. You can follow Ben on Twitter .
Recent stories by Ben Patterson:
- Become an expert at Safari for iOS with these 8 tips and tricks
- 11 gotta-know iOS camera tricks for beginners
- Switching from Mail to Airmail on iOS: 7 tips to get started
How to Set Up Safari Parental Controls on iPhone, iPad & Mac
Brad Bartlett

As a parent, you want to make sure your children are safe when they’re using the internet. You may also want to restrict the websites they can visit and set time limits for how long they can use the Safari browser. As the leading browser on Apple devices, Safari is a great way to keep your children safe when they’re online.
The sneaky thing about Safari is how ubiquitous it is. It’s available on the iPhone, iPad, and Mac—and is essential for a variety of purposes. It may seem harmless, but Safari is an open gateway to the whole internet. So, it’s essential to take the time to set up parental controls on Safari for each of these devices.
Are you looking for ways to keep your child safe on the internet? In this guide, we will take a look at how to set up parental controls on Safari for the iPhone, iPad, and Mac. Plus, we will offer tips to help you keep your children safe online.
What is Safari?
The flagship browser from Apple, Safari, is pre-installed on all Apple devices, including iPhones, iPads, and Macbooks.
The browser was launched in 2003, paving the way for the success of iPhone and iPads later in the decade. The browser has a range of features, such as tabbed browsing, private browsing, and the ability to sync bookmarks across devices.
Safari is used to access websites, search for information online, watch videos, and more. It’s important to note that Safari does not block any potentially dangerous websites by default. Instead, it’s up to you as the parent to activate parental controls on Safari and ensure your child is safe online.
Is Safari Dangerous for Children?
The short answer is yes. Without parental controls in place, Safari can be dangerous for children. As the leading browser on Apple devices, Safari provides access to the entire internet—including potentially harmful websites and content.
Here are just a few of the reasons why parents should consider setting up parental controls on Safari:
Unmonitored access to adult content
When children have unrestricted access to the internet, they can easily stumble across adult content that is inappropriate for their age. This is especially true when using unmonitored devices such as iPhones, iPads, and Macs. Whether it’s sexual content or violent videos, you want to protect your children from these potentially harmful materials.
Unauthorized purchases
When using Safari, children can unintentionally make unauthorized purchases without their parent’s knowledge. This could include in-app purchases or online shopping. If not blocked, children can rack up hundreds of dollars in charges on the family credit card.
Unrestricted access to social media
It’s important to note that many social media sites can be accessed through Safari. Without parental controls in place, your children may have unrestricted access to platforms such as Facebook and Instagram. This could lead to online predators contacting your child or cyberbullying.
Access to online scams
The internet is full of scammers looking to exploit unsuspecting victims—including children. Unrestricted browsing can put your child at risk of falling victim to an online scam. Even if a scam is not successful, it can still be an unpleasant experience for your child.
Unlimited screen time through Safari
Finally, unrestricted access to Safari can lead to too much screen time for your children. If not limited, they may spend hours upon hours scrolling through their social media feeds or watching videos on YouTube. This could be detrimental to their physical and mental health in the long run.
Safari makes it easy to browse the internet but can also be a gateway to potentially dangerous content. That’s why setting up parental controls on Safari for each of your Apple devices is essential. Let’s see what steps you should take next.
How to Set Up Parental Controls on Safari
The good news is that setting up parental controls on Safari is relatively simple. Here’s a step-by-step guide for each of your Apple devices:
How to Set Up Parental Controls on Safari for Mac
Safari comes installed as the default browser on Mac devices. These devices include desktops, laptops, or older versions of the iPad. To set up parental controls on Safari for Mac:
- Open Safari and go to Preferences. You can find this by clicking on the Safari menu in the top left corner of your screen and then selecting Preferences. Within the Preferences window, you’ll find several tabs.
- Click on the Websites tab and select Content Blockers. From here, you can choose which websites are allowed or blocked using the drop-down menus next to each website category. You’ll also have the option to set time limits for how long your child can use Safari during a given day.
- When you’re done, click on the Done button to save your changes.
- Click on the Privacy tab to adjust settings for the websites your child can access. You can set aspects such as privacy tracking, access to Apple Cards for payments, and other content.
- When you’re done, click on the Done button to save your changes.
Can I Set Up Parental Controls for Safari through Mac Preferences?
You can set parental controls from within Safari itself, but what if you want to set the same controls across all of your Mac’s applications – or limit the use of Safari completely? Within Mac’s preferences, you can limit the use of Safari and all other applications. To do this:
- Click on the Apple Menu in the top left corner of your screen and select System Preferences.
- Select Parental Controls from the list of preferences on the left side.
- From here, you can set up parental controls for each of your users. You can restrict applications and websites, set time limits, and monitor activity.
- When you’re done, click on the Lock button in the bottom left corner to save your changes.
That’s it! You’ve successfully set up parental controls on Safari for Mac. Whether you access the parental control settings through Safari or the Mac device’s System Preferences, you can always make changes to your child’s settings as needed. Take a look at all the available options, and make sure to adjust the settings as your child grows.
How to Set Up Parental Controls on Safari for iPhone & iPad
Just like Mac, iPhones and iPads come pre-installed with Safari as the default browser. The process for setting up parental controls on Safari is similar to the Mac—with a few added steps. The primary difference comes from iOS devices’ added features, such as App Store access and Siri, as well as Screen Time.
- Open the device’s Settings menu and select Screen Time. Screen Time is iOS’s system for setting limits on device usage. Within this menu, you can set time limits for app usage and restrict certain categories of apps.
- From the Screen Time menu, select Content & Privacy Restrictions. Here you will have the option to restrict access to specific websites and choose which type of content your child is allowed to view or download from the App Store. You can also turn off GPS tracking for apps like Safari.
- Select Websites from the Content & Privacy Restrictions menu and choose Always Allow or Never Allow for each website category. Consider setting time limits for Safari usage, as well.
That’s it! You’ve successfully set up parental controls for iPhone and iPad devices for Safari. As with Mac, you can always make adjustments and customize settings as needed. Don’t forget to check in every now and then to ensure your child uses their devices safely.
Tips for Using Safari Safely
Safari’s parental controls are a great way to keep your child safe while using the internet. However, it’s vital that you stay vigilant and help teach your child about online safety. Here are some tips for using Safari safely:
Be sure to set strong passwords on all devices and change them often.
One of the most important things you can do to keep your child safe is to set strong passwords on their devices. This will help protect them from hackers and malicious websites – which can happen even within Safari. Make sure to set unique and complex passwords and change them regularly.
Encourage your child to be cautious when clicking on links.
Links can contain malicious content or lead to websites that you don’t want them accessing. Encourage your child to think twice before clicking any link, even if it comes from a trusted source.
Monitor your child’s online activity regularly.
As your children use their devices, watching their online activity is important. Regularly check their browsing history and any other activities they may be engaging in online. Take note of any concerning behavior and talk to your child about it. Let them know that you are monitoring their activity and are there for them if they have any questions or concerns.
Use two-factor authentication or multi-factor authentication when possible.
Setting up two-factor authentication or multi-factor authentication on your child’s devices can also help keep their accounts secure. This will require additional steps to log in, such as entering a one-time code or verifying an email or SMS message. The more secure the login process, the better.
Talk to your child about online safety.
Finally, be sure to talk to your child about the importance of staying safe while using the internet. Teach them what they should and shouldn’t do online, and remind them that you’re always there if they need help or want to talk about something. If your child feels safe and comfortable, they’ll be more likely to ask for help if they ever encounter any danger online.
With Safari Parental Controls, you can easily keep your child safe while using the internet. Setting up these controls is easy and straightforward, so why wait? Take a few minutes to set up parental controls on Safari and keep your child safe online!
Take Your Online Safety Further with Kidslox
While Safari offers some great parental controls, you may want to take your online safety even further. One of the best ways to help keep your family safe online is by using Kidslox. It’s a comprehensive parental control app that allows you to manage screen time, block websites and apps, monitor internet activity, and more.
As a third-party parental control service, Kidslox offers added functionality and features unavailable on Safari. With a single account, you can connect all of your digital devices and manage them conveniently from one place. Plus, you can also set up custom profiles for each child with personalized settings and restrictions.
Ready to take your online safety to the next level? Try Kidslox today and keep your family safe no matter where they are. And with these Safari Parental Controls, you can be sure that your child is using their devices responsibly.
Related Posts

A Parent’s Guide to TikTok Challenges and Trends
The ALS Ice Bucket Challenge. Planking on the beach. Mastering the ...

The Best History Apps For Kids
Our list of the top applications focused on helping kids understand...
How to Use Nintendo Switch Parental Controls
As a parent, you know that nothing gets kids fired up like the late...

Is TikTok Dangerous?
Five things that parents need to know about the popular video shari...


Rebekah Pierce

With the proliferation of online content and the increasing time spent by children on digital platforms, implementing robust Safari parental controls has become paramount for ensuring a safe and secure browsing experience.
We all want to protect our children from harm, but we also want them to explore the world and learn new things.
With the rise of the internet, keeping our kids safe online has become a top priority for parents. That’s why parental controls on Safari, the default web browsers for iPhone, iPad, and Mac, are so important.
In this blog post, we’ll show you how to set up and customize Safari parental controls, so you can protect your kids from inappropriate content, limit their screen time, and more.
What is Safari?
Is safari dangerous for children, how to set up safari parental controls on iphone & ipad, how to set up parental controls on mac, tips for using safari safely, stay safe with find my kinds and kids360.

Nicole Lienemann/Shutterstock.com
Safari is a web browser developed by Apple and is included as the default browser on all Apple devices, including iPhones, iPads, and Mac computers. The first version of Safari was introduced in 2003 and has gone through several updates since then. Safari is known for its speed, security, and energy efficiency.
One of the main reasons why Safari is a great web browser for parents is its built-in parental controls. These controlling options allow a parent to set restrictions on websites and content that their children can access.
Safari also has a feature called ‘private browsing’ that allows users to browse the web without leaving a history or storing cookies. This is especially useful for parents who want to keep their children’s internet activity private.

Prostock-studio/Shutterstock.com
As parents, our top priority is always the safety and well-being of our children. In today’s digital age, the use of technology and the internet is inevitable, and we can’t always be there to monitor our children’s online activity.
With advancements in technology, it’s now easier for children to access harmful content than ever before. Safari is an integral part of Apple devices but without the right settings, it can be dangerous for children.
Ability to Access Adult Content
Safari is a gateway to the internet and can provide easy access to adult content. Children can accidentally stumble upon inappropriate content while browsing, which can lead to mental and emotional damage.
Can Make Unauthorized Purchases
Children can easily make unauthorized in-app purchases or purchases on Safari that can leave parents with a hefty bill.
Without proper parental controls, children can unintentionally subscribe to expensive services or buy in-app purchases without adult supervision. This can put a considerable dent in a parent’s wallet.
Able to Access Social Media with No Restrictions
Social media can be a potentially dangerous place for children. The anonymity of the internet provides an avenue for cyberbullying , predation, and exposure to harmful content.
Children can easily access social media on Safari and without restrictions, can engage in inappropriate behavior.
Access to Online Scams
Online scams are becoming more sophisticated, and it can be challenging for children to identify them without proper guidance. Children can unknowingly give out personal information and fall victim to phishing scams.
Unlimited Screen Time
Screen addiction can significantly impact children’s development and well-being, leading to physical and mental health issues. With the ability to access Safari anytime, anywhere, it’s easy for children to spend excessive time online.
Setting up Safari parental controls on your iPhone and iPad is a quick and easy way to protect your kids from inappropriate content and online threats. By following the steps outlined below, you’ll be able to customize your settings to meet your family’s specific needs.
How to Establish Safari Parental Controls on an iPhone

Credit: famisafe.wondershare.com
A smartphone is a useful tool for many things, but it can also expose your kids to various dangers online. That’s why it’s important to set up options for a controller, especially when it comes to web browsing.
- Open the Settings app on your iPhone. Select Screen Time.
- Select Content & Privacy Restrictions.
- Move the Content & Privacy Restrictions slider to on/green.
- Enter the Screen Time passcode for this device. If you haven’t set up a passcode yet, you’ll need to do that first.
- Select Allowed Apps. Here, you’ll see a list of all the apps installed on your device. To disable Safari, turn the slider to ‘off.’
If you want to allow Safari but restrict access to certain websites, go back to Content & Privacy Restrictions and select Content Restrictions. Select Web Content. Here, you’ll see several options to restrict access to specific types of web content. For example, you can choose to block adult websites, limit access to certain types of websites, or only allow access to specific websites.
Once you’ve made your selections, exit the Settings app. The parental controls you’ve just set up will apply to all users on this device, including your kids.
Related: How to Restrict Apps on iPhone .
How to Establish Safari Parental Controls on iPad
Credit: browserhow.com
- First, you need to go to the Settings app on the iPad. You should see the icon on the home screen. Select it to open the app.
- Next, you want to locate the Screen Time settings. Scroll down until you find it and tap it.
- Once you’re in the Screen Time menu, tap on Content & Privacy Restrictions.
- Move the switch on the Content & Privacy Restrictions screen to turn it on. If prompted, enter the Screen Time passcode for this device. This is an important passcode, so remember it or store it somewhere safe.
- Next, you will see a list of different settings that you can restrict. Select Allowed Apps. This will give you the option to disable Safari. If you want to block web browsing entirely, toggle the Safari browser slider off.
If you want to allow browsing but restrict access to certain types of content, tap on Content Restrictions, then tap Web Content. Here, you can set various permissions. For example, you can choose to only allow access to specific websites that you trust or choose to block adult content.

Credit: idownloadblog.com
- First, let’s get to the Screen Time settings on Mac. The settings can be accessed by clicking on the Apple logo on the top left corner of your screen, then selecting System Preferences > Screen Time.
- Ensure that you choose the name of your child’s account if you use Family Sharing. From here, you can manage all control settings, as well as set specific times for app usage and screen time for your child.
- Now, let’s dive deeper into Parental Controls on Safari. Click on ‘Content & Privacy’ and turn it on by clicking on the top right corner ‘Turn On’ button.
- The first option, Unrestricted Access, allows open access to all websites. If you don’t want any restrictions, then select this option.
- The second option, Limit Adult Websites, blocks access to explicit content. While this option won’t block all adult websites, It’s a good starting point.
- The third option, Allowed Websites Only, will only allow access to whitelisted websites. It’s the safest option, but it requires you to add all websites that you want your child to have access to beforehand.
Along with these three options, you can also customize other settings, such as blocking pop-ups and cookies. These options might help enhance your parental control settings to make internet browsing safer for your children.

Ground Picture/Shutterstock.com
Below, we’ll share some tips on how parents can ensure that their kids enjoy a secure and enjoyable Safari browsing experience.
Install an Ad Blocker
An ad blocker can help prevent unwanted pop-ups, banners, and ads. The purpose of ads is to get clicks, and sometimes, these ads may lead to malware-infected URLs. An ad blocker will make Safari browsing a seamless and pleasant experience, free from annoying pop-ups and advertisements.
Set Strong Passwords Across All Devices
Passwords are the first line of defense for your digital identity. Ensure that all your devices, including your phone, tablet, laptop, and desktop, are secured with strong passwords.
A strong password should be a combination of upper and lowercase letters, numbers, and special characters. The more complex the password, the harder it will be for cybercriminals to crack it.
Make sure that you use different passwords for different devices and change them often.
Change Passwords Often
It’s important to change passwords frequently to reduce the chances of someone hacking into your accounts. Change all your passwords every few months, especially after big data breaches where your data may have been compromised. This will help keep your online identity secure.
Teach Your Child Internet Safety
Internet safety should be a priority for every parent. While it’s important to teach your children about the dangers of the internet, it’s equally important to teach them how to stay safe online.
One of the biggest dangers online is clicking on links that could take them to unsafe or inappropriate websites. Make sure your child knows how to recognize a suspicious link and avoid clicking it.
Monitor Your Child’s Online Activity
As a parent, it’s essential to be in the loop about your kids’ online activities. Monitoring can help alert you when there is suspicious activity. It can also help you identify what sites they are visiting, how long they are spending online, and what kind of content they are consuming. There are many free and paid apps that can be used for monitoring and managing online activity.
Stay Updated and Use Reliable Software
Just as Safari is consistently updated, so is malware and other cyber threats. Ensure that you have a reliable antivirus solution installed on your Apple device and that it is updated regularly. Keeping your device and software updated can help keep you safe and secure while browsing .

F8 studio/Shutterstock.com
Gone are the days when parents only had to worry about their child’s safety in the physical world. With the rise of technology, the internet has made it possible for countless dangers to lurk around every online corner.
As parents, we’re in a constant battle between protecting our child and allowing them to explore and learn digitally. That’s where apps like Findmykids and Kids360 come in. With their advanced features, you can ensure your child stays safe.
As the name suggests, Findmykids is an app that allows parents to keep track of their child’s location. This app is excellent if you’re busy with work or chores and want to ensure your child is safe when they’re not with you. But, it’s not just about location tracking.

Findmykids also enables parents to control what apps their child download and use. The app allows you to monitor your child’s screen time in a particular app and presents statistics of all apps your kid spends time in.
Kids360 offers an additional layer of security by enabling parents to remotely monitor and control their child’s phone if needed. The parent can schedule gadget usage and block or restrict access to specific apps at specific times.

One of the best things about both Findmykids and Kids360 is their ease of use. Both apps are user-friendly and can be set up within minutes. While they sound similar, they offer different features that complement each other.
You can even use them simultaneously for added protection. Instead of fearing what your child may come across while browsing Safari, these apps offer peace of mind and security.
Download the Findmykids app to keep your child safe wherever they are and start using Kids360 to protect your child from inappropriate content.
Setting up Parental Controls on Safari is a simple yet effective way to protect your kids from online dangers. By restricting access to inappropriate content, setting screen time limits, and monitoring website activity, you’ll have peace of mind knowing that your kids can safely explore the web.
Take the time to experiment with different settings and check in regularly with your kids to see how things are working out. Together, you can create a safer and happier internet experience for your family.

How do I block inappropriate content on Safari?
To block adult content and other explicit websites, you can use the built-in parental control feature on iOS devices. To enable this feature, go to Settings > Screen Time > Content & Privacy Restrictions.
Read more Discipline, Not Control: Screen Time Management on iPhone .
How do I restrict web browsing for kids?
If your child is using an Android device, you can use the Google Family Link app to restrict web browsing, where the app allows parents to set daily usage limits, approve purchases, and review downloaded apps. Additionally, you can set up filters to block explicit content and block websites on router , which is a feature that is also available for iOS users who have a family-sharing account.
What is the best parental control app?
There are many parental control apps in the market, but the Kids360 app is one of the best. The app allows parents to monitor and control their kid’s internet activity remotely. Parents can view page search history, block apps and set screen time limits.
The picture on the front page: fizkes/Shutterstock.com

Hey there, iPhone-wielding parents! Are you ever curious about what your kids are up to…

One of the most popular ways to check the balance on your child’s GPS Watch…

We all know that panicked feeling you get when you suddenly realize your cell phone…
Subscribe now!
Glad you've joined us🎉🎉.
Start monitoring today with a special 30% discount
- Parenting Tips
How to Set Parental Controls on Safari: 3 Ways to Make Safari Kid Friendly

Modern children can’t imagine their lives without smartphones, as they need to keep up with their peers’ life. Overall, 84% of teens in the U.S . own an iPhone . At the same time, more than half of American kids get iPhones by the age of 11.
Kids tend to spend time texting with friends on social media apps or iMessages and search for the needed information in the Safari browser.
As a parent, you should know that many sites that kids and teens find online are filled with age-inappropriate content and adult-oriented ads. That’s why iPhone Safari parental controls can be a game-changer in ensuring a safer online experience for your kids.
Table Of Contents
How to set parental controls on safari: 3 methods.

It’s worth noting that parental controls Safari may not fully prevent children from encountering explicit content online. Luckily, there are exceptional monitoring apps available to further enhance overall safety on your kid’s iPhone.

1. Setting Up Built-In Safari Parental Controls
Restricting Adult Content
If you want to prevent your kid from running into age-inappropriate content on their iOS device, you can set Safari child-safe browsing and block the sites you disapprove of. However, you need to set up Screen Time on the target iPhone first:
- Access the device’s home screen and go to S ettings > Screen Time > Content & Privacy Restrictions .
- Place the toggle button in the “On” position.

3. Tap Web Content > Limit Adult Websites .

Note that this option doesn’t allow you to customize what sites your child can access. The system will block only those predefined by its algorithm. If you want to personalize the selection of sites you can block, read the section below.
Blocking Specific Sites
If you know a couple of sites that don’t fall under the adult category but distribute inappropriate content, you can blacklist their URLs. Here’s what you need to do:
- Go to S ettings > Screen Time > Content & Privacy Restrictions .
- Toggle Content & Privacy Restrictions .
- Select Content Restrictions > Web Content > Limit Adult Websites .
- Find the Never Allow option and enter the needed URL.

If you want to block more than one site, repeat the procedure as many times as you need. Note that if some of your unwanted sites have mobile versions, you need to block them separately.
Blocking All Content and Whitelisting Specific Sites
If you’re a parent of a very young child or if you deal with child screen addiction, there’s an option to block all web content and whitelist a few sites that you approve. To do so, follow these steps:
- Go to S ettings > Screen Time .
- Tap Content & Privacy Restrictions.
- Select Web Content > Choose Allowed Websites Only > Add Website .

4. Enter the URL you would like to whitelist.
Now, your child can access only a few allowed websites. Repeat the procedure if you decide to unblock other sites.
2. Customize Safari Restrictions
If you feel like your kid is spending too much time on Safari and it interferes with their study or sleep, you should consider restricting Safari for a certain time.
As you already know, Apple has the built-in Screen Time feature that lets you monitor how you or your kid spend on their phone and see what apps they use. To set time limits do the following:
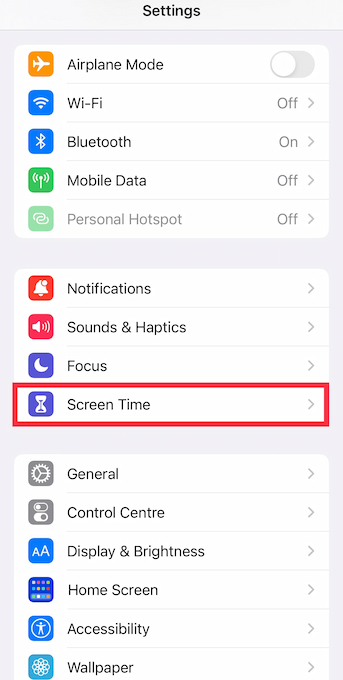
Now whenever the Downtime is turned on, your kid won’t be able to use Safari. You can do the same for gaming, messaging or any other app.
3. How to Make Safari Child-Friendly Using a Parental Control App?
Although a built-in parental control for Safari can come in handy for many parents, they aren’t perfect. All you can do is set screen time, block web-based content, and whitelist particular sites.
Now, imagine that you can monitor your child’s iPhone activity in real-time: view the list of visited sites, check out their Safari bookmarks, and even record their cell phone’s screen to see what they search for . It is possible if you consider using a parental control app.
For instance, the Eyezy tool makes it possible to check all child’s smartphone activity anytime, anywhere. After installing the app on your kid’s device, you immediately get access to a wide range of parental control features, including advanced Safari monitoring.

To install Eyezy on your child’s iPhone, follow these steps:
- Sign up with Eyezy and buy a subscription.
- Access your kid’s iPhone and type in their iCloud credentials. Enable the iCloud backup.
- Install Eyezy on their device.
- Log in to your Eyezy dashboard and start monitoring.
Final Thoughts
The digital environment is full of hidden dangers, and explicit content is minor trouble. Kids can fall victim to cyber-attacks conducted by scammers or befriend someone they shouldn’t. That’s why parents keep an eye on their iPhone activity.
Although Safari child settings might help to control your child’s Internet use and keep them focused on important things, kids can still access inappropriate content on another browser or app. Meanwhile, with Eyezy, you can not only see what they search for, but you can also block any website you find dangerous.
It’s up to you whether to use standard iOS parental controls or install a parental control app, such as Eyezy, on your kid’s device. Just make sure that your child is safe and sound on the Internet.
- Copy https://www.eyezy.com/blog/how-to-put-parental-controls-on-safari/
Leave a reply: Cancel reply
Your email address will not be published. Required fields are marked *
Save my name, email, and website in this browser for the next time I comment.
Post Comment
Related Articles

To Worry or Not to Worry? Pros and Cons…

5 Ways to Prevent Cyberbullying: Find out How to…

What Parents Need to Know About Minecraft

{[ bar_title ]}
Parental control safari on mac/ iphone/ ipad: make safari safe for kids.

There is no way to completely prevent your kids from accessing to Internet, since some of the online sources do help greatly on studying and living better. However, inappropriate web contents are always the top concern among parents.
Today, we are going to instruct on setting up parental control in web browser Safari on all Apple device, including Mac, iPhone and iPad, with or without a Safari parental control app .
Parental Control Safari on Mac
Parental control safari on iphone/ipad.
There are 2 strategies to set up parental control in Safari on Mac, to directly block certain websites by adding the website URL to block list, or lock the Safari App temporarily.
Method #1 Easiest Way to Set up Parental Control in Safari on Mac
As mentioned above, you can set up parental control in Safari by blocking certain website URLs or directly lock the Safari app. With a Safari Parental Control program, which allows you to block harmful online contents using these 2 methods, you can easily set up your parental controls.
While, the tool we use to set up Safari parental control on mac is Cisdem AppCrypt , a dedicated program to block distracting and harmful websites on your mac, also to lock Apps temporarily for high efficiency while working on Mac.
Main Features of Cisdem AppCrypt
- Lock Safari, Google Chrome and other web browser apps
- Lock apps installed on your mac with a password
- Block websites in Safari , Google Chrome and others on a time schedule
- Allow adding blacklist and whitelist when using Web Block
- Allow creating shortcuts to enable and disable Web Block
- High security, capture photos when any failure attempts to locked apps take place
- Easy to use
Steps to Set up Parental Control in Safari on Mac
There are 2 ways to set up parental control in Safari on Mac with Cisdem AppCrypt, enable the Web Block feature or lock the Safari browser app. You can check following 2 tutorials.
Steps to Set up Parental Control in Safari on Mac with Web Block

- Enter a password to block or lock with Cisdem as instucted.

Steps to Set up Parental Control in Safari on Mac with App Locker
In the case you want to lock the Safari app when your kids learn on your mac, you can use the App Locker of Cisdem to lock the app completely with a password, your kids can only use Safari after you have entered the correct password, this helps your kids focus on the studying when no online activity is required.

- Close the main interface, when trying to open Safari app, you will need to enter the correct password for unlocking.
Method #2 Set up Parental Control in Safari on Mac for Free
For the reason that Safari is the web browser coming with macOS, mac’s own Parental Control utility works for Safari.
Steps to Set up Parental Controls in Safari on Mac for Free
- Go to Apple menu>System Preferences.
- Then choose Parental Controls.

- Select the user account you want to set up Parental Controls, or you can click “+” to add an user account for your kids.

- Click “OK” to save the Parental Controls settings.
It is much likely that your kids will spend more time on mobile device, like iPhone or iPad, due to the high portability. Therefore, it becomes important to set up parental control in Safari on both iPhone and iPad. Still, there are 2 ways to set up the control, either with iOS bundled applications or with 3rd party iOS Safari Parental Control app.
Method #1 Set up Safari Parental Control without 3rd Party App
iOS is really a great operating system building us a safe and productive place to work, study and relax, even without any 3rd party applications, you can set up parental controls to make Safari safe for your kids’ use. Basing on different iOS versions, the ways to set up Safari Control on iPhone or iPad would be a little different.
Set up Safari Parental Control without 3rd Party App on iOS 12 to iOS 15
As all iPhone or iPad users have noticed, iOS adds an application called Screen Time, which allows users to limit specific apps and block inappropriate contents on your device. It can work as the best free Safari Parental Control app on your iPhone or iPad.
- Go to Settings App.

Set up Safari Parental Control without 3rd Party App on iOS 11 or earlier
For iOS earlier than 12, there is no Screen Time, but still iPhone or iPad users are allowed to set up Safari Parental Control easily without installing another application.
- Go to General>Restrictions.
- Tap Enable Restrictions, input your screen password.
- Tap Allowed Content>Websites>Limit Adult Content.

Method #2 Set up Safari Parental Control with 3rd Party Safari Parental Control App
Of course, if you want to set up parental controls in Safari browser on iPhone or iPad in an easier way, or require more features to build a safe online place for your kids, you can use a professional 3rd party iOS Safari Parental Control App.
OurPact is such a Safari Parental Control app for iOS, it is capable of blocking texts, apps, websites, also tracking location, setting screen time limits and so on, to help parents control how their kids use their iPhone or iPad.
- Step 1. Download and install OurPact from iOS App Store.
- Step 2. Sign up and login into your parent account.
- Step 3. Pair your child’s iPhone or iPad to your account.
- Step 4. Navigate to the child profile you want to block harmful contents for.
- Step 5. Tap Restrictions> Block Adult Content.

- Step 7. Click “Done” to finish the parental control setting up for Safari web browsering on iPhone or iPad.
To set up Safari parental controls on Mac, iPhone or iPad, both macOS and iOS offer free applications to do this, but if you want to configure the settings easier and make Safari safer for your kids, a 3rd party parental control tool for Safari would be a good choice.
Connie has been writing for Mac productivity and utility apps since 2009. Each review and solution is based on her practical tests, she is aways energetic and trustworthy in this field.
Hot Articles
Combat COVID-19 with Pure Sense Antimicrobial tech - read full story
- iPad Pro 12.9 (5th gen)
- iPad Pro 12.9 (4th gen)
- iPad Pro 12.9 (3rd gen)
- iPad Pro 12.9 (1st, 2nd gen)
- iPad Pro 11-inch (3rd gen)
- iPad Pro 11-inch (2nd Gen)
- iPad Pro 11-inch (1st gen)
- iPad Pro (10.5-inch)
- iPad Pro (9.7-inch)
- iPad mini 6
- iPad mini 5 / 4
- iPad mini 3 / 2 / 1
- iPad (10th Gen)
- iPad (9th gen)
- iPad (8th Gen)
- iPad (7th gen)
- iPad (6th gen)
- iPad (5th gen)
- iPad 4 / 3 / 2
- Galaxy Tab S4 10.5 (2018)
- Galaxy Tab A 10.5 (2018)
- Galaxy Tab A 8.0 (2018)
- Galaxy Tab A 10.1 (2016)
- Galaxy Tab A 7.0 (2016)
- Galaxy Tab E 9.6
- Galaxy Tab E 8.0
- Why Antimicrobial?
- Customer Reviews
- Free Shipping
- Risk Free Purchase
- Your Cart is Empty
iPad Kids Mode: Guide to Childproofing Your iPad
January 08, 2020

Childproofing in the digital world isn’t about locking drawers and covering outlets anymore.
iPad and iPhone apps give your little one access to a world of entertainment and education when used correctly. Many schools are beginning to embrace the benefits of tablets in their lessons to help youngsters grow accustomed to the digital world.
Of course, as valuable as technology can be when it comes to educational apps and tools, it also has its risks.
There’s always a chance that your child could accidentally tap or swipe their way into content that they’re not meant to see . At the same time, digital devices come with the option to accidentally make purchases that send your bank account spiraling into the red.
Fortunately, Apple has built some must-have parental controls into iOS in recent years, intended to help parents gain more control over the way that kids use technology.
These services protect a child’s privacy, keep them safe from unwanted content, and make it harder for children to make unauthorized purchases in apps.
Here’s how you can kid-proof your iPad in 2020.
#1 Turn on iPad Restrictions
First, you need to turn on the restrictions for your iPad. This takes you into a sort of iPad kids mode.
Guys from Tech&Design made a complete video guide on how to do that here:
However, it’s easier than it seems. Simply tap on your Settings option on your iPad and head to the tab named “Screen Time” to get started.
Choose the option to Use Screen Time Passcode and enter a unique code that will protect the restrictions you implement on your iPad and prevent your child from making changes, either accidentally or on purpose.

Once you’ve entered your passcode, you can start enabling restrictions one at a time.
Let’s walk through some of the restriction options:
- Disabling Facetime, Camera, and Safari: This prevents your child from gaining browser access without your guidance. It also means that your youngsters can’t accidentally send or receive facetime calls.
- Disabling iTunes store, installing/deleting apps, and in-app purchases: This helps you to safeguard your wallet and ensures that your child can’t download anything without your permission.
- Siri, CarPlay, and Airdrop: Disabling Siri will not necessarily disable voice control. That means that your child still just needs to hold down the home button on your tablet to access voice command options.
- Access to Accounts: Disable access to accounts in the Allow Changes subsection of your settings to prevent your child from adding, modifying, or removing contacts, mail, or calendar accounts.
- Disable multiplayer games: Under the Game Center subsection, you can disable multiplayer games, adding friends, and more to prevent your child from accidentally initiating multiplayer games.
#2 Make Allowances
When you’re still in the Screen Time section of your iPad account settings, make sure that you head through to the content and privacy restriction options.
You’ll need to turn the slider on at the top of the page by tapping on it. This will allow you to determine which privacy levels you want to put in place for your youngster.

The Privacy section on the Apple iOS will enable you to set Allow or Don’t Allow for everything on your account.
You can choose to turn the microphone off, remove speech recognition so your child can’t use Siri, and even turn off Bluetooth sharing.
It’s easy to create the kids' mode on an iPad that’s suitable for your youngster.
Although it’s up to you which services you want to disallow, it’s particularly important to make sure that you don’t allow in-app purchases , deleting apps, and installing apps.
It’s very easy for a child to download an application for free and accidentally make purchases on your account when trying to play a game.
Depending on the kind of apps your child uses, and how nervous you are about things like location tracking, you might want to prevent your iPad from tracking your location by removing Location Services too.
#3 Turn Off Internet Access
The digital screen has become a treasure trove of entertainment and educational tools for today’s children. However, thanks to internet access on modern devices, it’s all too easy for youngsters to end up accessing things that they weren’t meant to see.
If you’re dealing with a younger child, we’d recommend simply disabling the app store and internet access, so that your child can only use the content that you’ve already deemed appropriate for them.
To disable Safari Web Browser, head into the Screen Time settings on your iPad, and click on Content and Privacy Restrictions > Content Restrictions > Web Content.
You can use these settings to turn Safari off. However, this won’t disable web traffic completely . This means that permitted apps that have their own browser interfaces can still access the internet, so your child can use games and apps already installed.
Disabling Wi-Fi is the only reliable way to block web access completely.
Head into your settings and toggle the Wi-Fi option into off mode.

You can turn it back on when you use your tablet later. Think of turning Wi-Fi off as the ultimate kids' mode for iPad.
#4 Apply Content Restrictions
Simply turning Wi-Fi or Safari access off for your toddler might be an excellent way to prevent them from accessing unwanted content.
However, if you’re trying to protect a slightly older user on your iPad, then you won’t be able to restrict them from using the internet completely. The chances are that you’ll want to give your youngster the opportunity to explore different kinds of content instead.

Fortunately, in the Web Content section of your device, you can adapt your own kid's mode on iPad to suit the needs of your little one. For instance, in the Apps category of the Content and Privacy restrictions page, you can restrict content by age.
Categories include:
Aside from specifically choosing an age that you think is suitable for the content that your child should be able to access, you can also decide to limit access to adult websites or prevent explicit language from appearing on the iPad.
#5 Disable Notifications and Enable Do Not Disturb
Even if your children aren’t searching for inappropriate websites and information, there’s always the chance that something could appear on your tablet that upsets them.
For instance, if you regularly get news sent to your notifications list, or you get updates from your parenting apps that might cover complicated topics, you don’t want your child to accidentally tap or swipe into those notifications.
Disabling your notifications and “Today View” will help to keep your child from accidentally revealing content.
Head into the Notification Center under the Settings page and disable the respective switches. You can also scroll down in this view and make sure that notifications from some apps are disabled, but others can still show up.

An alternative option could be to turn on Do Not Disturb mode.
Remember, Do Not Disturb can be scheduled to run at specific times during the day. You could also flip a switch to leave the Do Not Disturb option turned on all the time. This will prevent incoming alerts and calls from reaching your child.
This is a convenient alternative to turning notifications off individually when you’re creating a kids mode iPad for your child.
#6 Enable Guided Access
Another option for parents searching for the perfect way to create an iPad kids mode is to enable Guided Access .
Here’s a video from Friendly Vikas on iPad and iPhone Guided Access to help you out:
Guided Access limits your toddler’s access to a single application. This feature allows you to tweak everything from whether the wave and sleep buttons work, to whether your child can adjust the volume on your app.
To implement guided access, go into the General settings page, and click on Accessibility. From here, you can enable Guided Access.
Follow that up by launching the app that you want to provide Guided Access with. You can triple-click the Home button to summon a guided access page from that point onwards.

The only downside is that with Guided Access, you can only protect one app at a time . This means your little one can’t switch easily from one app to another when they get bored with the tools that they’re using.
Of course, there’s always a chance that Apple will introduce multiple app use for Guided Access in a future version of a new Kids mode for iPad.
Other Ways to Protect Your Child’s iPad
Defending your child from problems when they’re using your iPad isn’t just about making sure that they can’t make in-app purchases or access the wrong content.
You can ensure that you’re taking steps to keep both your child and technology protected in other ways too.
As durable as iPads are designed to be, toddlers and younger children can easily drop or damage them.
With that in mind, it’s a good idea to store your device in a robust case that can handle the occasional bump.
While you’re investing in the right case, don’t forget to think about the possibility that your child will touch their face or put their fingers in their mouth straight after holding the device.
Because of this, it can be useful to invest in a special antibacterial tablet case that will reduce the risk of bacteria and germs spreading when your child uses a device.
Other ways to make sure that you have the perfect kids' mode iPad in place for your youngster include:
- Watching the right child-friendly movies and shows together on your iPad : Your tablet can be an excellent place to find entertainment – particularly during hours of travel for your youngster. However, it’s crucial to ensure that you know where to find age-appropriate content .
- Download the right apps : Creating an iPad kids mode for your youngster doesn’t mean eliminating all of the convenient and helpful features from your tablet. There are plenty of child-friendly apps out there that can delight your child and stop them from searching for other, inappropriate content on their own.
- Backup your data : If you have anything valuable on your iPad that you want to keep safe, make sure that you have a back-up. Children can accidentally delete files or break technology, which could leave you in a bad position if you’re trying to recover work documents.
- Get a screen protector : Screen protectors can be just as valuable as the right case when defending your tablet from damage. A broken screen can also come with broken glass that may hurt your child if they accidentally drop your device. Screen protectors will help to prevent this.
- Stay vigilant : Keep up to date with all of the latest features that Apple introduces to make protecting iPads easier for parents looking after their children.
Making the Most of Kids Mode on iPad
Ultimately, it’s hard to ignore the fact that technology is everywhere in today’s landscape. You can’t prevent your child from being exposed to the digital age.
What’s more, you probably wouldn’t want to stop your child from accessing technology – even if you could. The internet, tablets, and other useful devices can give your youngster access to an amazing world of entertainment and education that will expand their minds every day.
However, although iPads and other devices can be very valuable, they’re also filled with dangers that parents need to consider when they’re sharing technology with their children.
If you want to make sure that your child has the best experience when using your devices, make sure that you use the steps above to get your tablet child-ready.
Also in News

Can Pure Sense Cases antimicrobial additives kill COVID-19?
April 01, 2020

17+ iPad Hacks You Need to Know
March 16, 2020

Best Parenting Apps to Use in 2020
November 11, 2019
Sign up to get the latest on sales, new releases and more…
Pure Sense Cases LLC, Wilmington, Delaware, USA. Contact us on [email protected]
© 2024 PureSenseCases.com . All Rights Reserved. Powered by Shopify
How To Block Safari On Kids IPad

- Software & Applications
- Browsers & Extensions

Introduction
As a parent, ensuring the safety and well-being of your children in the digital age is a top priority. With the widespread use of iPads and other devices, it's essential to implement measures to protect your kids from accessing inappropriate content or spending excessive time on certain apps. One effective way to achieve this is by blocking specific apps, such as Safari, on their iPads. By doing so, you can have peace of mind knowing that your children are engaging with age-appropriate content and using their devices responsibly.
In this comprehensive guide, we will walk you through the step-by-step process of blocking Safari on your child's iPad. By following these instructions, you can create a safer and more controlled digital environment for your kids, allowing them to explore the digital world within boundaries that you set.
Whether you're concerned about your child stumbling upon unsuitable websites or simply want to limit their screen time, taking control of the apps they can access is a proactive approach to fostering a healthy relationship with technology. With the right settings in place, you can encourage your children to engage in educational and entertaining activities while minimizing exposure to potentially harmful online content.
Now, let's delve into the practical steps to block Safari on your child's iPad, empowering you to take charge of their digital experiences and promote a safer and more enriching online environment for them.
Step 1: Accessing the Settings
Accessing the settings on your child's iPad is the crucial first step in the process of blocking Safari. This initial action sets the stage for implementing the necessary restrictions and controls to ensure a safer and more controlled digital environment for your kids.
To begin, locate the "Settings" app on the iPad's home screen. The "Settings" app is represented by a gear icon and is typically found among the other installed applications. Once you have located the app, tap on it to open the settings menu.
Upon entering the settings menu, you will be presented with a range of options and configurations that allow you to customize various aspects of the iPad's functionality. These settings encompass a wide array of features, including display, sound, privacy, and general device management.
Next, navigate to the "Screen Time" option within the settings menu. "Screen Time" provides valuable insights into how your child uses their iPad and enables you to set specific limits and restrictions on their device usage. By tapping on "Screen Time," you will gain access to a comprehensive suite of tools designed to manage and monitor your child's digital activities.
Once inside the "Screen Time" section, you will find a variety of controls that empower you to regulate your child's access to apps and content. From setting time limits on specific apps to managing app usage and content restrictions, "Screen Time" serves as a powerful tool for parents seeking to establish a balanced and responsible approach to their child's digital engagement.
By successfully accessing the settings and navigating to the "Screen Time" feature, you have laid the groundwork for the subsequent steps in the process of blocking Safari on your child's iPad. This initial phase sets the stage for implementing the necessary restrictions and controls, ultimately contributing to a safer and more controlled digital environment for your children.
With the settings accessed and "Screen Time" at your disposal, you are now ready to proceed to the next step in the process, which involves enabling restrictions and taking proactive measures to block Safari, thereby fostering a secure and enriching digital experience for your kids.
Step 2: Enabling Restrictions
Enabling restrictions on your child's iPad is a pivotal step in the process of creating a secure and controlled digital environment. By activating restrictions, you can effectively manage and regulate the apps and content accessible to your children, empowering you to tailor their digital experiences to align with your family's values and safety guidelines.
To initiate this essential step, navigate to the "Screen Time" section within the iPad's settings menu. Once inside "Screen Time," tap on "Content & Privacy Restrictions" to commence the process of enabling restrictions.
Upon entering the "Content & Privacy Restrictions" menu, you will be prompted to set a passcode. This passcode serves as a safeguard, preventing unauthorized modifications to the established restrictions. It is crucial to select a passcode that is memorable to you but not easily guessed by your children, ensuring that the restrictions remain intact and effective.
After setting the passcode, you will gain access to a comprehensive range of restriction options, allowing you to customize the content and privacy settings according to your preferences and your child's age and maturity level. These settings encompass various aspects, including app usage, content restrictions, privacy features, and more, providing you with the flexibility to tailor the restrictions to suit your specific requirements.
Within the "Content & Privacy Restrictions" menu, you can selectively enable or disable specific apps, including Safari, to control your child's access to them. By toggling the switch next to Safari, you can effectively block the app, preventing your children from using it and accessing potentially unsuitable web content.
Furthermore, you have the option to set additional restrictions related to web content, ensuring that your child's browsing experience is further safeguarded. By adjusting the content restrictions for websites, you can limit access to adult content, restrict specific websites, and prevent inadvertent exposure to inappropriate material.
By enabling restrictions and customizing the content and privacy settings, you are taking proactive measures to create a safer and more controlled digital environment for your children. These restrictions empower you to manage their app usage, regulate their access to online content, and instill responsible digital habits, ultimately fostering a secure and enriching digital experience for your kids.
With restrictions successfully enabled and tailored to your preferences, you are now equipped to proceed to the next step, which involves specifically blocking Safari on your child's iPad, further enhancing the safety and appropriateness of their digital interactions.
Step 3: Blocking Safari
Blocking Safari on your child's iPad is a strategic and proactive measure to ensure a safer and more controlled digital environment. By implementing this restriction, you can effectively prevent your children from accessing the Safari browser , thereby minimizing the risk of exposure to unsuitable web content and promoting responsible digital habits.
To initiate the process of blocking Safari, navigate to the "Content & Privacy Restrictions" menu within the "Screen Time" section of the iPad's settings. Once inside this menu, you will have the ability to selectively enable or disable specific apps, including Safari, to regulate your child's access to them.
Upon locating the Safari app within the "Content & Privacy Restrictions" menu, toggle the switch next to Safari to the "off" position. This action effectively blocks the Safari browser on your child's iPad, preventing them from launching the app and engaging in unrestricted web browsing.
In addition to blocking the Safari app itself, you can further enhance the safety measures by adjusting the content restrictions for websites. By customizing these settings, you can limit access to adult content, restrict specific websites, and prevent inadvertent exposure to inappropriate material, thereby bolstering the protective measures in place.
By successfully blocking Safari and customizing the content restrictions, you are taking proactive steps to safeguard your child's digital experiences and promote a healthier and more controlled online environment. These measures empower you to shape your child's digital interactions in a manner that aligns with your family's values and safety guidelines, fostering responsible and age-appropriate usage of digital devices.
With Safari effectively blocked and the content restrictions tailored to your preferences, you have established a secure and controlled digital environment for your children, allowing them to explore the digital world within boundaries that you have set. By implementing these restrictions, you can have peace of mind knowing that your children are engaging with age-appropriate content and using their devices responsibly.
By following these steps to block Safari on your child's iPad, you are actively contributing to the creation of a safer and more enriching digital experience for your kids, empowering them to navigate the online landscape in a manner that prioritizes their safety and well-being.
In conclusion, by following the comprehensive steps outlined in this guide, you have successfully taken proactive measures to block Safari on your child's iPad, thereby creating a safer and more controlled digital environment for their online activities. Through the strategic implementation of restrictions and content controls, you have empowered yourself to shape your child's digital experiences in a manner that aligns with your family's values and safety guidelines.
By accessing the settings and navigating to the "Screen Time" feature, you laid the groundwork for enabling restrictions and taking proactive measures to regulate your child's access to specific apps. This initial phase set the stage for implementing the necessary controls and restrictions, ultimately contributing to a secure and enriching digital experience for your children.
Enabling restrictions within the "Content & Privacy Restrictions" menu provided you with the flexibility to customize the content and privacy settings according to your preferences and your child's age and maturity level. By selectively blocking Safari and adjusting the content restrictions for websites, you have effectively minimized the risk of exposure to unsuitable web content, fostering responsible digital habits and promoting a healthier online environment.
By successfully blocking Safari and customizing the content restrictions, you have established a secure and controlled digital environment for your children, allowing them to explore the digital world within boundaries that you have set. These proactive measures empower you to shape your child's digital interactions in a manner that prioritizes their safety and well-being, ultimately contributing to a safer and more enriching digital experience for your kids.
In today's digital age, where children are increasingly exposed to online content, taking control of the apps they can access is a proactive approach to fostering a healthy relationship with technology. By implementing these restrictions, you can have peace of mind knowing that your children are engaging with age-appropriate content and using their devices responsibly.
By following the steps outlined in this guide, you have actively contributed to the creation of a safer and more enriching digital experience for your kids, empowering them to navigate the online landscape in a manner that prioritizes their safety and well-being. With Safari effectively blocked and the content restrictions tailored to your preferences, you have set the stage for a secure and controlled digital environment, allowing your children to explore the digital world within boundaries that you have set.
Leave a Reply Cancel reply
Your email address will not be published. Required fields are marked *
Save my name, email, and website in this browser for the next time I comment.
- Crowdfunding
- Cryptocurrency
- Digital Banking
- Digital Payments
- Investments
- Console Gaming
- Mobile Gaming
- VR/AR Gaming
- Gadget Usage
- Gaming Tips
- Online Safety
- Software Tutorials
- Tech Setup & Troubleshooting
- Buyer’s Guides
- Comparative Analysis
- Gadget Reviews
- Service Reviews
- Software Reviews
- Mobile Devices
- PCs & Laptops
- Smart Home Gadgets
- Content Creation Tools
- Digital Photography
- Video & Music Streaming
- Online Security
- Online Services
- Web Hosting
- WiFi & Ethernet
- Browsers & Extensions
- Communication Platforms
- Operating Systems
- Productivity Tools
- AI & Machine Learning
- Cybersecurity
- Emerging Tech
- IoT & Smart Devices
- Virtual & Augmented Reality
- Latest News
- AI Developments
- Fintech Updates
- Gaming News
- New Product Launches
- AI Writing How Its Changing the Way We Create Content
- How to Find the Best Midjourney Alternative in 2024 A Guide to AI Anime Generators
Related Post
Ai writing: how it’s changing the way we create content, unleashing young geniuses: how lingokids makes learning a blast, 10 best ai math solvers for instant homework solutions, 10 best ai homework helper tools to get instant homework help, 10 best ai humanizers to humanize ai text with ease, sla network: benefits, advantages, satisfaction of both parties to the contract, related posts.

How To Get Rid Of Ads On IPad Safari

How Do I Delete Safari From My IPad

How To Stop Pop-Ups On IPad Safari

How To Block Safari From IPad

Why Is Safari Not Loading Websites

How Do I Get To Safari Browser

14 Best Osmo Coding Awbie Game for 2024

15 Amazing Osmo Coding for 2024
Recent stories.

How to Find the Best Midjourney Alternative in 2024: A Guide to AI Anime Generators

How to Know When it’s the Right Time to Buy Bitcoin

How to Sell Counter-Strike 2 Skins Instantly? A Comprehensive Guide

10 Proven Ways For Online Gamers To Avoid Cyber Attacks And Scams

- Privacy Overview
- Strictly Necessary Cookies
This website uses cookies so that we can provide you with the best user experience possible. Cookie information is stored in your browser and performs functions such as recognising you when you return to our website and helping our team to understand which sections of the website you find most interesting and useful.
Strictly Necessary Cookie should be enabled at all times so that we can save your preferences for cookie settings.
If you disable this cookie, we will not be able to save your preferences. This means that every time you visit this website you will need to enable or disable cookies again.
How to turn your iPhone into a bare-bones device
A simple setting can turn your iphone into a kid’s phone, ipod or help cut your screen time.

Our smartphones are overflowing. In one pocket-size rectangle, you have unlimited access to all human knowledge posted online, instant communication with friends and family, and six seasons of “Love Is Blind.”
It can be a bit much.
A recently added setting on iPhones and iPads makes the devices less complicated. It can turn a smartphone into a feature phone, a landline replacement, a kid’s phone and even an iPod. Called Assistive Access, the setting was introduced in September in iOS 17 as an accessibility option for people with cognitive disabilities. Like many accessibility features, it has potentially beneficial applications for everyone.
When activated, it switches to a bare-bones home screen that shows one or more apps as larger-than-usual icons. It makes smartphones and tablets easier to navigate by minimizing the number of options and adding more visual-based controls.
How to set it up
Assistive Access works on any iPad or iPhone that runs iOS 17. If you have an old iPhone, you can update the OS and repurpose it, or buy a compatible used device starting at $100 to $200 online. Once iOS 17 is installed, go to Settings → Accessibility → Assistive Access (in the General section at the bottom). You will be walked through instructions on setting it up.
Five Apple apps have been simplified in this mode: Calls (a combination of the Phone and FaceTime apps), Camera, Messages, Music and Photos. You can include any other apps, and most will ask privacy questions when you add them. All apps will appear slightly smaller in this mode with a large “Back” button below.
Choose whether you want the apps in a list or grid form. You can customize a few other options, such as whether the battery level shows, if Siri is on and if the volume buttons work. The device will still get notifications for other apps, so turn them off entirely or be ready to exit Assistive Access mode to check them.
You will set a passcode that is required to exit the mode. If you need to securely set up this phone for someone else to use, choose a password they won’t know or guess, and make it different from the passcode to unlock the phone. Triple-click the side button to exit.
If you’re looking for speed or a mode you can hop in and out of frequently, this is not the best choice. More traditional controls, such as screen time or focus modes, might work better. Assistive Access is slow to navigate and turn on and off.
A safe phone for kids
Many parents want a kid-friendly phone that lets them make calls without the trappings of a smartphone. Options include feature phones with keypads and kid devices such as Gizmo and Gabb, but depending on their age, your child may be embarrassed to be seen with these. If your family is in the Apple ecosystem and you have an old phone, try this as a compromise.
Assistive Access is like parental controls turned all the way up. Apple has extensive built-in controls, but setting them up and managing them isn’t simple — and kids are constantly finding workarounds. This mode offers tighter limitations and easier use. Many parental controls like website restrictions will still work when a device is in Assistive Access mode and should be properly set up first. Some apps can still allow plenty of access to the internet in this mode.
When setting up the device for a child, choose Selected Contacts in the calling and messaging apps to handpick the contacts for incoming and outgoing calls. If the device doesn’t have a SIM card, choose Select Contact, the name of the person you want to approve, and tap Call to choose FaceTime or another app that allows WiFi calling such as WhatsApp or Viber. Show the child how to call emergency services.
A simple phone for seniors
If you or an older family member is struggling with using a smartphone, this mode can be less confusing or intimidating than the usual layout, and it can minimize mistakes. If you’re setting it up for someone else, always explain what you’re doing and get permission when possible. Apple’s satellite SOS feature does not work in this mode, but people can use the phone to dial emergency services either on the keypad or by triple-clicking the side button on most devices. Health tracking and sharing features still work.
A music-only device
Remember the iPod? The Discman? The Walkman? People who want an audio-only device have a few options, such as Mighty or Yoto . Or you can take an older iPhone or iPad and allow only music apps. If you have an existing digital music library, you can load it into the device since the storage isn’t being used for other apps. If you want to take it for a jog or drive, most music apps allow downloads for offline listening so no need to pay for cellular service. If it’s for children, add headphones if you don’t want to hear their music, and make sure you have turned on any parental controls in the services. (Yes, even music and audiobook apps have inappropriate content.)
A home phone
Landlines are dwindling with fewer than a quarter of Americans still using them. There are advantages to having a central home telephone that anyone can use, such as letting a child call 911. If you don’t want to get a VoIP (Voice over Internet Protocol) line, you can use an old iPhone. For this use, you will want to add an extra line to your cellular plan. While you can set up the device with apps such as WhatsApp and Viber that allow WiFi-based calls, or only contact people who use FaceTime, it’s safest to have a cellular connection for emergencies. You can dial 911 from a phone in the United States even when it doesn’t have a SIM card.
A less-distracting phone
Many people struggle with their phone usage, so much so that tech companies have screen time controls meant to help us use their products less. On the iPhone, there are options for setting time limits on apps and getting weekly reports about how much time you spend on your device. That’s not enough for everyone, and some are switching back to feature phones or “ dumbphones ,” such as classic flip phones — or are trying other ways to block themselves from being on devices too much.
“I think a lot of people are interested in [stepping back], but I think very few people are able to succeed,” said Jose Briones , a 28-year-old digital minimalism advocate in Colorado.
Assistive Access is an extreme option that can help with the self-control aspect, especially if you have someone else set up the passcode. Choose only the apps you need and don’t include your usual time wasters. You can find a list of culprits by going to Settings → Screen Time → See All App & Website Activity and looking at your most used apps.
“At the end of the day, you have to come to a decision point,” Briones said. “Am I going to rely on self-control all the time, or am I going to eliminate myself from this environment?”
Help Desk: Making tech work for you
Help Desk is a destination built for readers looking to better understand and take control of the technology used in everyday life.
Take control: Sign up for The Tech Friend newsletter to get straight talk and advice on how to make your tech a force for good.
Tech tips to make your life easier: 10 tips and tricks to customize iOS 16 | 5 tips to make your gadget batteries last longer | How to get back control of a hacked social media account | How to avoid falling for and spreading misinformation online
Data and Privacy: A guide to every privacy setting you should change now . We have gone through the settings for the most popular (and problematic) services to give you recommendations. Google | Amazon | Facebook | Venmo | Apple | Android
Ask a question: Send the Help Desk your personal technology questions .
- Elon Musk’s X restores free blue check marks. Here’s what it means. Earlier today Elon Musk’s X restores free blue check marks. Here’s what it means. Earlier today
- Are walking pads worth it? Why I’m never leaving my desk treadmill. April 4, 2024 Are walking pads worth it? Why I’m never leaving my desk treadmill. April 4, 2024
- How to turn your iPhone into a bare-bones device April 3, 2024 How to turn your iPhone into a bare-bones device April 3, 2024

Apple's mysterious iOS 17.4.1 and iPad OS 17.4.1 updates are actually very important

[UPDATE: March 30, 2024: Apple posted a security bulletin listing two security patches present in iOS 17.4.1 and iOS 17.4.1.]
Last week, Apple rolled out iOS 17.4.1 and iPadOS 17.4.1, a swift follow-up to the 17.4 release earlier this month .
So, what exactly does this update include?
The bottom line is that we don't know, as Apple isn't saying much about what's inside. The release notes offer the standard mention of "bug fixes and security updates," as well as urging users to install the latest version.
Also: Why I limit my iPhone 15's charge capacity to 80% (and you should you too)
Strangely, even Apple's dedicated page for outlining the security content of updates is oddly devoid of details this time around. Apple only teases us with a note of "details coming soon."
iOS 17.4.1 update.
This is reminiscent of the iOS 17.2.1 update that Apple released in late 2023, another update with very little information associated with it.
Digging around, I've found that this update fixes an issue where an iPad might not be able to scan QR codes and the annoying bug where the alarm doesn't go off. I've also noticed that AirDrop seems to be a lot faster and more reliable, as connecting my AirPods seems to be quicker and the connection more stable.
As far as battery life and performance are concerned, things seem to be about the same as before.
Regarding the inevitable "Should you install this?" question, my answer is yes. Not only might it turn out to contain security fixes, but there doesn't seem to be much downside to applying it.
MacOS 14.4.1 makes it once again safe to update your Mac
Apple wants you to know what you're missing by not upgrading to an iphone 15, the best apple deals you can buy right now.
iPad User Guide
- iPad models compatible with iPadOS 17
- iPad mini (5th generation)
- iPad mini (6th generation)
- iPad (6th generation)
- iPad (7th generation)
- iPad (8th generation)
- iPad (9th generation)
- iPad (10th generation)
- iPad Air (3rd generation)
- iPad Air (4th generation)
- iPad Air (5th generation)
- iPad Pro 10.5-inch
- iPad Pro 11-inch (1st generation)
- iPad Pro 11-inch (2nd generation)
- iPad Pro 11-inch (3rd generation)
- iPad Pro 11-inch (4th generation)
- iPad Pro 12.9-inch (2nd generation)
- iPad Pro 12.9-inch (3rd generation)
- iPad Pro 12.9-inch (4th generation)
- iPad Pro 12.9-inch (5th generation)
- iPad Pro 12.9-inch (6th generation)
- Setup basics
- Make your iPad your own
- Keep in touch with friends and family
- Customize your workspace
- Do more with Apple Pencil
- Customize iPad for your child
- What’s new in iPadOS 17
- Turn on and set up iPad
- Wake and unlock
- Set up cellular service
- Connect to the internet
- Sign in with Apple ID
- Subscribe to iCloud+
- Find settings
- Set up mail, contacts, and calendar accounts
- Learn the meaning of the status icons
- Charge the battery
- Show the battery percentage
- Check battery usage
- Use Low Power Mode to save battery life
- Read and bookmark the user guide
- Learn basic gestures
- Learn advanced gestures
- Adjust the volume
- Find your apps in App Library
- Switch between apps
- Zoom an app to fill the screen
- Quit and reopen an app
- Drag and drop
- Open two items in Split View
- Switch an app window to Slide Over
- View an app’s windows and workspaces
- Multitask with Picture in Picture
- Move, resize, and organize windows
- Access features from the Lock Screen
- Perform quick actions
- Search on iPad
- Get information about your iPad
- View or change cellular data settings
- Travel with iPad
- Change or turn off sounds
- Create a custom Lock Screen
- Change the wallpaper
- Adjust the screen brightness and color balance
- Customize the text size and zoom setting
- Change the name of your iPad
- Change the date and time
- Change the language and region
- Organize your apps in folders
- Add, edit, and remove widgets
- Move apps and widgets on the Home Screen
- Remove apps
- Use and customize Control Center
- Change or lock the screen orientation
- View and respond to notifications
- Change notification settings
- Set up a focus
- Allow or silence notifications for a Focus
- Turn a Focus on or off
- Customize sharing options
- Type with the onscreen keyboard
- Dictate text
- Move the onscreen keyboard
- Select and edit text
- Use predictive text
- Use text replacements
- Add or change keyboards
- Add emoji and stickers
- Take a screenshot
- Take a screen recording
- Write and draw in documents
- Add text, shapes, signatures, and more
- Fill out forms and sign documents
- Use Live Text to interact with content in a photo or video
- Use Visual Look Up to identify objects in your photos and videos
- Lift a subject from the photo background
- Subscribe to Apple Arcade
- Play with friends in Game Center
- Connect a game controller
- Use App Clips
- Update apps
- View or cancel subscriptions
- Manage purchases, settings, and restrictions
- Install and manage fonts
- Buy books and audiobooks
- Annotate books
- Access books on other Apple devices
- Listen to audiobooks
- Set reading goals
- Organize books
- Create and edit events in Calendar
- Send invitations
- Reply to invitations
- Change how you view events
- Search for events
- Change calendar and event settings
- Schedule or display events in a different time zone
- Keep track of events
- Use multiple calendars
- Use the Holidays calendar
- Share iCloud calendars
- Take photos
- Take a selfie
- Take a Portrait mode selfie
- Take videos
- Change advanced camera settings
- Adjust HDR camera settings
- View, share, and print photos
- Use Live Text
- Scan a QR code
- See the world clock
- Set an alarm
- Use the stopwatch
- Use multiple timers
- Add and use contact information
- Edit contacts
- Add your contact info
- Send Contacts on iPad
- Use other contact accounts
- Hide duplicate contacts
- Export contacts
- Get started with FaceTime
- Make FaceTime calls
- Receive FaceTime calls
- Create a FaceTime link
- Take a Live Photo
- Turn on Live Captions
- Use other apps during a call
- Make a Group FaceTime call
- View participants in a grid
- Use SharePlay to watch, listen, and play together
- Share your screen in a FaceTime call
- Collaborate on a document in a FaceTime call
- Use video conferencing features
- Hand off a FaceTime call to another Apple device
- Change the FaceTime video settings
- Change the FaceTime audio settings
- Change your appearance
- Leave a call or switch to Messages
- Block unwanted callers
- Report a call as spam
- Connect external devices or servers
- Modify files, folders, and downloads
- Search for files and folders
- Organize files and folders
- Set up iCloud Drive
- Share files and folders in iCloud Drive
- Share your location
- Add or remove a friend
- Locate a friend
- Get notified when friends change their location
- Notify a friend when your location changes
- Add your iPad
- Get notified if you leave a device behind
- Locate a device
- Mark a device as lost
- Erase a device
- Remove a device
- Add an AirTag
- Share an AirTag or other item in Find My on iPad
- Add a third-party item
- Get notified if you leave an item behind
- Locate an item
- Mark an item as lost
- Remove an item
- Adjust map settings
- Get started with Freeform
- Create a Freeform board
- Draw or handwrite
- Apply consistent styles
- Position items on a board
- Search Freeform boards
- Share and collaborate
- Delete and recover boards
- Get started with Health
- Fill out your Health Details
- Intro to Health data
- View your health data
- Share your health data
- View health data shared by others
- Download health records
- View health records
- Log menstrual cycle information
- View menstrual cycle predictions and history
- Track your medications
- Learn more about your medications
- Log your state of mind
- Take a mental health assessment
- Customize your Sleep Focus
- Turn Sleep Focus on or off
- View your sleep history
- Check your headphone audio levels
- Use audiogram data
- Back up your Health data
- Intro to Home
- Upgrade to the new Home architecture
- Set up accessories
- Control accessories
- Control your home using Siri
- Use Grid Forecast to plan your energy usage
- Set up HomePod
- Control your home remotely
- Create and use scenes
- Use automations
- Set up security cameras
- Use Face Recognition
- Configure a router
- Invite others to control accessories
- Add more homes
- Get music, movies, and TV shows
- Get ringtones
- Manage purchases and settings
- Magnify nearby objects
- Change settings
- Detect people around you
- Detect doors around you
- Receive image descriptions of your surroundings
- Read aloud text and labels around you
- Set up shortcuts for Detection Mode
- Add and remove email accounts
- Set up a custom email domain
- Check your email
- Unsend email with Undo send
- Reply to and forward emails
- Save an email draft
- Add email attachments
- Download email attachments
- Annotate email attachments
- Set email notifications
- Search for email
- Organize your email in mailboxes
- Flag or block emails
- Filter emails
- Use Hide My Email
- Use Mail Privacy Protection
- Change email settings
- Delete and recover emails
- Add a Mail widget to your Home Screen
- Print emails
- Use keyboard shortcuts
- Get travel directions
- Select other route options
- Find stops along your route
- View a route overview or a list of turns
- Change settings for spoken directions
- Get driving directions
- Report traffic incidents
- Get cycling directions
- Get walking directions
- Get transit directions
- Delete recent directions
- Get traffic and weather info
- Predict travel time and ETA
- Download offline maps
- Search for places
- Find nearby attractions, restaurants, and services
- Get information about places
- Mark places
- Share places
- Rate places
- Save favorite places
- Explore new places with Guides
- Organize places in My Guides
- Delete significant locations
- Look around places
- Take Flyover tours
- Find your Maps settings
- Measure dimensions
- View and save measurements
- Measure a person’s height
- Set up Messages
- About iMessage
- Send and reply to messages
- Unsend and edit messages
- Keep track of messages
- Forward and share messages
- Group conversations
- Watch, listen, or play together using SharePlay
- Collaborate on projects
- Use iMessage apps
- Take and edit photos or videos
- Share photos, links, and more
- Send stickers
- Request, send, and receive payments
- Send and receive audio messages
- Animate messages
- Change notifications
- Block, filter, and report messages
- Delete messages and attachments
- Recover deleted messages
- View albums, playlists, and more
- Show song credits and lyrics
- Queue up your music
- Listen to broadcast radio
- Subscribe to Apple Music
- Listen to lossless music
- Listen to Dolby Atmos music
- Apple Music Sing
- Find new music
- Add music and listen offline
- Get personalized recommendations
- Listen to radio
- Search for music
- Create playlists
- See what your friends are listening to
- Use Siri to play music
- Change the way music sounds
- Get started with News
- Use News widgets
- See news stories chosen just for you
- Read stories
- Follow your favorite teams with My Sports
- Subscribe to Apple News+
- Browse and read Apple News+ stories and issues
- Download Apple News+ issues
- Solve crossword puzzles
- Search for news stories
- Save stories in News for later
- Subscribe to individual news channels
- Get started with Notes
- Add or remove accounts
- Create and format notes
- Draw or write
- Add photos, videos, and more
- Scan text and documents
- Work with PDFs
- Create Quick Notes
- Search notes
- Organize in folders
- Organize with tags
- Use Smart Folders
- Export or print notes
- Change Notes settings
- Delete, share, or copy a photo
- View and edit Photo Booth photos in the Photos app
- View photos and videos
- Play videos and slideshows
- Delete or hide photos and videos
- Edit photos and videos
- Trim video length and adjust slow motion
- Edit Live Photos
- Edit Cinematic videos
- Edit portraits
- Use photo albums
- Edit, share, and organize albums
- Filter and sort photos and videos in albums
- Make stickers from your photos
- Duplicate and copy photos and videos
- Merge duplicate photos
- Search for photos
- Identify people and pets
- Browse photos by location
- Share photos and videos
- Share long videos
- View photos and videos shared with you
- Watch memories
- Personalize your memories
- Manage memories and featured photos
- Use iCloud Photos
- Create shared albums
- Add and remove people in a shared album
- Add and delete photos and videos in a shared album
- Set up or join an iCloud Shared Photo Library
- Add content to an iCloud Shared Photo Library
- Use iCloud Shared Photo Library
- Import and export photos and videos
- Print photos
- Find podcasts
- Listen to podcasts
- Follow your favorite podcasts
- Use the Podcasts widget
- Organize your podcast library
- Download, save, and share podcasts
- Subscribe to podcasts
- Listen to subscriber-only content
- Change download settings
- Make a grocery list
- Add items to a list
- Edit and manage a list
- Search and organize lists
- Work with templates
- Use Smart Lists
- Print reminders
- Use the Reminders widget
- Change Reminders settings
- Browse the web
- Search for websites
- Customize your Safari settings
- Change the layout
- Use Safari profiles
- Open and close tabs
- Organize your tabs with Tab Groups
- View your tabs from another device
- Share Tab Groups
- Use Siri to listen to a webpage
- Bookmark a website
- Bookmark a website as a favorite
- Save pages to a Reading List
- Find links shared with you
- Annotate and save a webpage as a PDF
- Automatically fill in forms
- Get extensions
- Hide ads and distractions
- Clear your cache
- Browse the web privately
- Use passkeys in Safari
- Check stocks
- Manage multiple watchlists
- Read business news
- Add earnings reports to your calendar
- Use a Stocks widget
- Translate text, voice, and conversations
- Translate text in apps
- Translate with the camera view
- Subscribe to Apple TV+, MLS Season Pass, or an Apple TV channel
- Add your TV provider
- Get shows, movies, and more
- Watch sports
- Watch Major League Soccer with MLS Season Pass
- Watch multiple live sports streams
- Control playback
- Manage your library
- Change the settings
- Make a recording
- Play it back
- Edit or delete a recording
- Keep recordings up to date
- Organize recordings
- Search for or rename a recording
- Share a recording
- Duplicate a recording
- Check the weather
- Check the weather in other locations
- View weather maps
- Manage weather notifications
- Use Weather widgets
- Learn the weather icons
- Find out what Siri can do
- Tell Siri about yourself
- Have Siri announce calls and notifications
- Add Siri Shortcuts
- About Siri Suggestions
- Change Siri settings
- Set up Family Sharing
- Add Family Sharing members
- Remove Family Sharing members
- Share subscriptions
- Share purchases
- Share locations with family and locate lost devices
- Set up Apple Cash Family and Apple Card Family
- Set up parental controls
- Set up a child’s device
- Get started with Screen Time
- Protect your vision health with Screen Distance
- Set up Screen Time for yourself
- Set communication and safety limits and block inappropriate content
- Set up Screen Time for a family member
- Set up Apple Pay
- Use Apple Pay in apps and on the web
- Track your orders
- Use Apple Cash
- Use Apple Card
- Use Savings
- Manage payment cards and activity
- Power adapter and charge cable
- Use AirPods
- Use EarPods
- Use headphone audio-level features
- Apple Pencil compatibility
- Pair and charge Apple Pencil (1st generation)
- Pair and charge Apple Pencil (2nd generation)
- Pair and charge Apple Pencil (USB-C)
- Enter text with Scribble
- Draw with Apple Pencil
- Take and mark up a screenshot with Apple Pencil
- Quickly write notes
- Preview tools and controls with Apple Pencil hover
- Wirelessly stream videos and photos to Apple TV or a smart TV
- Connect to a display with a cable
- HomePod and other wireless speakers
- iPad keyboards
- Switch between keyboards
- Enter characters with diacritical marks
- Use shortcuts
- Choose an alternative keyboard layout
- Change typing assistance options
- Connect Magic Trackpad
- Trackpad gestures
- Change trackpad settings
- Connect a mouse
- Mouse actions and gestures
- Change mouse settings
- External storage devices
- Bluetooth accessories
- Apple Watch with Fitness+
- Share your internet connection
- Make and receive phone calls
- Use iPad as a second display for Mac
- Use iPad as a webcam
- Use a keyboard and mouse or trackpad across your Mac and iPad
- Hand off tasks between devices
- Cut, copy, and paste between iPad and other devices
- Stream video or mirror the screen of your iPad
- Use AirDrop to send items
- Connect iPad and your computer with a cable
- Transfer files between devices
- Transfer files with email, messages, or AirDrop
- Transfer files or sync content with the Finder or iTunes
- Automatically keep files up to date with iCloud
- Use an external storage device, a file server, or a cloud storage service
- Get started with accessibility features
- Turn on accessibility features for setup
- Change Siri accessibility settings
- Open features with Accessibility Shortcut
- Enlarge text by hovering
- Change color and brightness
- Make text easier to read
- Reduce onscreen motion
- Customize per-app visual settings
- Hear what’s on the screen or typed
- Hear audio descriptions
- Turn on and practice VoiceOver
- Change your VoiceOver settings
- Use VoiceOver gestures
- Operate iPad when VoiceOver is on
- Control VoiceOver using the rotor
- Use the onscreen keyboard
- Write with your finger
- Use VoiceOver with an Apple external keyboard
- Use a braille display
- Type braille on the screen
- Customize gestures and keyboard shortcuts
- Use VoiceOver with a pointer device
- Use VoiceOver for images and videos
- Use VoiceOver in apps
- Use AssistiveTouch
- Use an eye-tracking device
- Adjust how iPad responds to your touch
- Auto-answer calls
- Change Face ID and attention settings
- Use Voice Control
- Adjust the top or Home button
- Use Apple TV Remote buttons
- Adjust pointer settings
- Adjust keyboard settings
- Adjust AirPods settings
- Adjust Apple Pencil settings
- Control a nearby Apple device
- Intro to Switch Control
- Set up and turn on Switch Control
- Select items, perform actions, and more
- Control several devices with one switch
- Use hearing devices
- Use Live Listen
- Use sound recognition
- Set up and use RTT
- Flash the LED for alerts
- Adjust audio settings
- Play background sounds
- Display subtitles and captions
- Show transcriptions for Intercom messages
- Get Live Captions (beta)
- Type to speak
- Record a Personal Voice
- Use Guided Access
- Use built-in privacy and security protections
- Set a passcode
- Set up Face ID
- Set up Touch ID
- Control access to information on the Lock Screen
- Keep your Apple ID secure
- Use passkeys to sign in to apps and websites
- Sign in with Apple
- Share passwords
- Automatically fill in strong passwords
- Change weak or compromised passwords
- View your passwords and related information
- Share passkeys and passwords securely with AirDrop
- Make your passkeys and passwords available on all your devices
- Automatically fill in verification codes
- Sign in with fewer CAPTCHA challenges
- Two-factor authentication
- Use security keys
- Control app tracking permissions
- Control the location information you share
- Control access to information in apps
- Control how Apple delivers advertising to you
- Control access to hardware features
- Create and manage Hide My Email addresses
- Protect your web browsing with iCloud Private Relay
- Use a private network address
- Use Advanced Data Protection
- Use Lockdown Mode
- Receive warnings about sensitive content
- Use Contact Key Verification
- Turn iPad on or off
- Force restart iPad
- Update iPadOS
- Back up iPad
- Return iPad settings to their defaults
- Restore all content from a backup
- Restore purchased and deleted items
- Sell, give away, or trade in your iPad
- Install or remove configuration profiles
- Important safety information
- Important handling information
- Find more resources for software and service
- FCC compliance statement
- ISED Canada compliance statement
- Apple and the environment
- Class 1 Laser information
- Disposal and recycling information
- Unauthorized modification of iPadOS
- ENERGY STAR compliance statement
Set up a device for a child with Family Sharing on iPad
With Family Sharing, the organizer, a parent, or a guardian can use Quick Start on their iPad to set up a new iPhone or iPad for a child and customize parental controls. You can also set up a device for a child without using Quick Start.
If you didn’t sign in to a child’s account when you set up their device, you can do so in Settings with their Apple ID and password, or by using proximity sign-in with a nearby iPhone or iPad.
Note: If the child already has an Apple ID, make sure they’ve been added to your Family Sharing group . If the child doesn’t have an Apple ID and they’re under 13 ( this age varies by region ), you can create one for them while adding them to the group.
Use Quick Start to set up an iPad or iPhone for a child
Note: Requires iPadOS 16 or later. Bluetooth must be turned on.
Sign in to your iPad with your Apple ID.
On the new iPad or iPhone you want to set up for your child, press and hold the side button or top button until the Apple logo appears.
Bring your iPad next to the new device.
When you see Set Up New [ device ] on your iPad, tap Continue, follow the onscreen instructions, then do one of the following:
If you have a child in your family group, tap your child’s name.
If you need to create a new Apple ID for a child who is under 13 , tap Create New Child Account, then create an Apple ID for your child.
Follow the onscreen instructions to finish setting up your child’s device.
Set up an iPad or iPhone for a child without using Quick Start
Turn on the new device.
When the Quick Start screen appears, tap Set Up Without Another Device, follow the onscreen instructions, then tap Set Up for a Child in My Family.
Continue to follow the onscreen instructions to complete the setup.
Set up an iPad or iPhone for a child in Settings
If you didn’t sign in to a child’s account during setup, do the following:
Tap Sign in to your iPad.
Do one of the following:
Sign in with a nearby iPad or iPhone: Tap Use Another Apple Device, then follow the onscreen instructions. If you already have a child in your family group, tap their name, then tap Get Started. If you need to create a new Apple ID for a child, tap Create New Child Account.
Sign in with an email address or phone number and password: Tap Sign in Manually, then tap Sign in a child in my Family.
You can set content restrictions, communication limits, and downtime ; set up Screen Distance ; share locations with all members of the Family Sharing group, including any new members added later; and turn on Ask to Buy . You can change these settings at any time.
Note: Screen Distance is available on supported models .
IMAGES
VIDEO
COMMENTS
To set up restrictions: Tap Settings on the iPad Home screen. Select Screen Time in the left panel. Tap Use Screen Time Passcode in the main screen. Enter a 4-digit passcode to protect the restrictions you set up and prevent your child from making changes.You must enter this code to make changes in the future.
Customize iPad for your child. You can set up your child's iPad with parental controls and kid-friendly features. Set downtime and app limits, guard your child's vision health, protect them from explicit photos, review and approve purchases, and more. You can even keep your child focused on a single app with Guided Access.
To make sure that your parental control settings sync across devices, update all of the devices in your Family Sharing group to the latest software version before turning on parental controls or changing your parental controls settings. Go to Settings and tap Screen Time. Tap Turn on Screen Time, then tap it again.
Apple has also expanded guidance in Siri, Spotlight, and Safari Search by providing additional resources to help children and parents stay safe online and get help with unsafe situations. For example, users who ask Siri how they can report child exploitation will be pointed to resources for where and how to file a report.
Open the Settings app. Tap on General. Select Restrictions. Tap Enable Restrictions. Set a passcode. The passcode should be different from the one you use to unlock your screen and, just to be ...
Open Guided Access. Open the app that you want your kid to use, then triple-click the device's Home button (click the button quickly three times in a row). You'll see the Guided Access options appear, like this: When you open the Guided Access feature, you'll see various options appear. Choose options.
2. Tap to enter the Guided Access settings. Turn on Guided Access. 3. Next, tap Passcode Settings. Either create a passcode or enable Touch ID. There may also be a Face ID option on supported ...
Here's how to create an Apple ID. On your iPhone or iPad, open the Settings app. Go to "Family" under your Apple ID. Select "Add Family Member" in the upper-right corner of the screen. Tap "Create Child Account.". Enter the child's name and date of birth. Follow the rest of the on-screen instructions to finish setting up.
You can create a child's iCloud account directly on your own iPhone or iPad. Just tap Settings, tap your iCloud username, then tap Family Sharing > Add Family Member > Create an Apple ID for a ...
Turn On The iPad's Restrictions. Set up iPad parental controls. Go to Settings > General > Restrictions and tap Enable Restrictions. Every time you do this you'll be asked to set a 4-digit ...
Click on the Apple Menu in the top left corner of your screen and select System Preferences. Select Parental Controls from the list of preferences on the left side. From here, you can set up parental controls for each of your users. You can restrict applications and websites, set time limits, and monitor activity.
With the rise of the internet, keeping our kids safe online has become a top priority for parents. That's why parental controls on Safari, the default web browsers for iPhone, iPad, and Mac, are so important. ... How to Set Up Safari Parental Controls on iPhone & iPad. Setting up Safari parental controls on your iPhone and iPad is a quick and ...
1. Setting Up Built-In Safari Parental Controls. Restricting Adult Content. If you want to prevent your kid from running into age-inappropriate content on their iOS device, you can set Safari child-safe browsing and block the sites you disapprove of. However, you need to set up Screen Time on the target iPhone first:
OurPact is such a Safari Parental Control app for iOS, it is capable of blocking texts, apps, websites, also tracking location, setting screen time limits and so on, to help parents control how their kids use their iPhone or iPad. Step 1. Download and install OurPact from iOS App Store. Step 2.
Using the built-in iPhone Safari parental controls, parents can ensure that their child's web browsing experience is age-appropriate and safe while managing other aspects of their device usage. Method 3. Using Family Sharing: Family Sharing is an excellent tool for parents on how to put restrictions on safari.
Allowing young family members to use the Internet in general and iPhones, iPads and MacBooks in particular, can make children become highly exposed to content that is not appropriate for their age. There was a case where a parent caught her first-grader watching pornography online. To somewhat prevent such dangers, Apple has a series of parental controls Safari like Safari safe search or ...
These services protect a child's privacy, keep them safe from unwanted content, and make it harder for children to make unauthorized purchases in apps. Here's how you can kid-proof your iPad in 2020. #1 Turn on iPad Restrictions. First, you need to turn on the restrictions for your iPad. This takes you into a sort of iPad kids mode.
To change or turn off the passcode on your child's device, tap Settings > Screen Time > [your child's name]. Then tap Change Screen Time Passcode or Turn Off Screen Time Passcode, and authenticate the change with Face ID, Touch ID or your device passcode. Find out what to do if you forgot your Screen Time passcode.
Step 1: Accessing the Settings. Accessing the settings on your child's iPad is the crucial first step in the process of blocking Safari. This initial action sets the stage for implementing the necessary restrictions and controls to ensure a safer and more controlled digital environment for your kids. To begin, locate the "Settings" app on the ...
How to set it up. Assistive Access works on any iPad or iPhone that runs iOS 17. If you have an old iPhone, you can update the OS and repurpose it, or buy a compatible used device starting at $100 ...
Go to Settings > Family > [ child's name ] > Screen Time. Tap the child for whom you want to set up Screen Time. Tap Screen Time, then follow the onscreen instructions. For information about Screen Time settings, see Set up Screen Time for a family member on iPad. To learn more about the different content & privacy restrictions, see the Apple ...
Adrian Kingsley-Hughes/ZDNET. This is reminiscent of the iOS 17.2.1 update that Apple released in late 2023, another update with very little information associated with it. Digging around, I've ...
On the new iPad or iPhone you want to set up for your child, press and hold the side button or top button until the Apple logo appears. Bring your iPad next to the new device. If you have a child in your family group, tap your child's name. If you need to create a new Apple ID for a child who is under 13, tap Create New Child Account, then ...